-
cwecoworkingPerguntado em 9 de setembro de 2024 às 12:57
Olá, tenho um formulário e um documento assinável, tem como preencher um documento assinável com os dados do formulário automaticamente?
-
Rhina Jotform SupportRespondido em 9 de setembro de 2024 às 15:13
Hi Elizael,
Our Portuguese Support agents are busy helping other Jotform users right now, so I'll try to help you in English using Google Translate, but you can reply in whichever language you feel comfortable using. Or, if you'd rather have support in Portuguese, let us know and we can have them do that. But, it might take a while until they're available again.
Unfortunately, the feature you're looking for is not currently available as a workaround, you can consider creating a Smart PDF Form instead then enable Jotform Sign automation. Let me walk you through it:
1. On your My Forms page, click on Create Form on the top-left side of the page.
2. Choose Import Form and then Import PDF Form.
3. Now, upload your PDF file.
4. Add the necessary fields and customize them using the Add Form Element menu on the left side of the page.
Sometimes, the fields that are automatically created in the PDF file will be in the wrong place. If that happens, you'll have to move and resize the fields. Check out the screencast below to see how to do that:
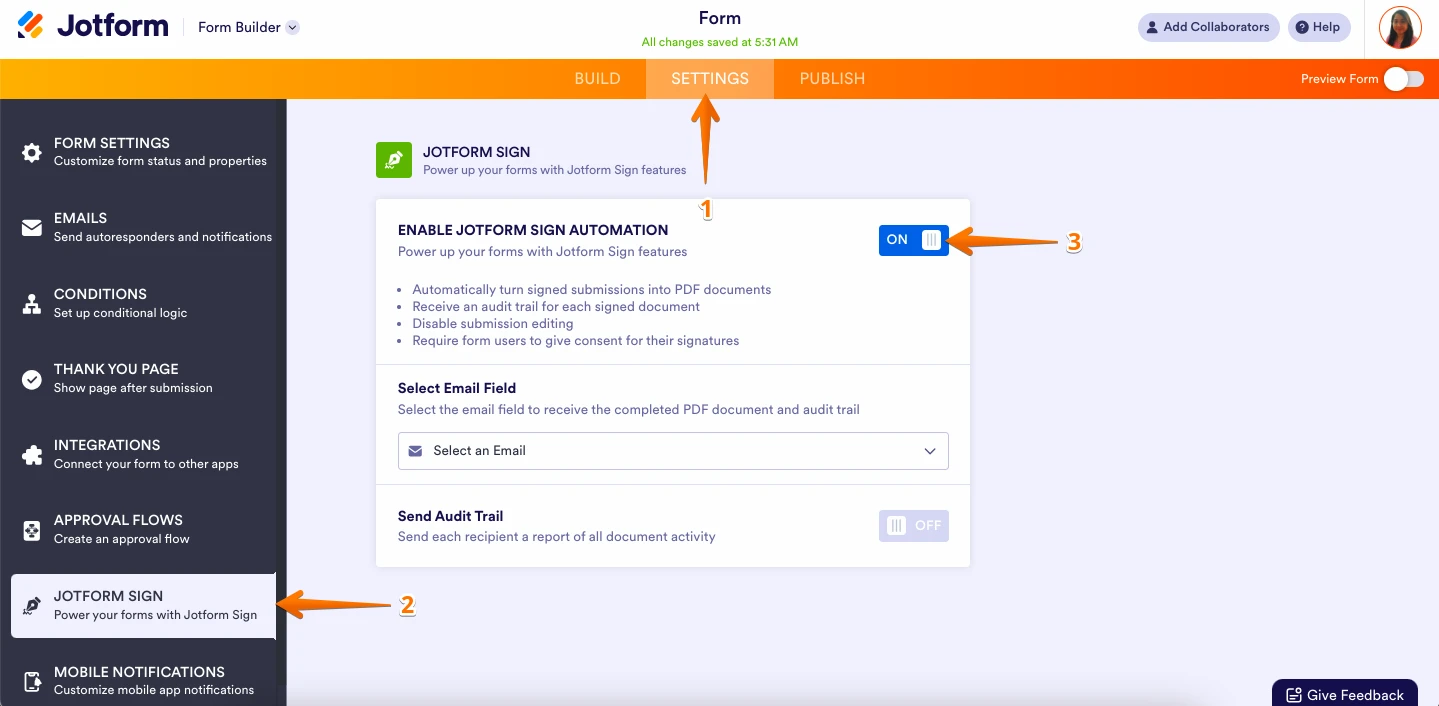
You can then turn on Jotform Sign automation. Let me show you how to enable Jotform Sign automation:
- In Form Builder, click on Settings from the top bar menu.
- Next, click on Jotform Sign from the left panel menu.
- Lastly, toggle ON the Enable Jotform Sign Automation.

Once done, you can prefill the Smart PDF with data from another form. Let me show you how:
- In Form Builder, in the orange navigation bar at the top of the page, click on Publish.
- Now, click on Prefill in the menu on the left side of the page, and then select Form Prefill.
- Click on the Downward Arrow icon and select the form that you want to prefill from, and then match the fields.
- Finally, click on Save Settings on the bottom-right side of the Form Prefill section.
- Click on Add a New Prefill and select a row or the rows you want to be prefilled.
- Then, click on the Create button in the right corner of the page.
- In the Form Prefill settings, click on Can Edit next to the prefill link.
- In the dropdown menu that opens, select Read only, and that's it.
If there are any updates, we’ll circle back to this thread and let you know.


