

Capture and resolve every customer request
Are you a visual thinker?
We vary in the way we process information, but the majority of us work best when we can visualize what we’re working on in a different way.
Jotform Boards, our newest product, delivers a visual way to work on customer requests and other tasks — whichever channel they come through.
If you’ve ever wished there was a single collaborative place where you could see the big picture of all your tasks and to-dos — whether they originate from form submissions, conversations with your AI Agents, or standard workflow steps — Jotform Boards is for you.
Now, there’s no shortage of excellent board-based task management solutions available — but the beauty of Jotform Boards is how easy it makes it to create, organize, and collaborate on tasks by simply connecting your forms, workflows, and AI Agents to your board. You can even link multiple channels to a single board.
Jotform Boards lets you do everything in one place. You don’t have to switch between different platforms to manage your forms, workflows, customer conversations, and task collaboration — now, you can do it all with Jotform.
What you’ll learn in this post
- How Jotform Boards differs from other solutions
- How to use Jotform Boards’ top features
- Helpful resources to learn more about Jotform Boards
How Jotform Boards differs from other solutions
Like other task management solutions, Jotform Boards lets you collaborate with your team to process tasks.
But unlike other task management solutions, Jotform Boards empowers you to create those tasks by syncing the forms, agents, and workflows you’ve already created to your board.
Our task management solution lets you
- Auto-generate tasks from form responses, AI Agent conversations, and workflows
- Connect multiple forms, workflows, and agents to the same board, so you can create and organize all related tasks regardless of which channel they come from
- Manage your business from the “A” of information gathering to the “Z” of crossing off task assignments
- Easily track tasks, set due dates, sort and tag tasks, and assign team members
Jotform Boards is an excellent solution for project and task management, featuring a familiar kanban-style interface with drag-and-drop columns. It makes processing customer requests more organized, efficient, and collaborative.
Now, let’s take a look at creating, connecting, and managing boards.
How to create a board
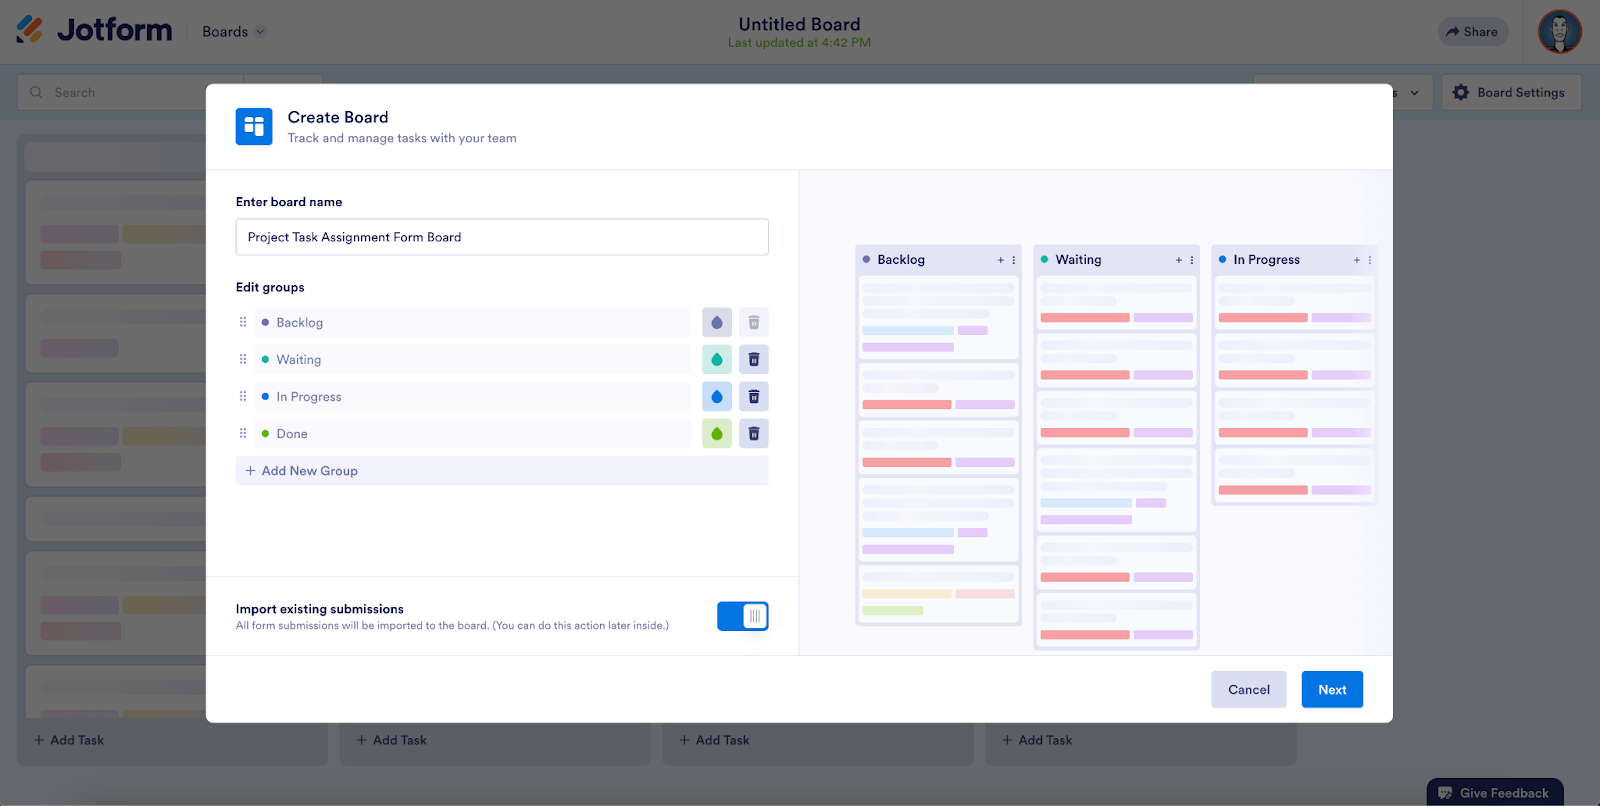
From your My Workspace page, select Create and choose Board. You can choose to create a board from scratch, a template, or a form, or you can import a board from another platform. For now, select Start from scratch.

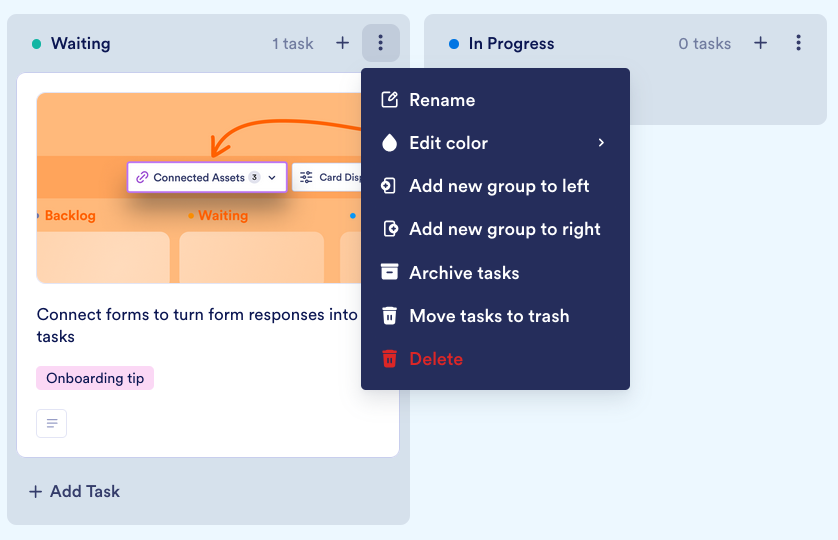
The Boards interface will open. By default, a new board has four standard groups, or task columns: Backlog, Waiting, In Progress, and Done. You can easily remove a group, rename it, and edit it by selecting the three-dot icon inside the group pane. (Note that you can rename the very first group, but not delete it.)
To add a new group, select Add Group to the right of the existing groups.
Customize your board and task cards by selecting Board Settings. Select Task Fields to choose which information will appear across all tasks (for example, due dates, team assignments, and so on). Select Card View to customize which task fields will appear at a glance on your board before you open a card. You can also customize your board’s background by selecting Theme.
Now that we’ve gone over the basics of creating a board, let’s look at how to connect channels to your boards to automatically generate tasks.
How to connect forms to your boards
Arguably the top feature of Jotform Boards is the ability to automatically generate board tasks from form submissions. Here’s how.
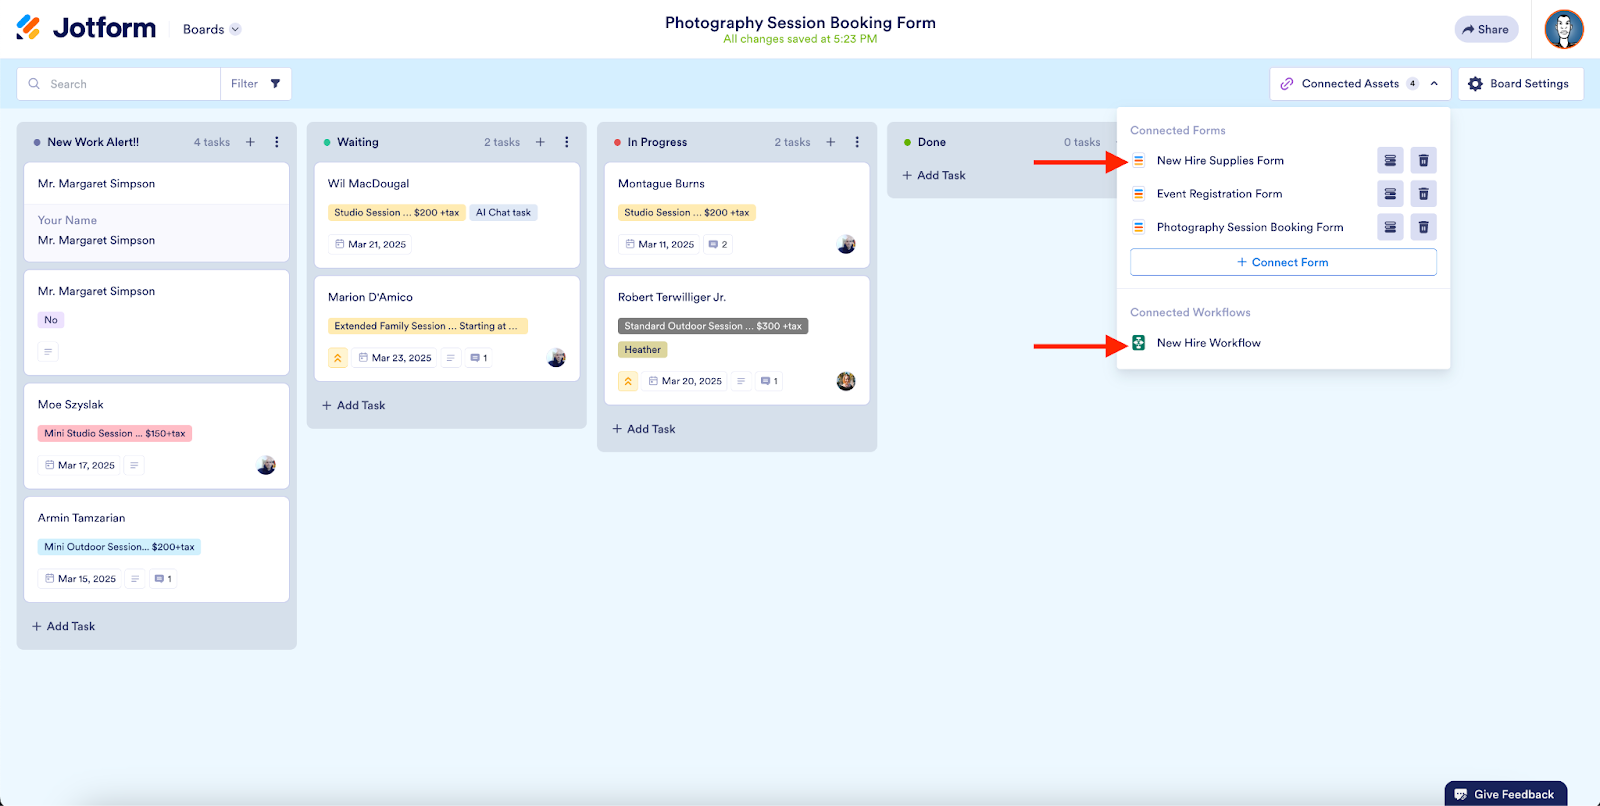
In the Boards interface, select Connected Assets, then select Connect Form to start linking forms with your board.
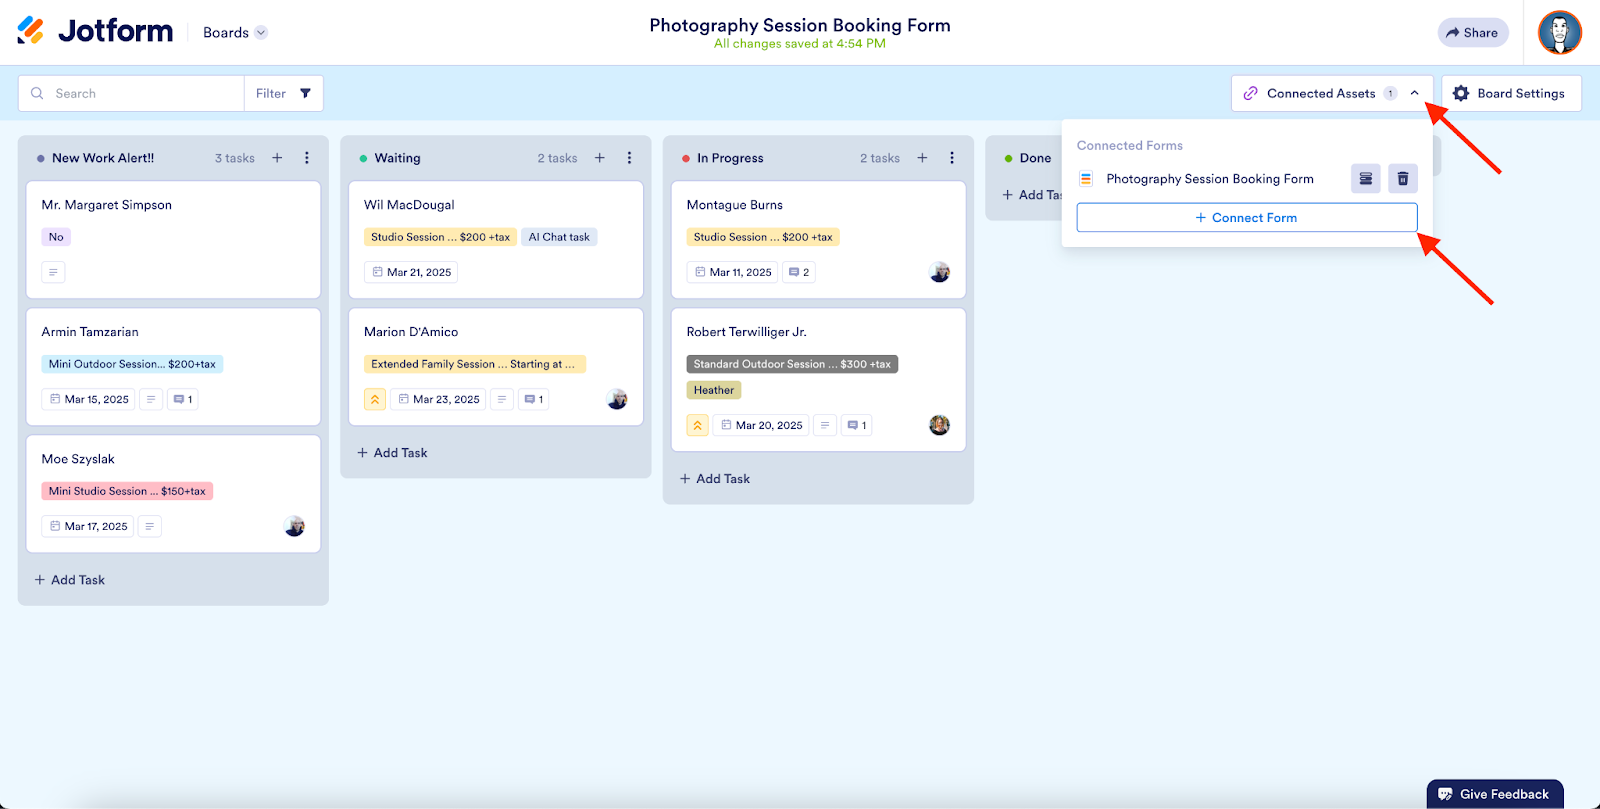
A window will open listing your existing Jotforms. Choose the one you want and click Next.

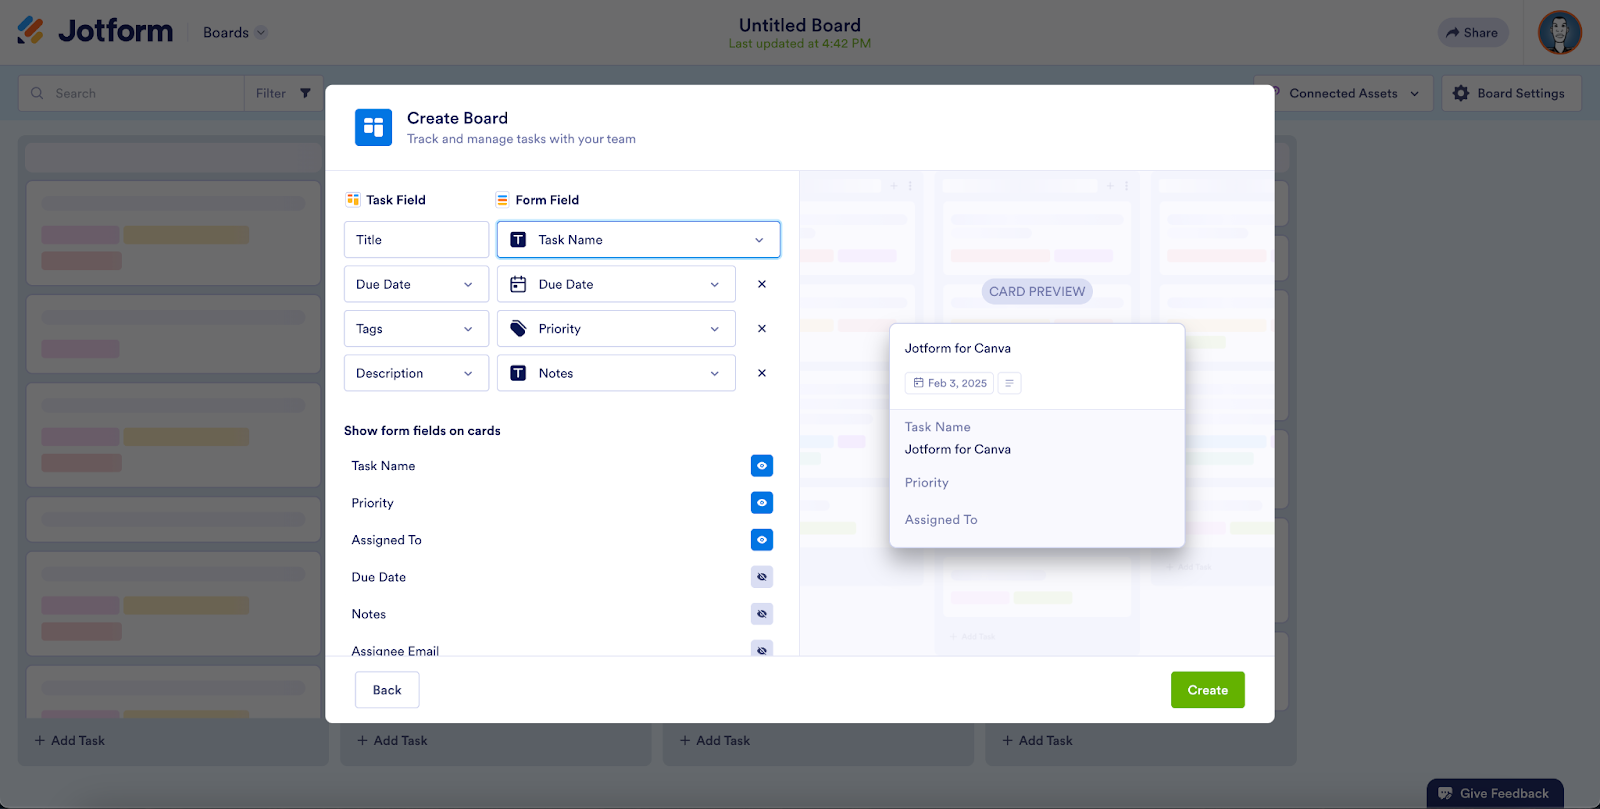
Now you can customize which form fields show up in your task cards and map task fields to form fields. (You can do this retroactively too by clicking back into Connected Assets.)
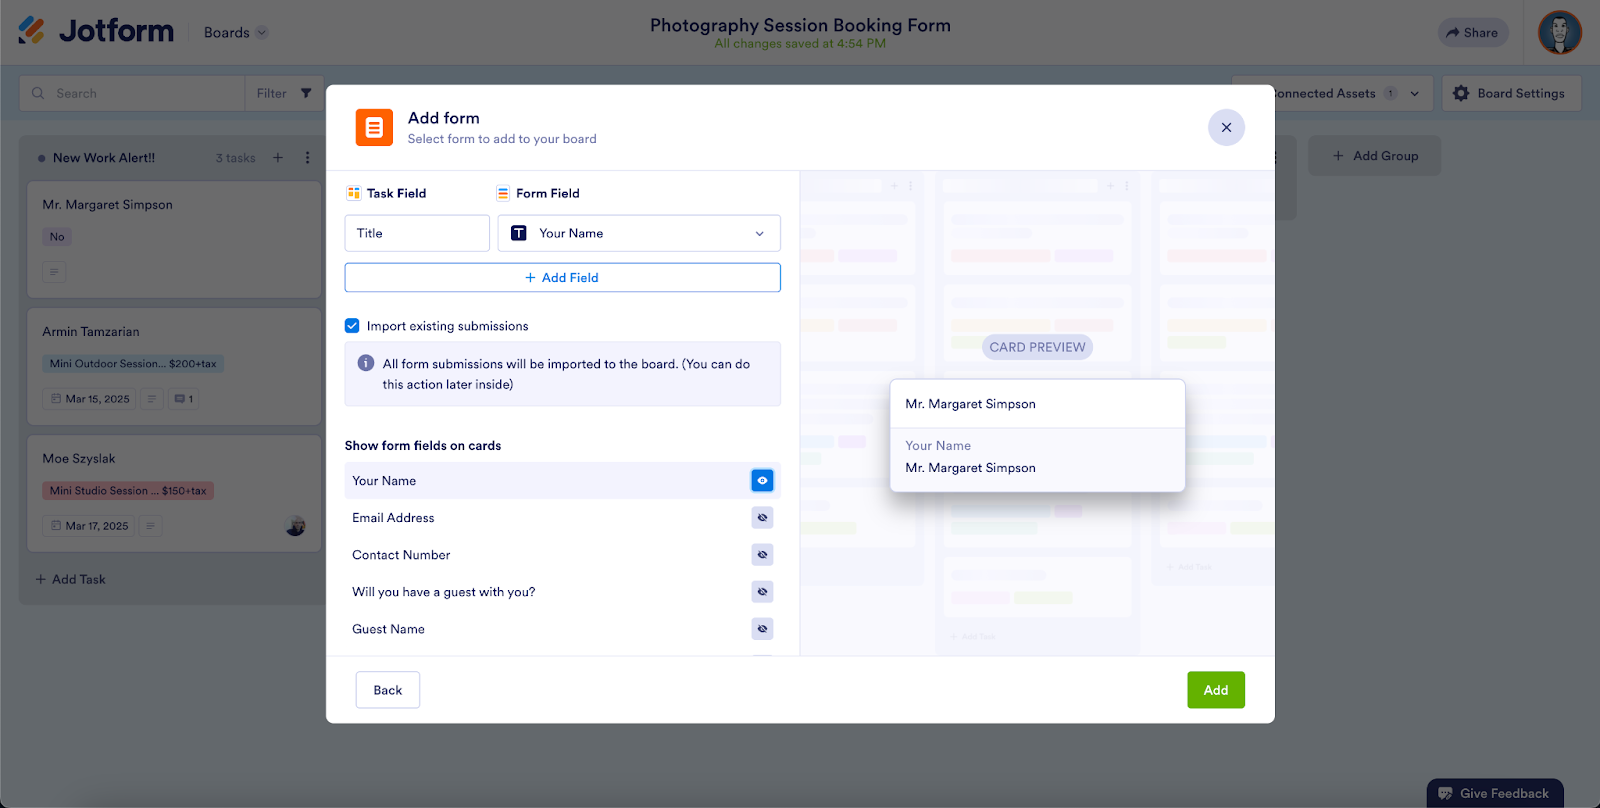
New submissions from your form will now be added to your board as tasks.
Another amazing feature of Jotform Boards is that you can link multiple forms and channels to a single board! If you want to add more forms to your board, just select Connected Assets once again and add them.
No matter which channels customer requests are arriving through, Jotform Boards is a handy way to visualize your tasks and start “herding those cats”!
Now we’ll look at how to connect your Jotform AI Agents and Jotform Workflows to your boards. While you can add forms, agents, and workflows to your board through the Connected Assets dropdown, you can also connect your boards directly from the AI Agent Builder and the Workflow Builder.
How to connect Jotform AI Agents with your boards
Connect your Jotform AI Agents to your boards to have customer conversations with your agents trigger task generation in your board.
That means that if your customers give feedback, ask for more information, place orders, or make other requests through your AI Agents, Jotform can automatically turn those requests into tasks that hit your board.
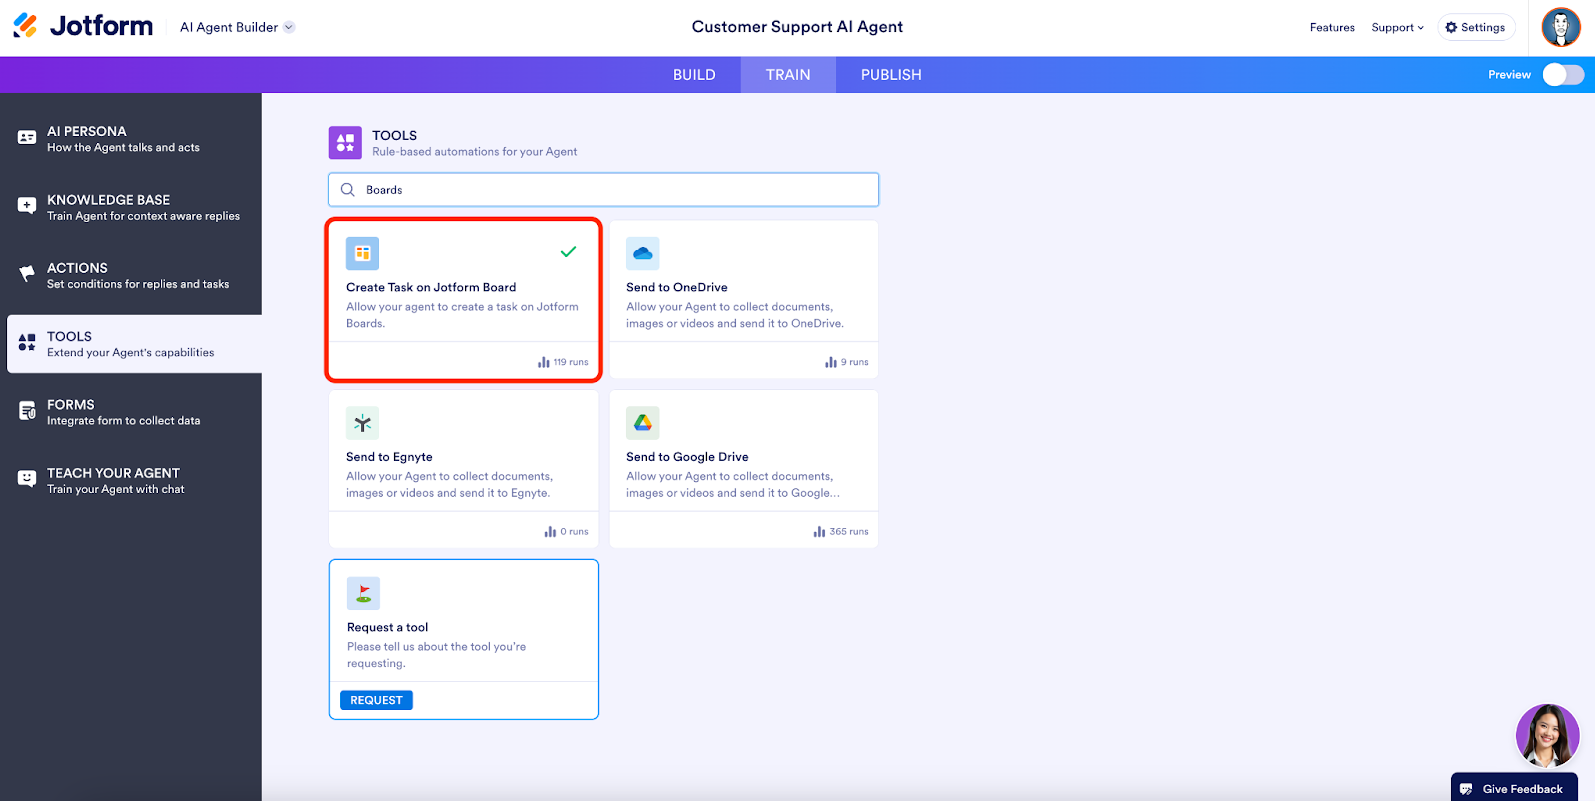
To get started, in the AI Agent Builder, select Train from the toolbar, then in the sidebar of the Train page, select Tools. In the search bar, enter “boards.” Select Create Task on Jotform Board.
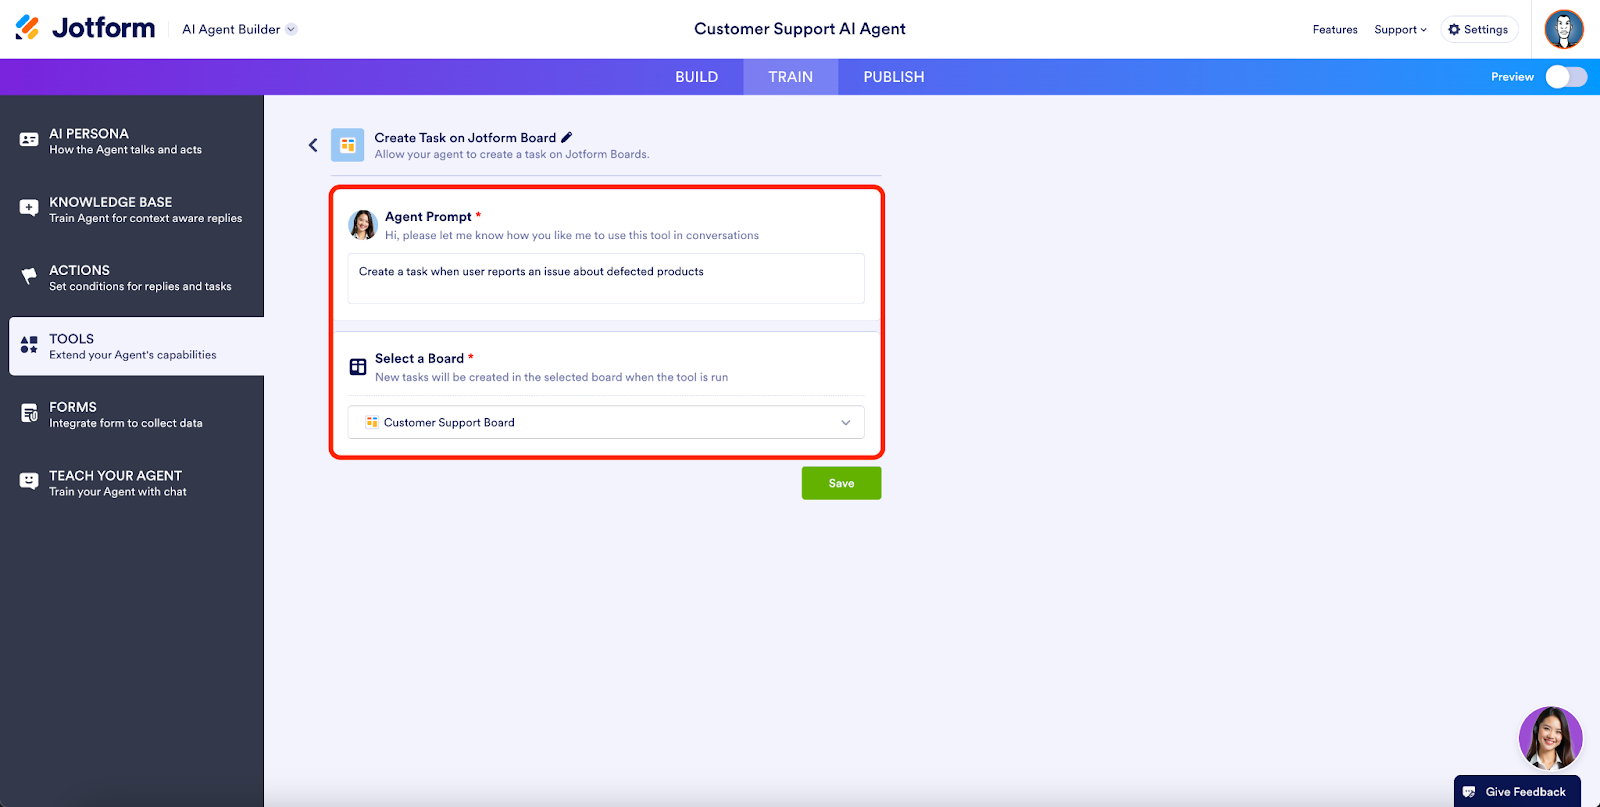
In the interface that opens, you can give your agent instructions to specify which requests to send to a board, and choose which boards to connect it to.
In the Agent Prompt field, you can let your agent know
- When to trigger the task in a conversation
- The corresponding message/information the agent should convey in the task that’s created
In the Select a Board dropdown, choose which boards your agent will send tasks to.
Here’s an example.
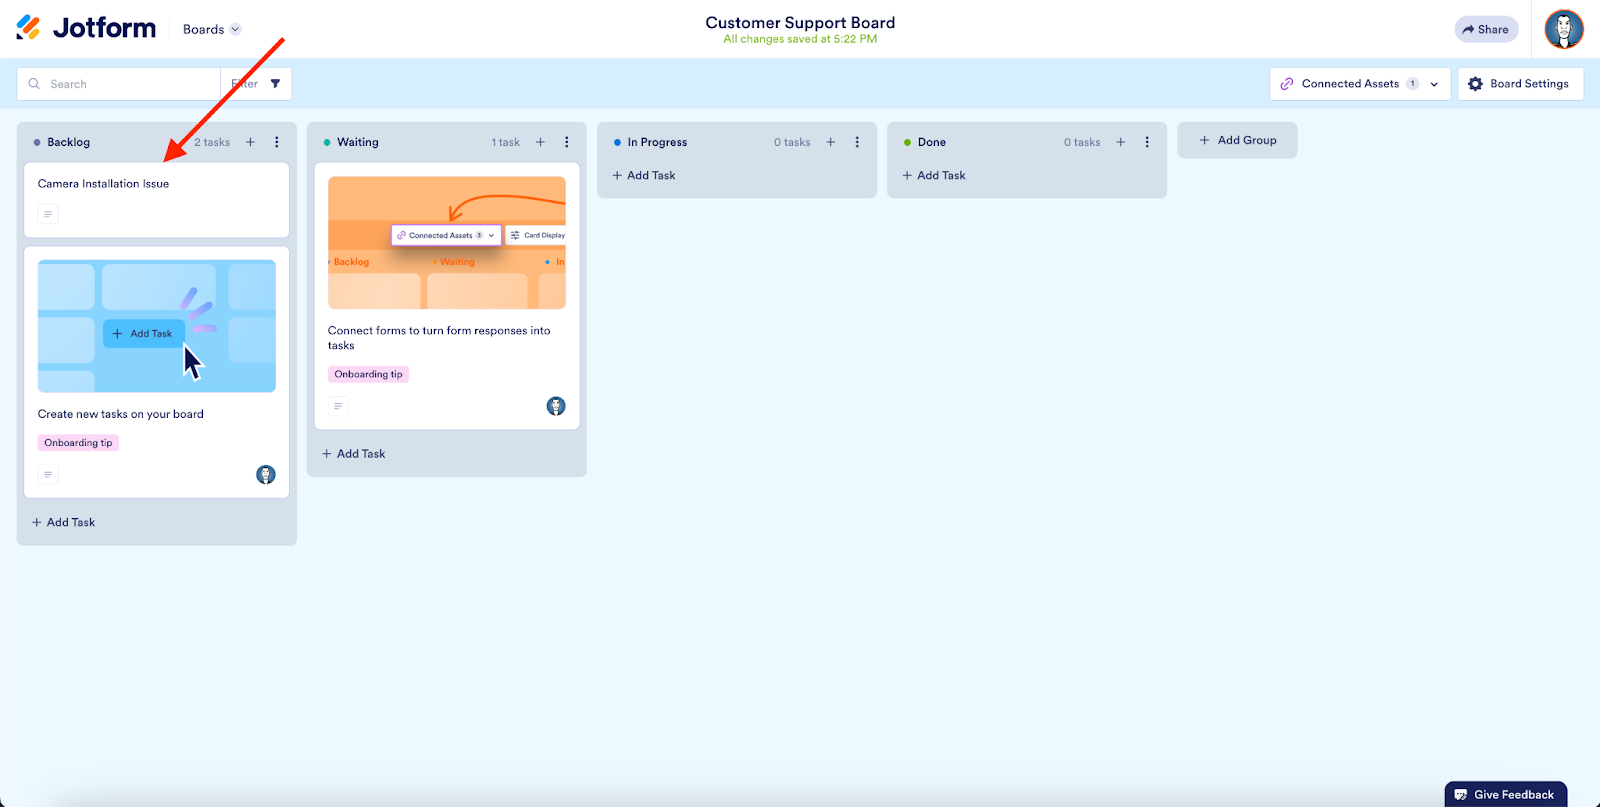
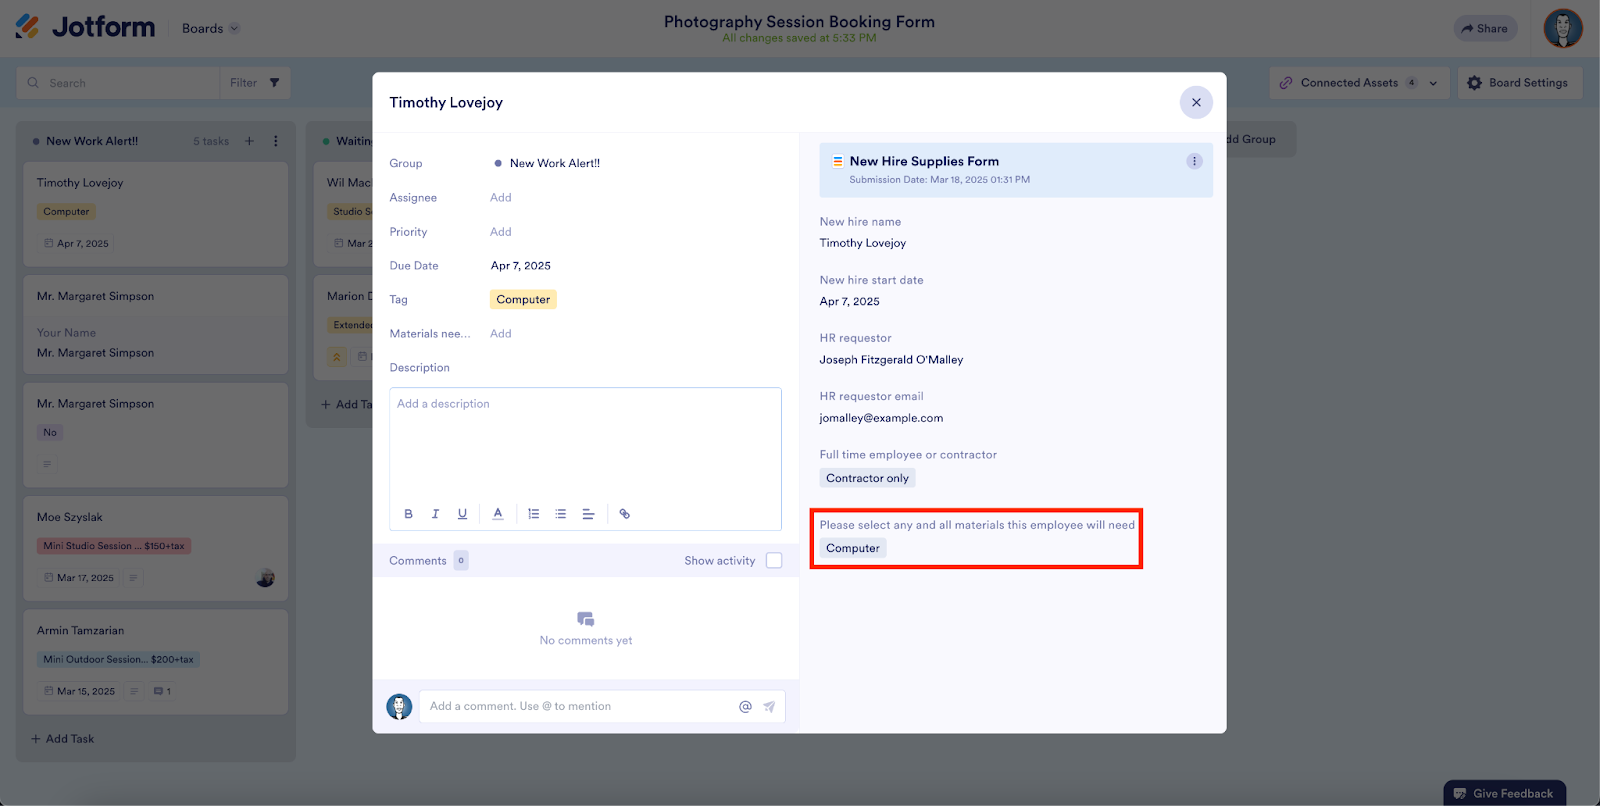
Now, the agent will send the requests you outlined in your Agent Prompt to your board as new tasks. You can simply select the new task in your board to open the task card and see the related agent conversation.
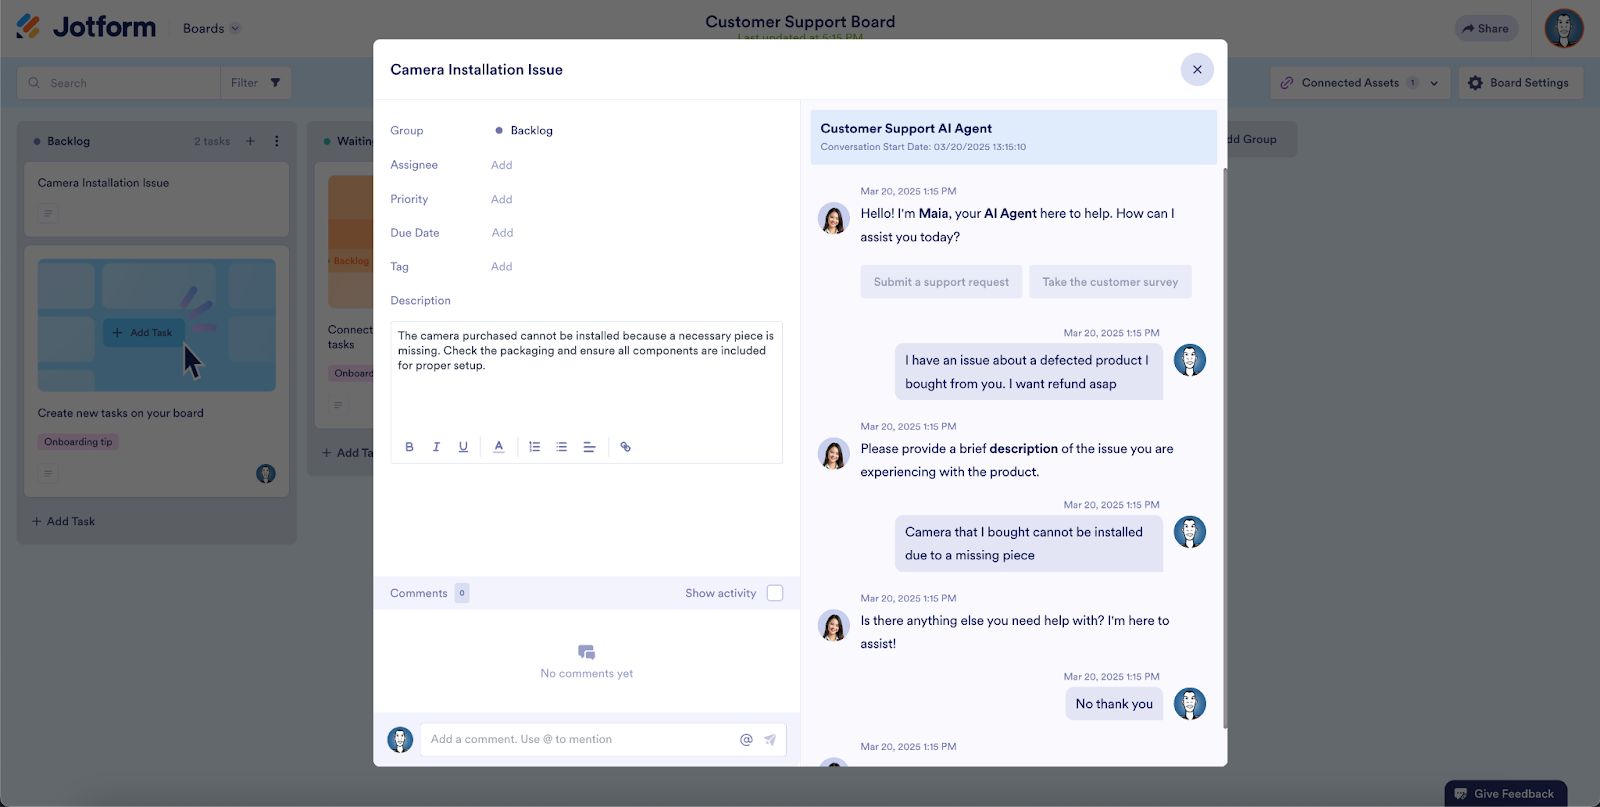
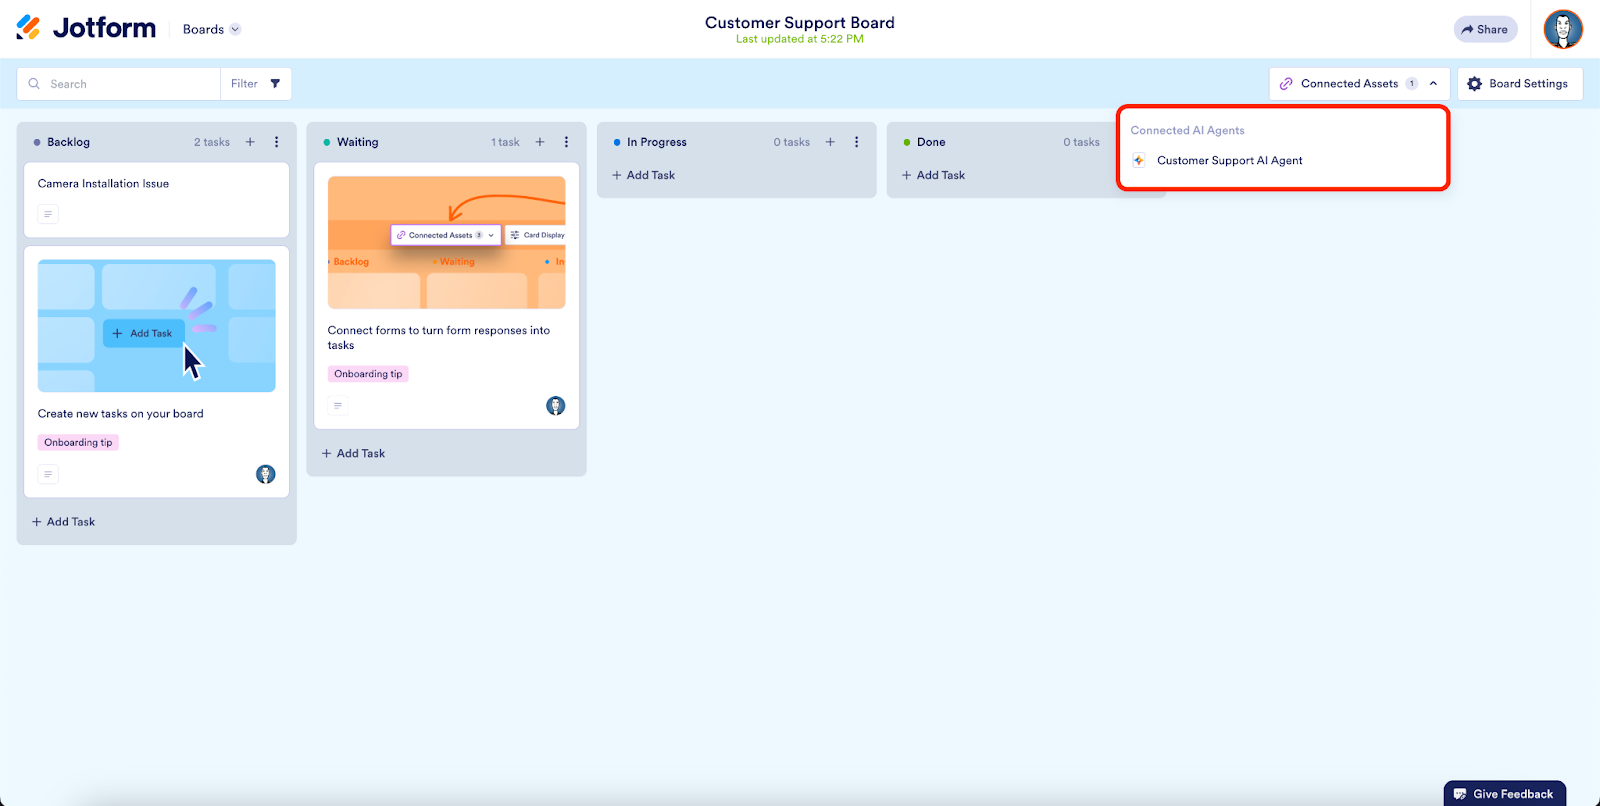
Any linked AI Agents will appear in your board’s Connected Assets dropdown. From here, you can easily remove agents, manage their connection settings, and add new ones.
How to connect Jotform Workflows with your boards
You can also link the workflows you build with Jotform Workflows to your board. This will let you automatically add tasks to your board at particular points in your workflow. Here’s how.
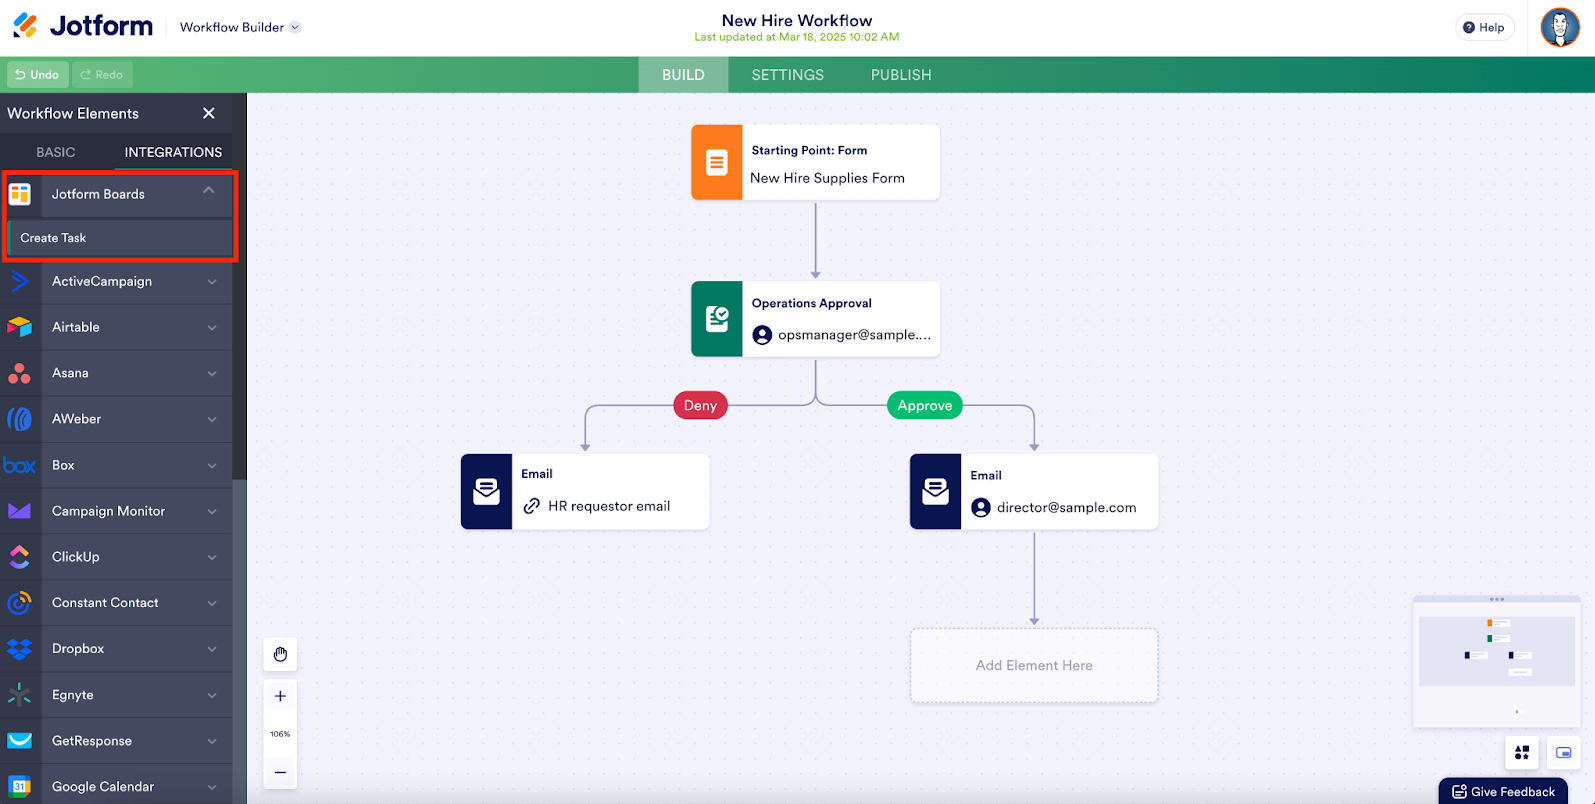
In the Workflow Builder, select Integrations from the Workflow Elements sidebar. Choose Jotform Boards, and select Create Task. Drag the new Boards element to the desired place in your workflow.
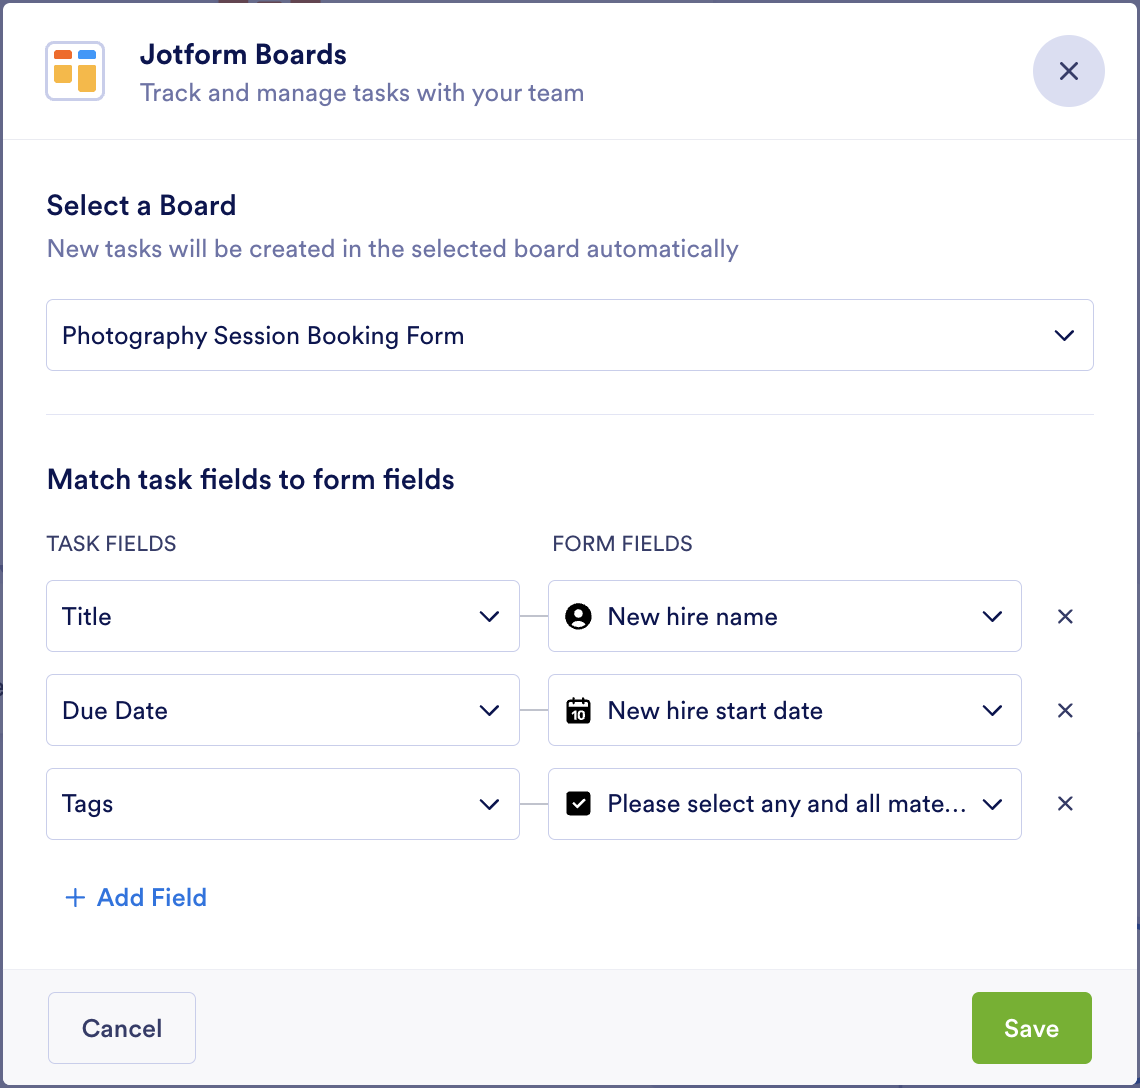
Inside the Boards element, select Complete Settings to connect a board to the workflow. Map the appropriate fields, then click Save.
Once you’ve linked a workflow to your board, it will appear in the Connected Assets dropdown in the Boards interface.
That’s it. This connection can come in handy in all sorts of scenarios. For example, if you have a new employee starting work, by connecting your onboarding workflow to your task board, your team will see onboarding tasks added to the board automatically as the new hire progresses through the onboarding process.
You can link a single workflow to multiple boards to create board tasks conditionally too. For example, if you have different task boards for different departments, you can set up your onboarding workflow to link to each of those boards. So if a new hire is in marketing, then you can set up the connection to create a task on the marketing team’s board.
* * *
A board can be connected to multiple forms, workflows, and agents. On the flip side, a single form, workflow, or agent can also create tasks on different boards. This gives you flexibility in how you build to suit your business needs.
These connections let you efficiently blend information gathering with task management like never before.
How to use Jotform Boards’ top features
Now we’ll take a look at how to use Jotform Boards in more depth.
Creating a board from your form
While you can create a board from scratch with no connections to forms, workflows, or agents, you can also create a board directly from your form.
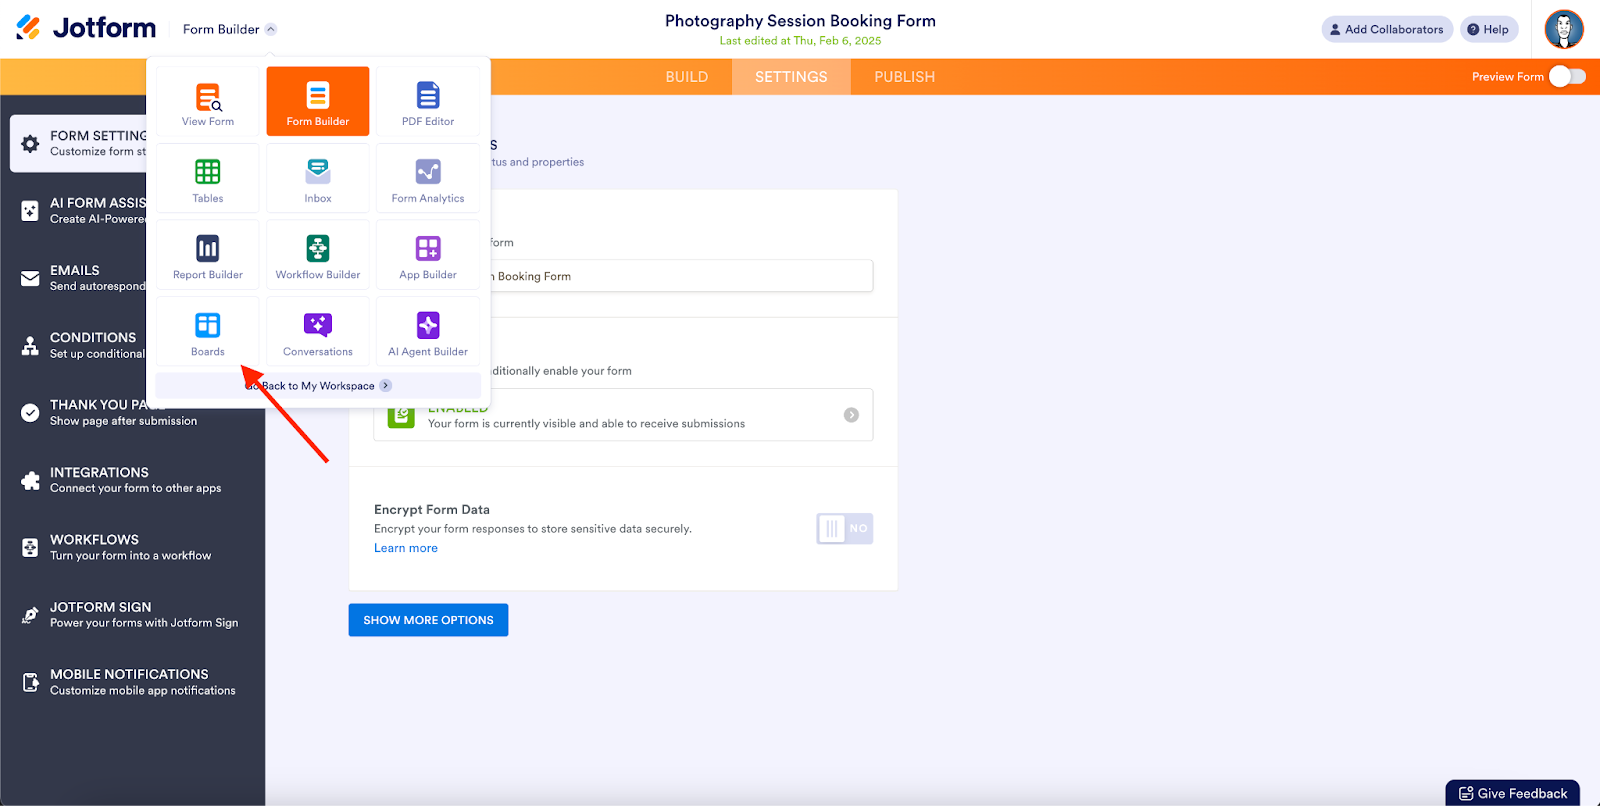
From the Form Builder menu bar, select the Form Builder dropdown and choose Boards.
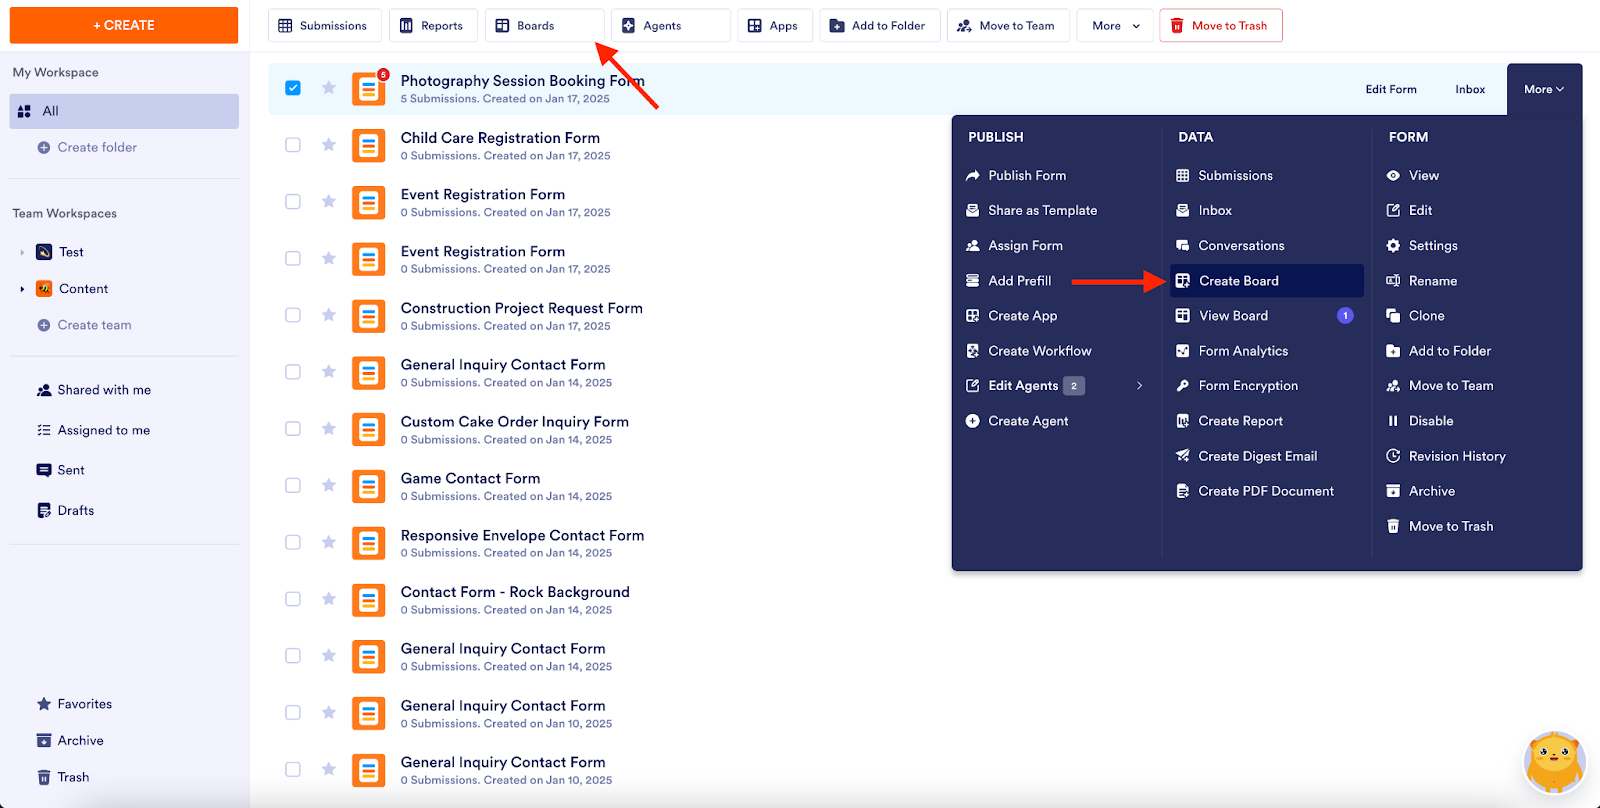
You can also create a board from a form directly from your My Workspace or My Forms page. Just select the form you’d like to create a board from, then either select the Boards button from the toolbar, or select the More dropdown and choose Create Board.
After any of these steps, a window will open that lets you choose your task groups, name your board, and import existing form submissions into your board as tasks.
After you click Next, you can match your form’s fields to your board’s task fields, so future tasks can be easily understood and assigned. When you’re done, click Create.
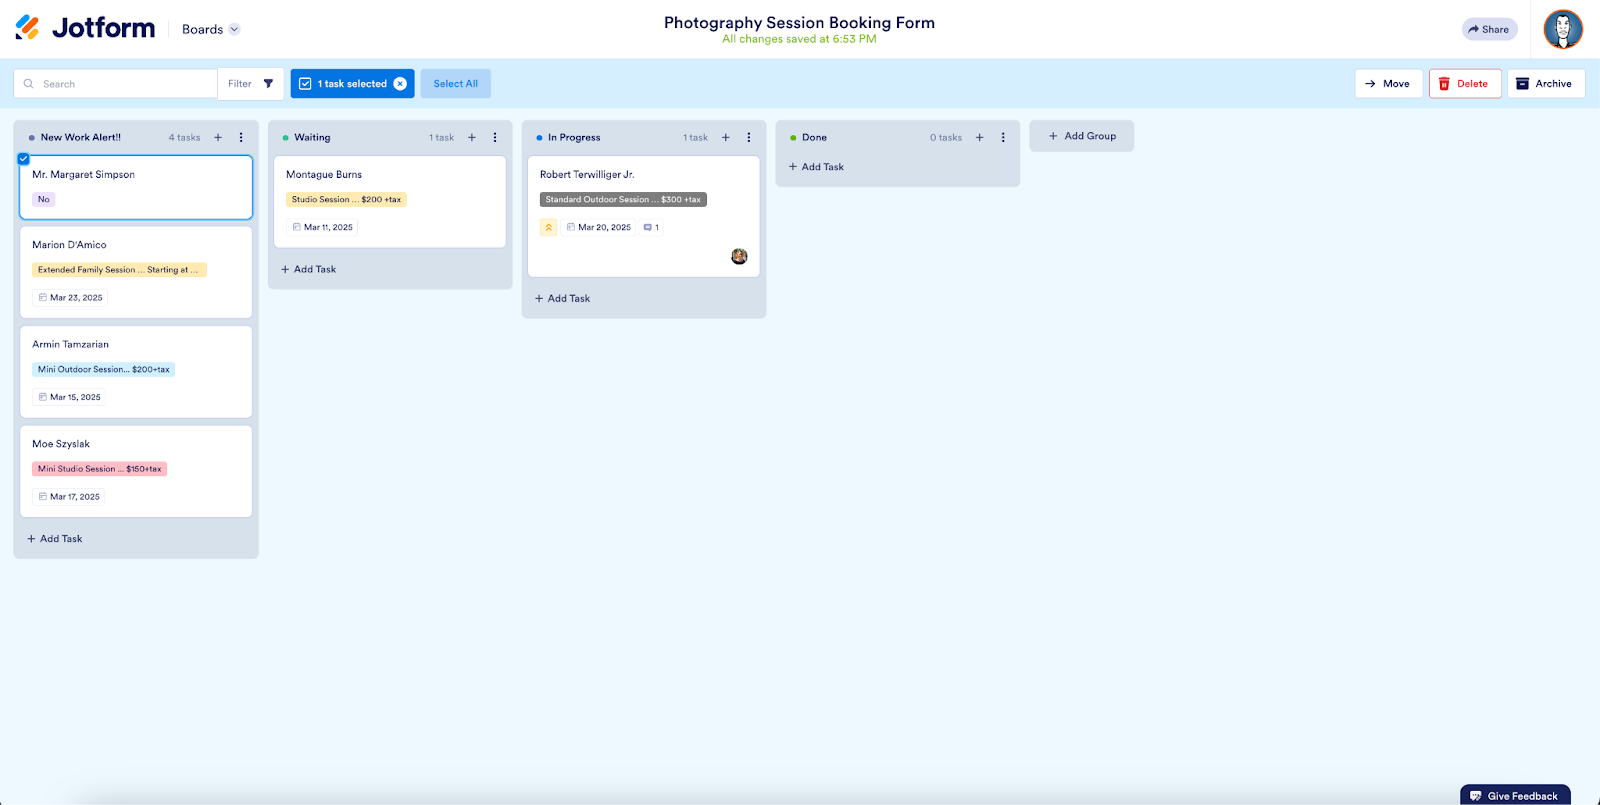
Once you’ve connected your form to a board, any existing submissions will appear in the first task group. Now you can begin to use the board’s drag-and-drop functionality to create and manage tasks!
Pro Tip
You can create a board without it having to be connected to a form, agent, or workflow. From your My Workspace page, click the Create button, then select Board. Choose Start from scratch.
Adding team members to your board
You may want to add team members to your board to help you out with the tasks to come. To do so, just click the Share button from the menu bar. A window will open that allows you to copy a link to your board or email the teammates you’d like to add.
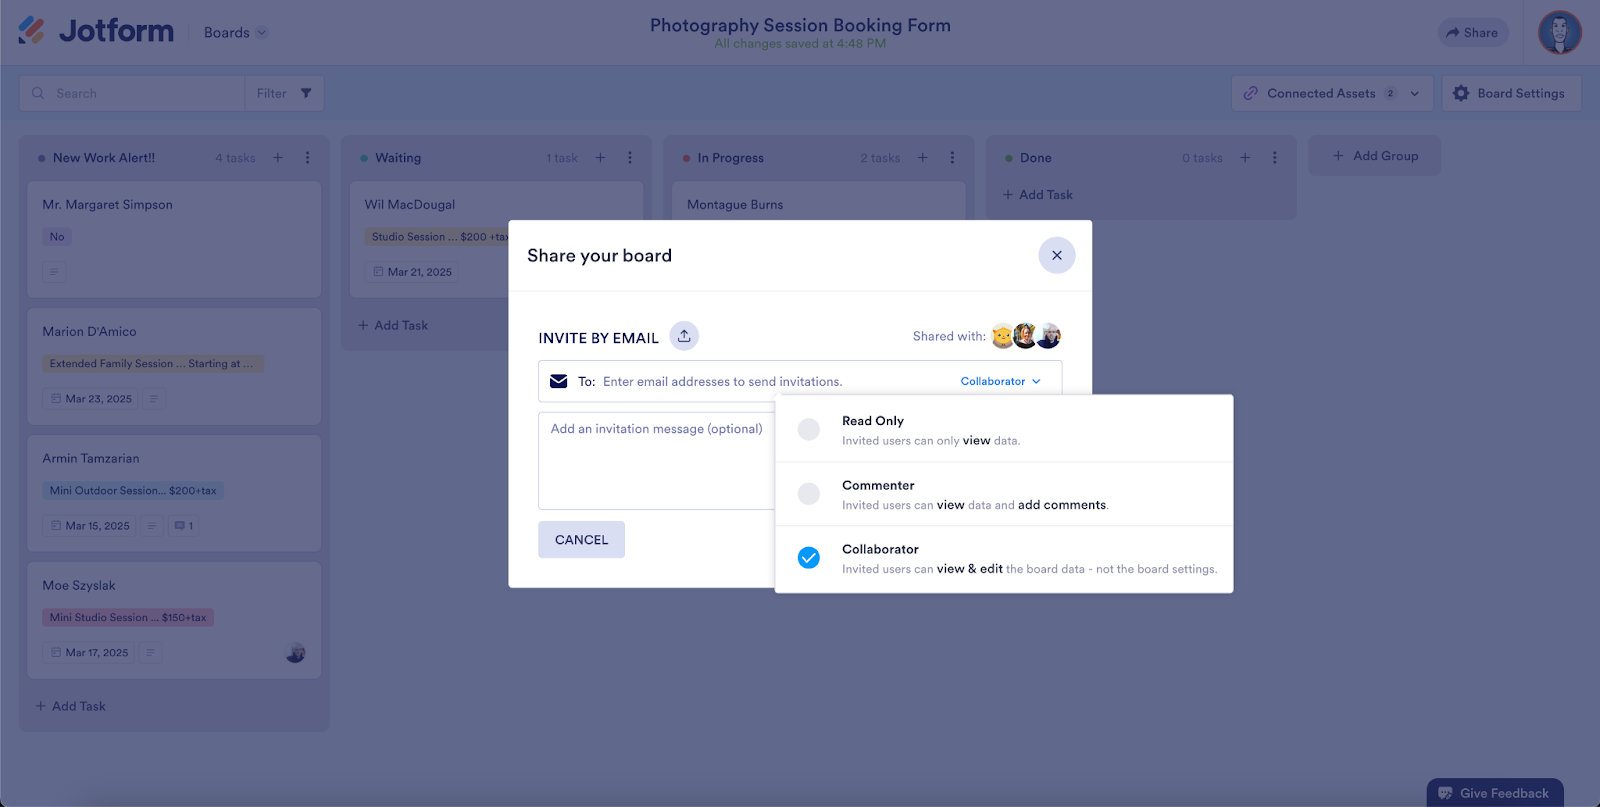
Control access settings by selecting Settings from the window. You can designate your teammates’ access privileges as Read Only (they can view the board), Commenter (they can view the board and add comments), or full Collaborator (they can view and edit the board, but not the settings).
Pro Tip
You can invite coworkers to your board and they can interact with your tasks, but they will need to have an active Jotform account.
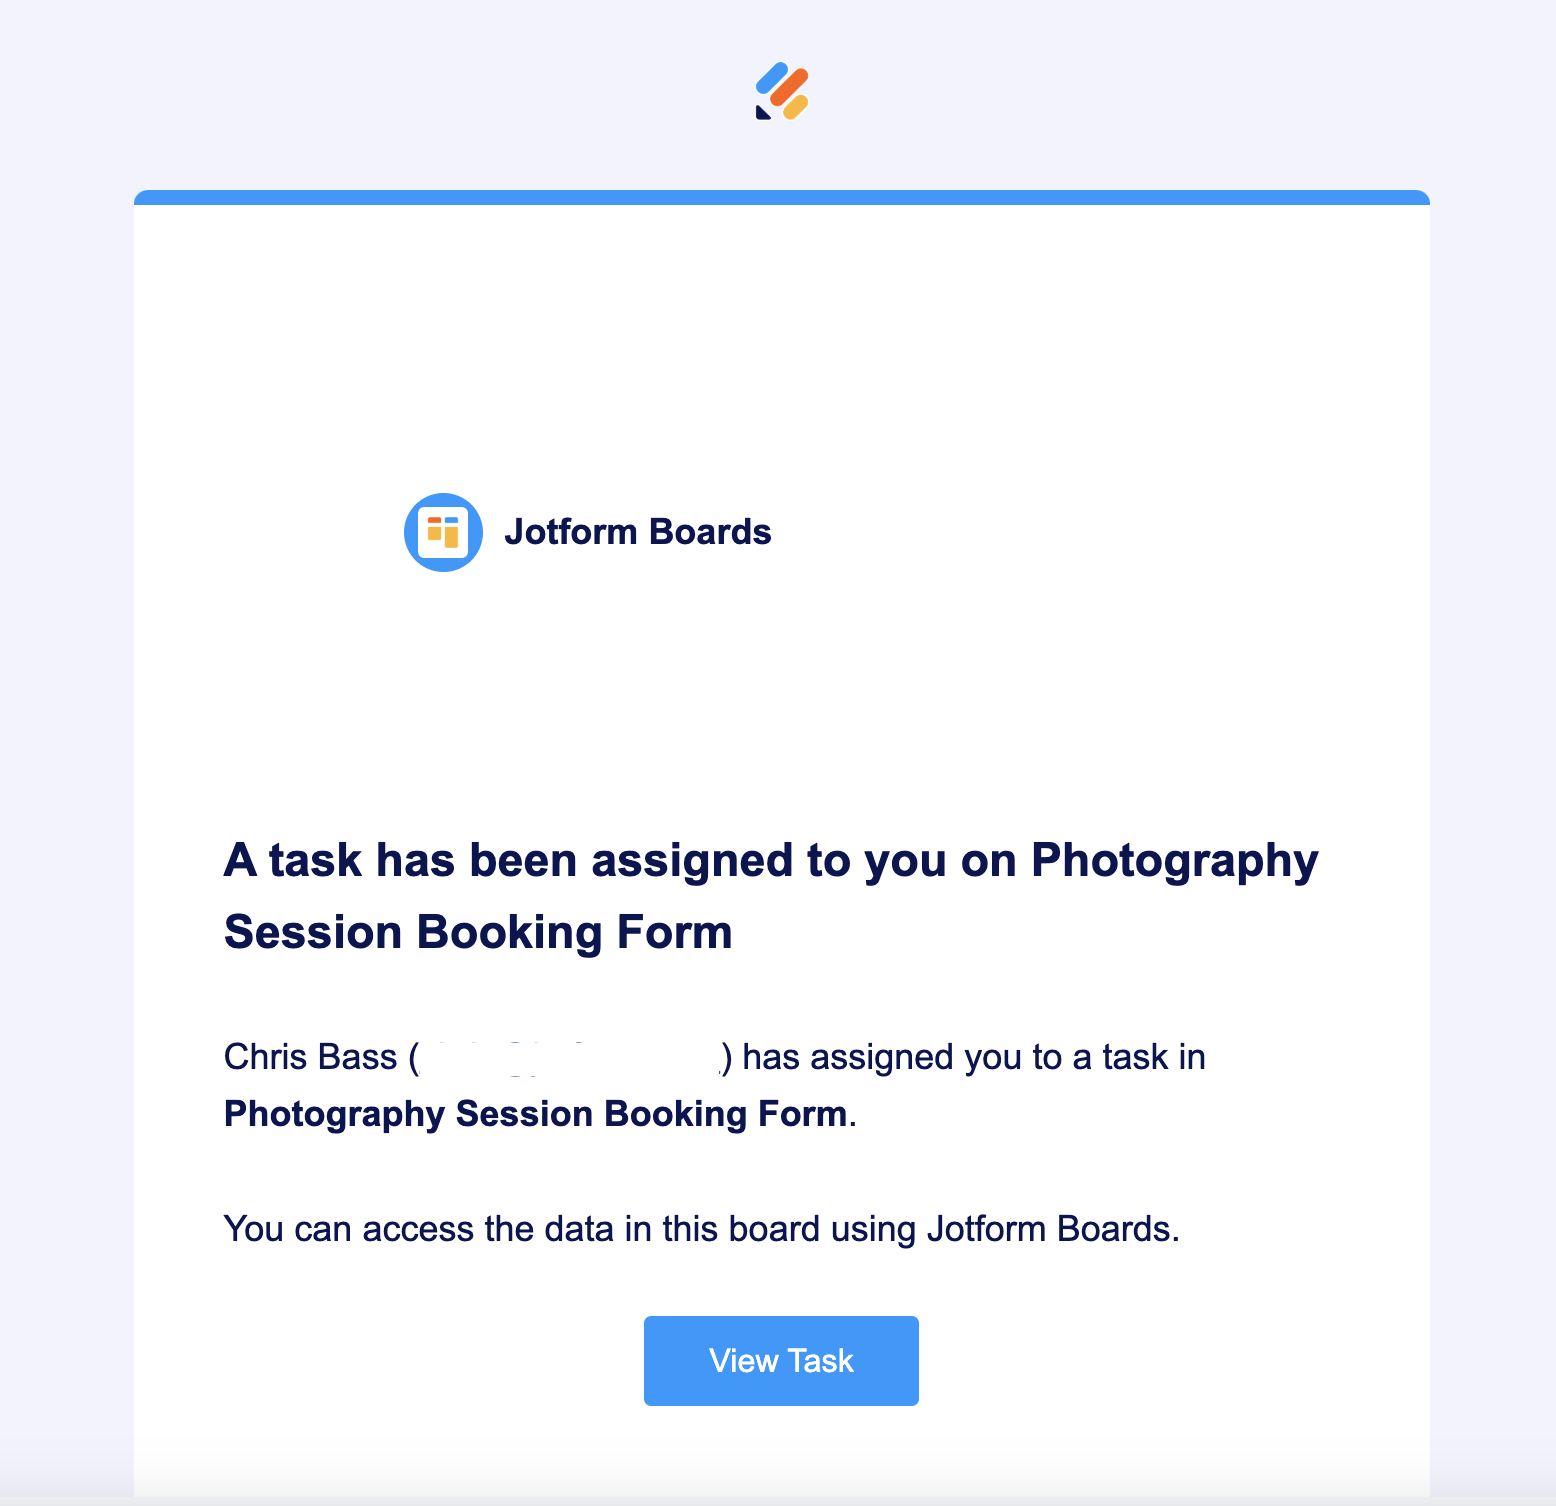
After you’ve invited other users to the board, to assign tasks to them, click into a task. Next to Assignee, select the Add field. A dropdown with your teammates will appear. Simply select the correct person to assign them to the task. (You can also invite team members to your board directly from this dropdown by selecting Invite to This Board.)
When your teammate is assigned a task, they’ll receive an email notification with a link to view the task.
Updating tasks
When you need to assign and work on tasks, customizations help in a big way. We’ve made it easy to customize and update tasks so that you and your collaborators can be more efficient.
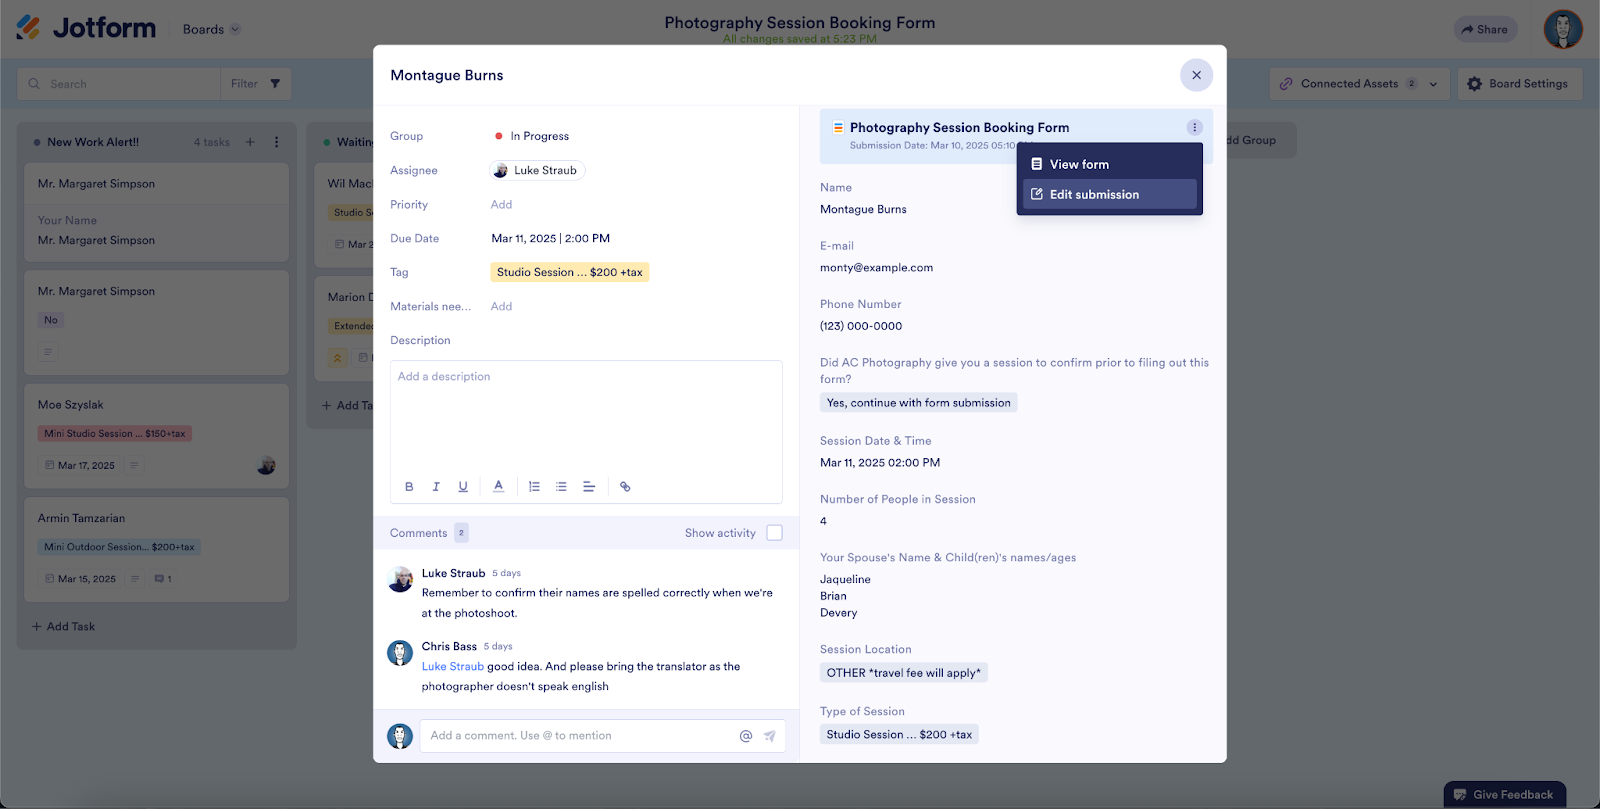
Within a task, you can adjust the group, the assignee, the priority level, and the due date. Additionally, you can add (or edit) task tags, provide a task description, and display an activity log.
Leave a comment for your collaborators to communicate any details that need to be done or watched for. Use the @ symbol to notify them that action needs to be taken and they’ll receive a heads-up.
It’s easy for you or your assignee to update progress on the task as well, whether that’s moving the task to the next group, adding a comment, or even updating a form submission from the task card.
Customizing your board
Whether you want to choose your own task fields or modify how your board appears, you have the flexibility to customize your board based on your organizational needs and how you want your workflow to move along.
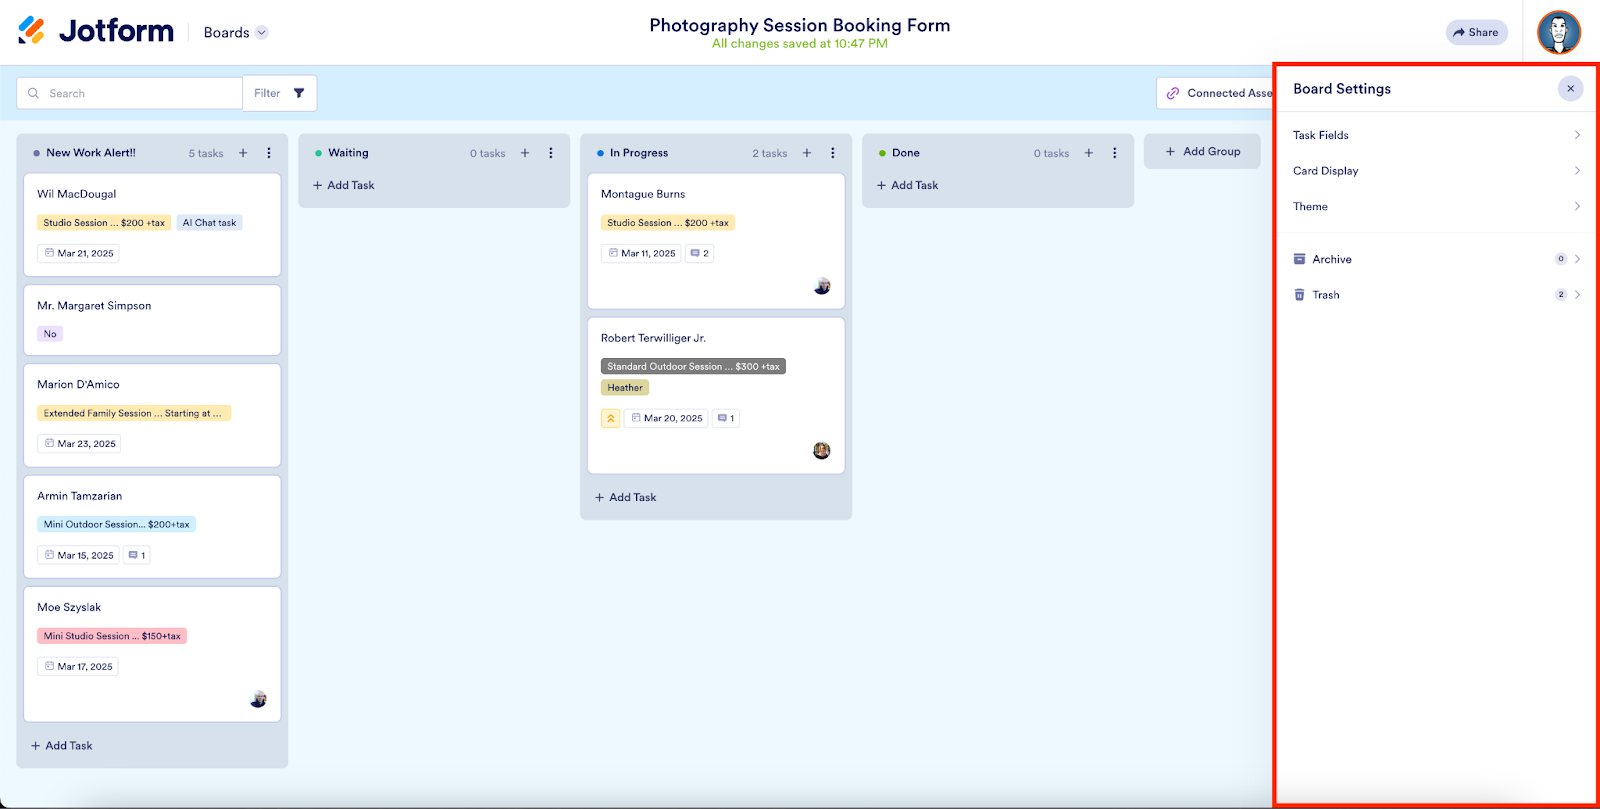
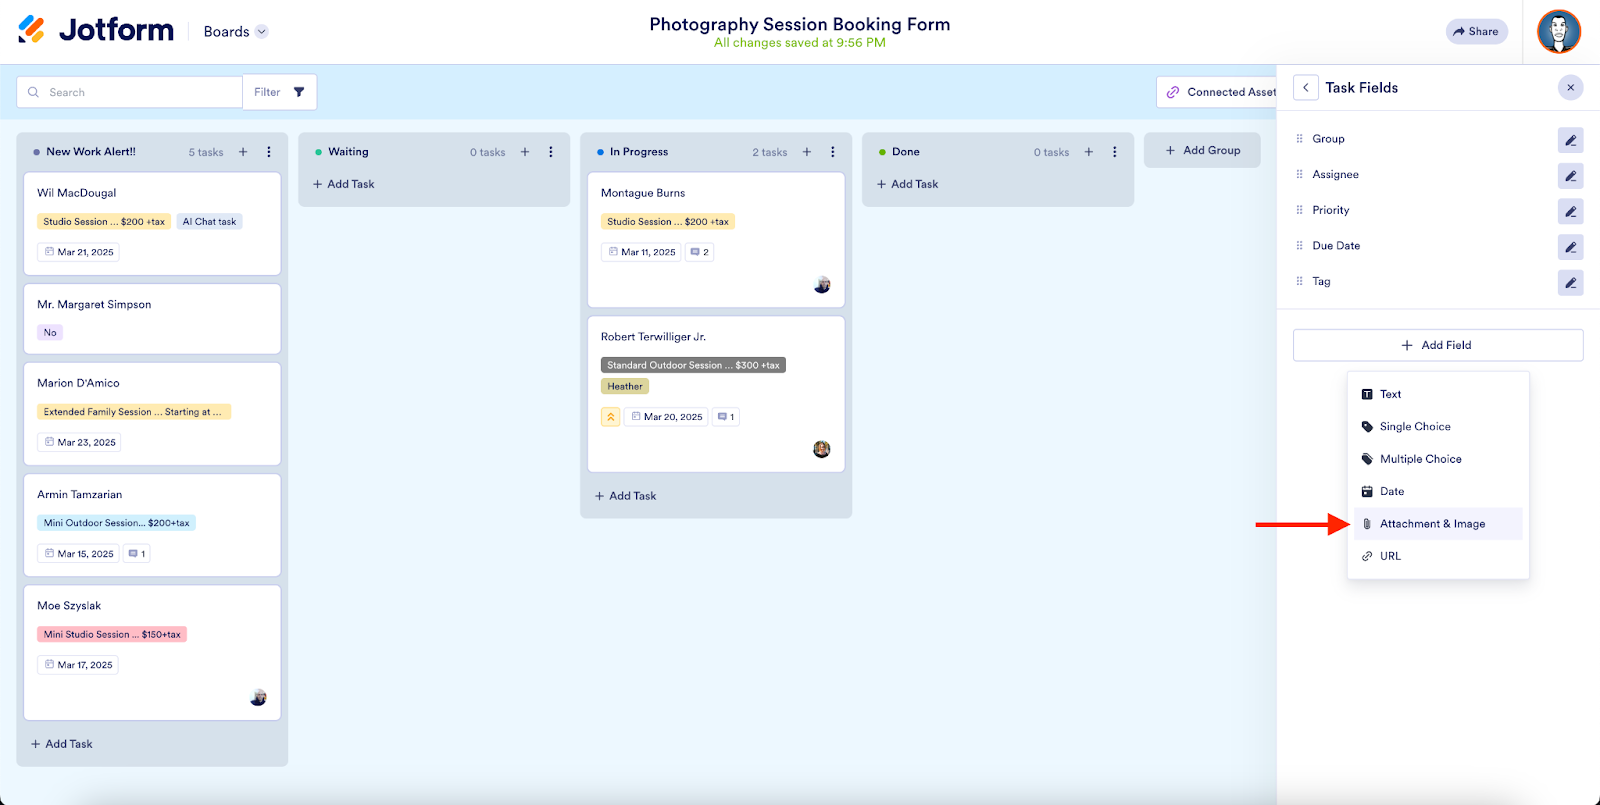
Select Board Settings to set, rename, or add new task fields to fit your needs (the default task fields will be shown initially).
Among the fields you can add to your task are multiple- or single-choice options, attachments, and more.
Did you know
Editing a task field in Board Settings gives you the option to hide that field in “task view.” This means when you open the full task card, this field won’t be displayed. Also, it’s important to remember that you are limited to a maximum of five custom task fields (in addition to your default fields).
Customizing the “card view” of your task as it appears on your board can be done by selecting Card View in Board Settings. This lets you choose which fields appear in the main board view.
Among other custom options, you can elect to have the assignee, task priority, and due date visible, depending on your needs.
A neat way to brand your board is by choosing your own background theme or image. Either choose from a selection of background colors or upload your own branded image. It’s just another way you and your team can feel comfortable in your workspace.

Customizing your board lists (or groups) to better reflect your processes is only a couple clicks away. Easily rename a group, change the color, or move your group around your board.
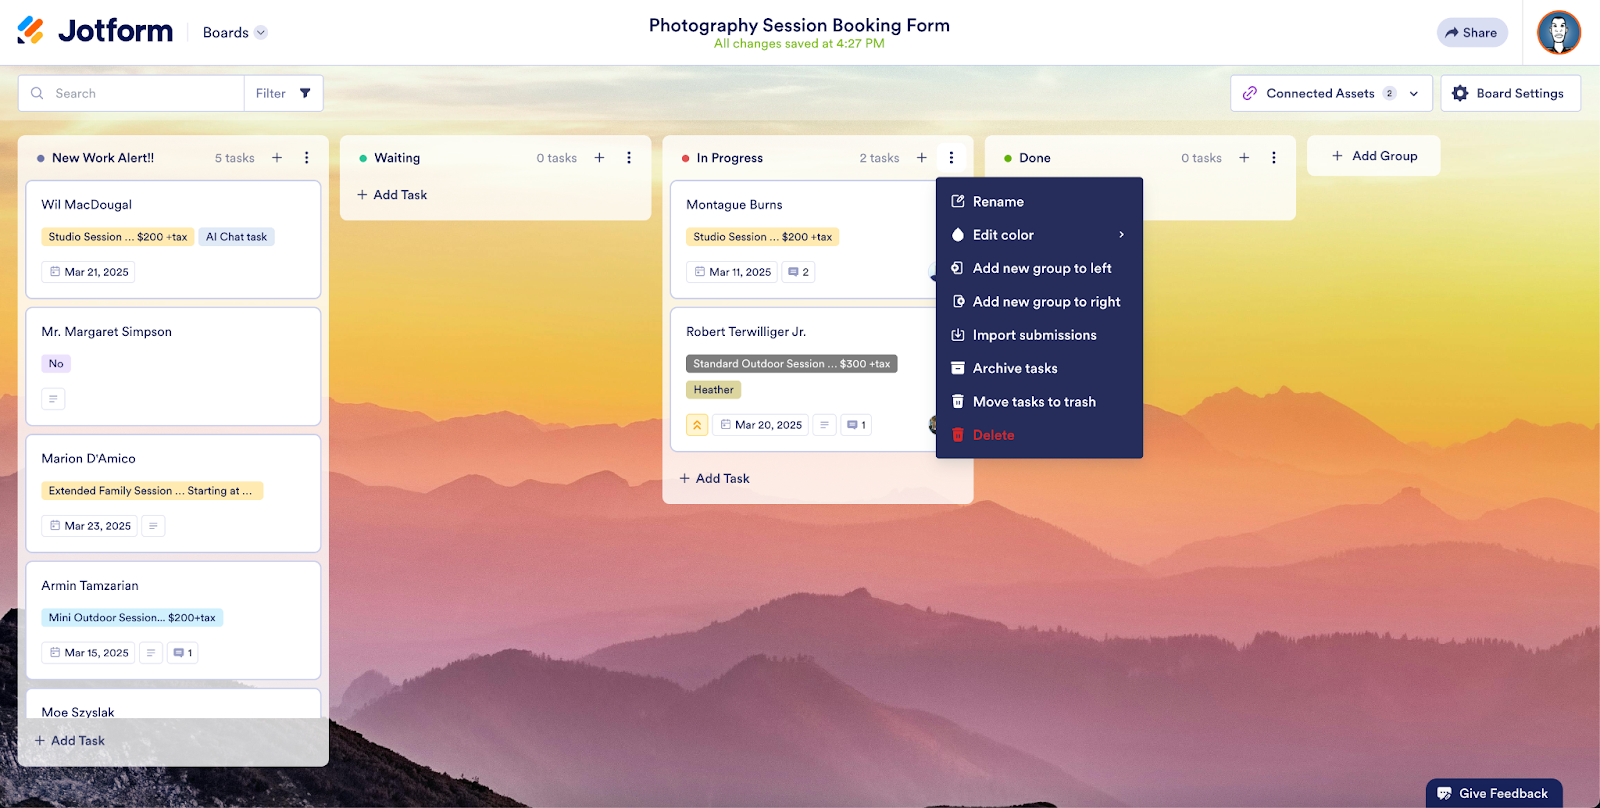
Need to add previous form submissions (or submissions from another connected form) to your group? No prob! Just select the three-dot icon in a group’s pane and choose Import submissions.
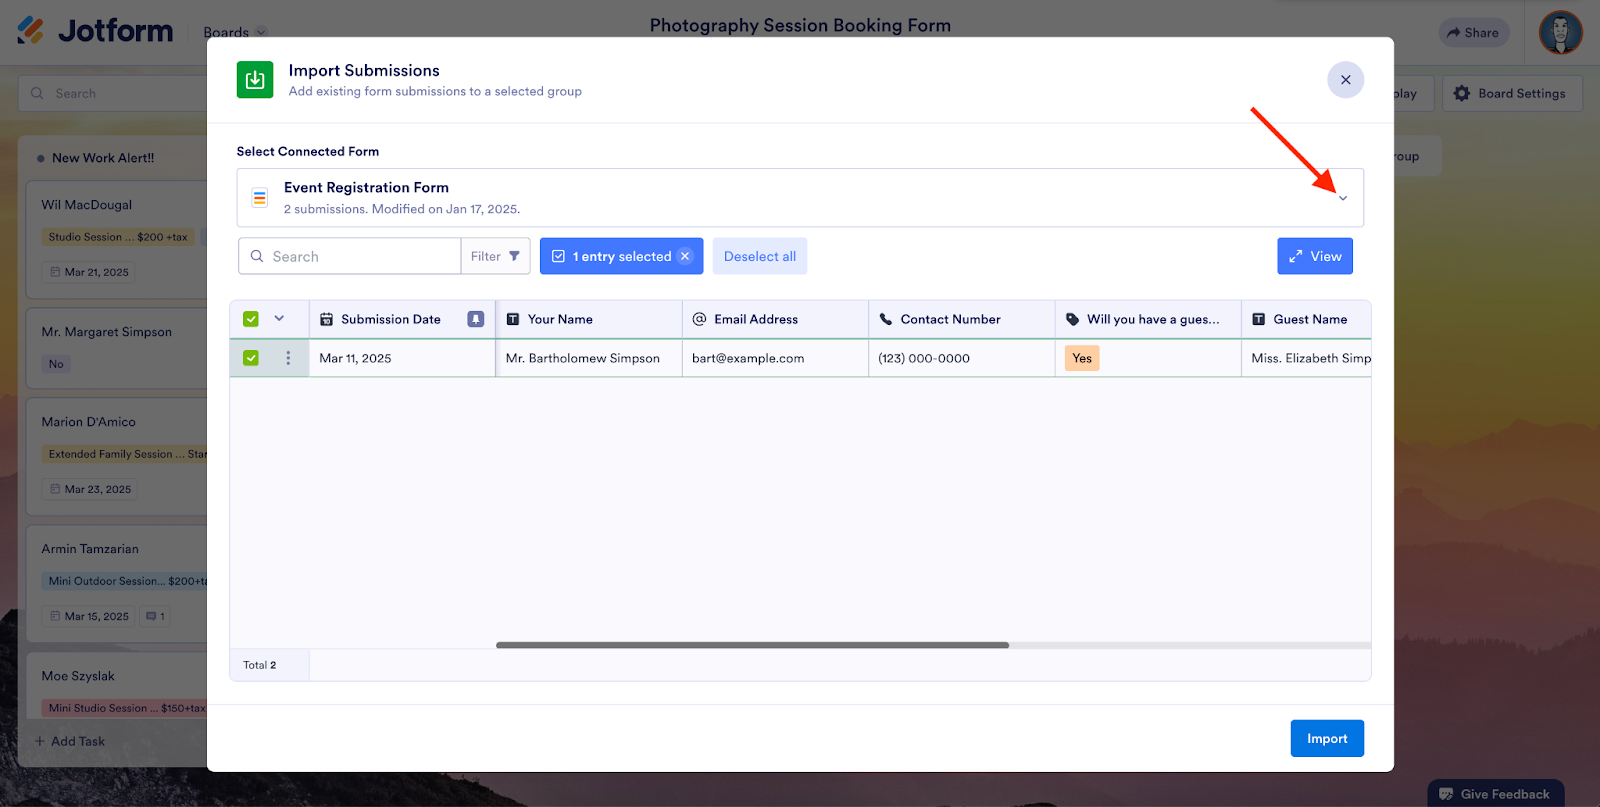
You can view a submission prior to adding it or just import it to your group by selecting Import.
And when your board begins to get a little crowded, we’ve made it easy for you to navigate your tasks efficiently with the ability to quickly search and filter your board. Enter search terms in the search bar, or select Filter to narrow things down.
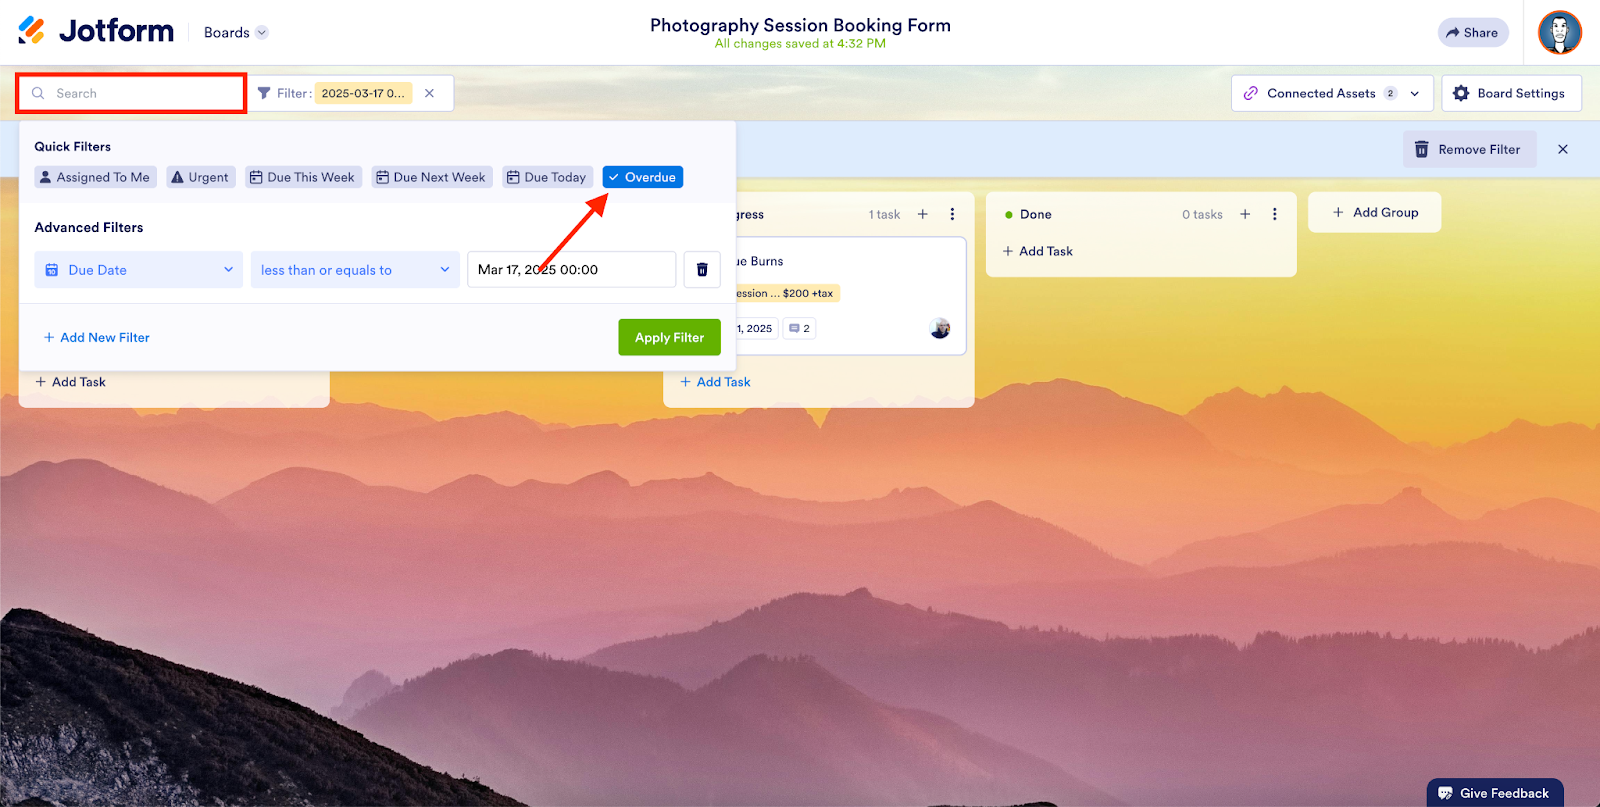
Use the quick filters to find the information you need or enter customized criteria.
Conclusion
Jotform Boards is a unique task management solution that gives you an organic way to connect the forms, workflows, and agents you’ve created to the tasks you need to complete.
It makes handling customer requests a more organized, efficient, and collaborative endeavor because Boards auto-generates tasks from form responses, AI Agent conversations, and your workflows for easy tracking and team assignment.
Jotform Boards is fully customizable, allowing you to model your board around your business processes and manage your tasks in an effective and collaborative way.
To help you get started, we’ve got more than 1,000 templates so you can get a quick start, whether you want to simply take advantage of a user-friendly kanban board or are looking to import customer requests immediately.
And if you have questions along the way, our help guides can be your go-to for questions:
- How can I create a board in Jotform Tables?
- How do I manage connected forms in Jotform Boards?
- How do I group tasks in Jotform Boards by using tags?
As with most of our products, Jotform Boards is free to use. Board owners and collaborators will need to have a Jotform account. Boards does have feature limits, though all features and limits are the same regardless of account level:
- A form limit of five form connections to a board
- A limit of five custom fields to a task (in addition to default fields)
- An assignee limit of 10 people per task
- A collaborator limit of 100
- A task display limit of 1,000
Jotform Boards allows you to capture and resolve every customer request and empower your team to work more efficiently. Get started today!


Send Comment: