Make is a no-code automation development platform that makes it easy to visualize and create automation. You can connect Jotform to other apps by creating a custom workflow with Make.
With Jotform integration through Make, you can configure the following Triggers and Actions:
- Trigger:
- Watch for Submission — Triggers the scenario automatically when a new form submission is received.
- Actions:
- Create a New Form — Creates a new form with custom questions, properties, and email settings.
- List Form Questions — Retrieves all questions from a specific form.
- Add Questions to Form — Adds new questions to the specified form.
- Get Form Submissions — Retrieves all submissions from a specific form.
- Get User Submissions — Retrieves all submissions across the user’s account.
- Get Monthly User Usage — Retrieves the number of form submissions received this month, including SSL submissions, payment submissions, and the total upload space used.
- Make an API call — Sends a custom API request to any endpoint listed in the Jotform API documentation.
Note
- In this example, we use Google Sheets, but the steps might be different depending on the app you choose.
- Make supports a wide range of integrations. To explore all the apps you can connect with Jotform through Make, you’ll find more info in our guide on Connect Any Apps with Jotform.
- To connect your Jotform account to Make, you need to generate an API key from your Jotform account. Make sure to set the permission to Full Access as this is required for any modules that write data to your account. To learn how it’s done, see our guide on How to Create Jotform API Keys for more details.
Creating a scenario in Make involves several steps. You’ll need to connect your Jotform account and the account of the other app you want to integrate with Jotform. The process includes the following:
- Choosing your Apps — Selecting Jotform as your app.
- Building your Scenario — Set up the trigger and actions to define your workflow.
- Testing your Scenario — Run a test to ensure everything works correctly.
- Activating your Scenario — Turn on your scenario to start automating your tasks.
Let’s discuss each of these steps in more detail below.
Choosing Your Apps
The first step to creating your scenario is to select Jotform as your first app. Here’s how to do it:
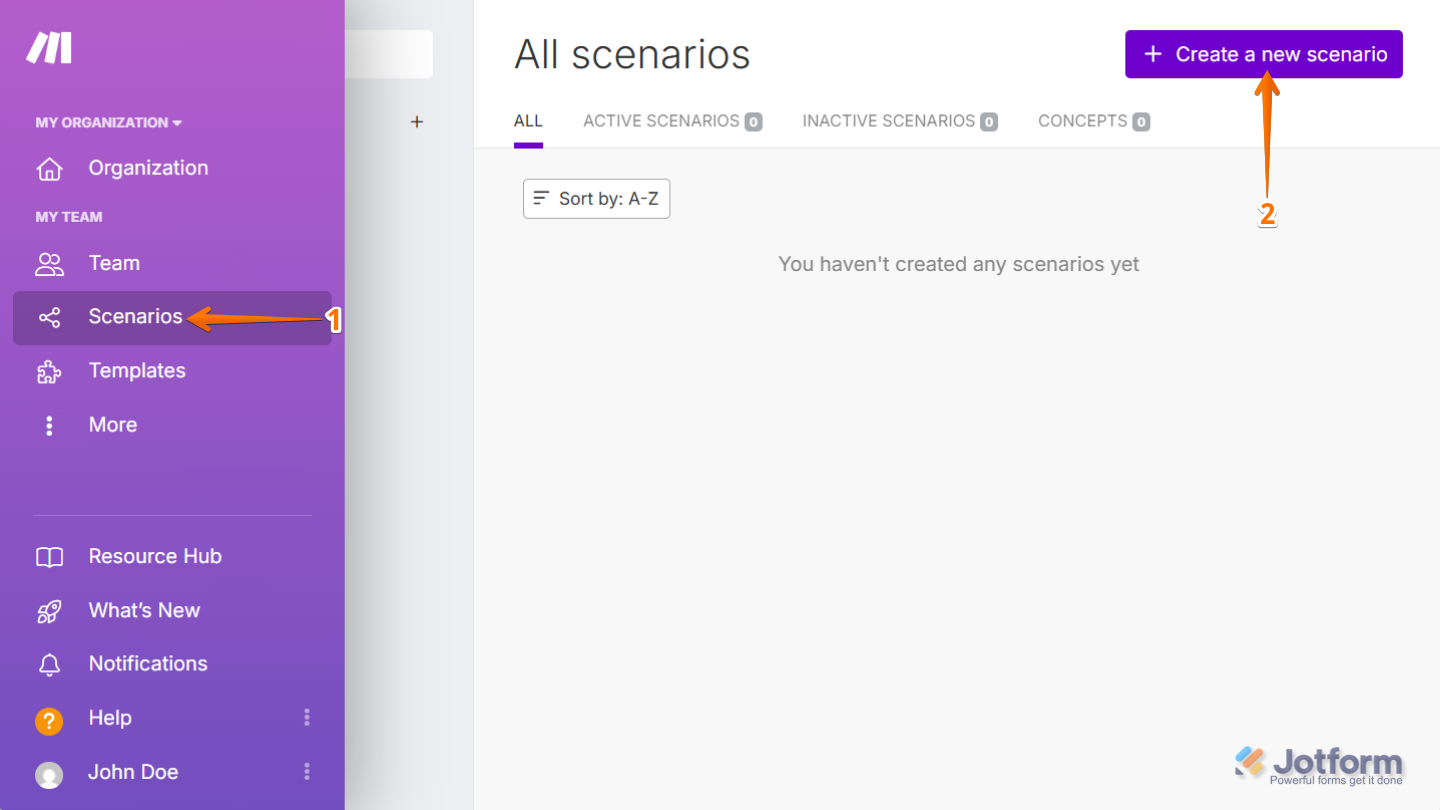
- In your Make Dashboard, in the left side of the page, click on Scenarios.
- Then, in the top-right corner of the page, click on Create a New Scenario.
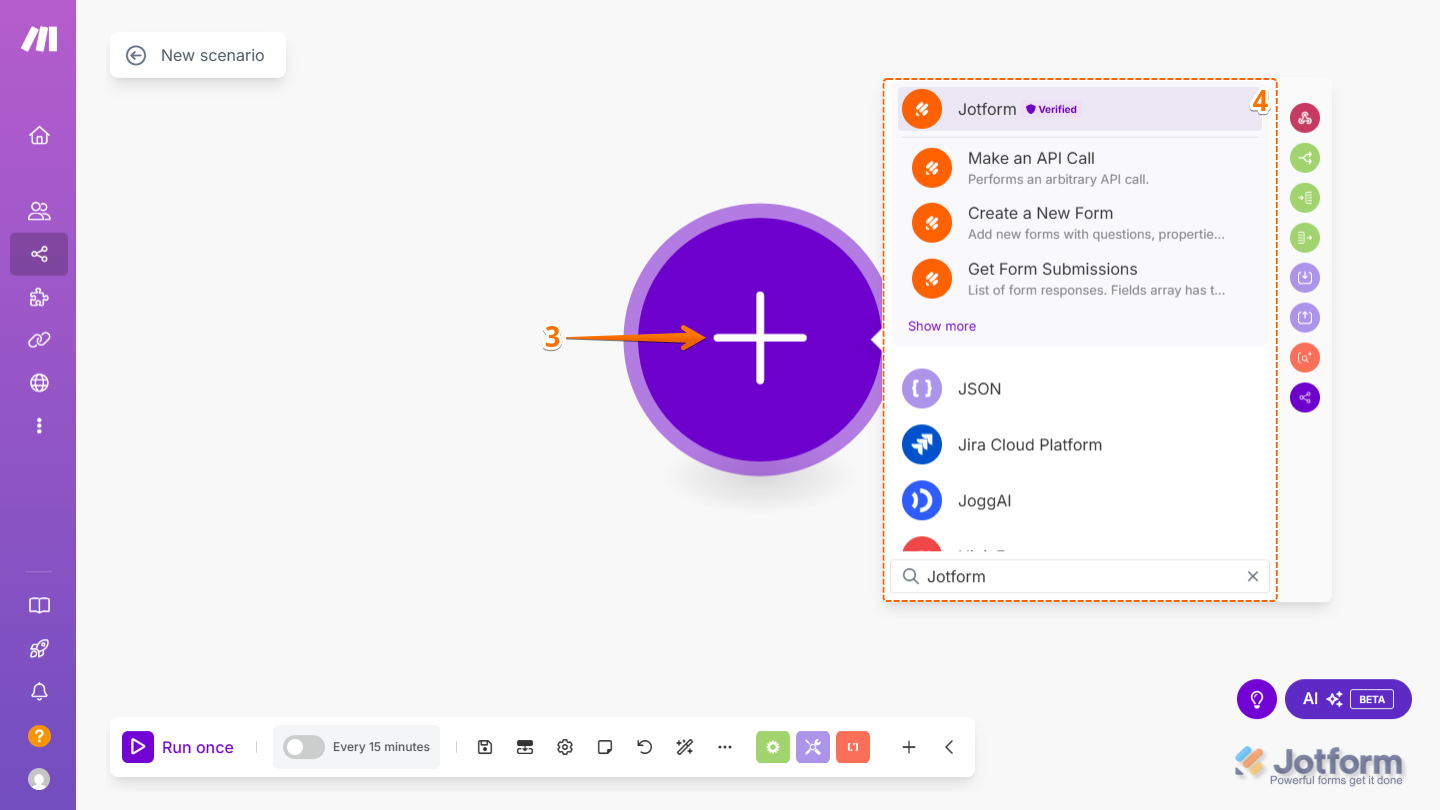
- Next, click on the Plus icon in the middle of the page.
- Now, search for Jotform and select it from the list.
Building Your Scenario
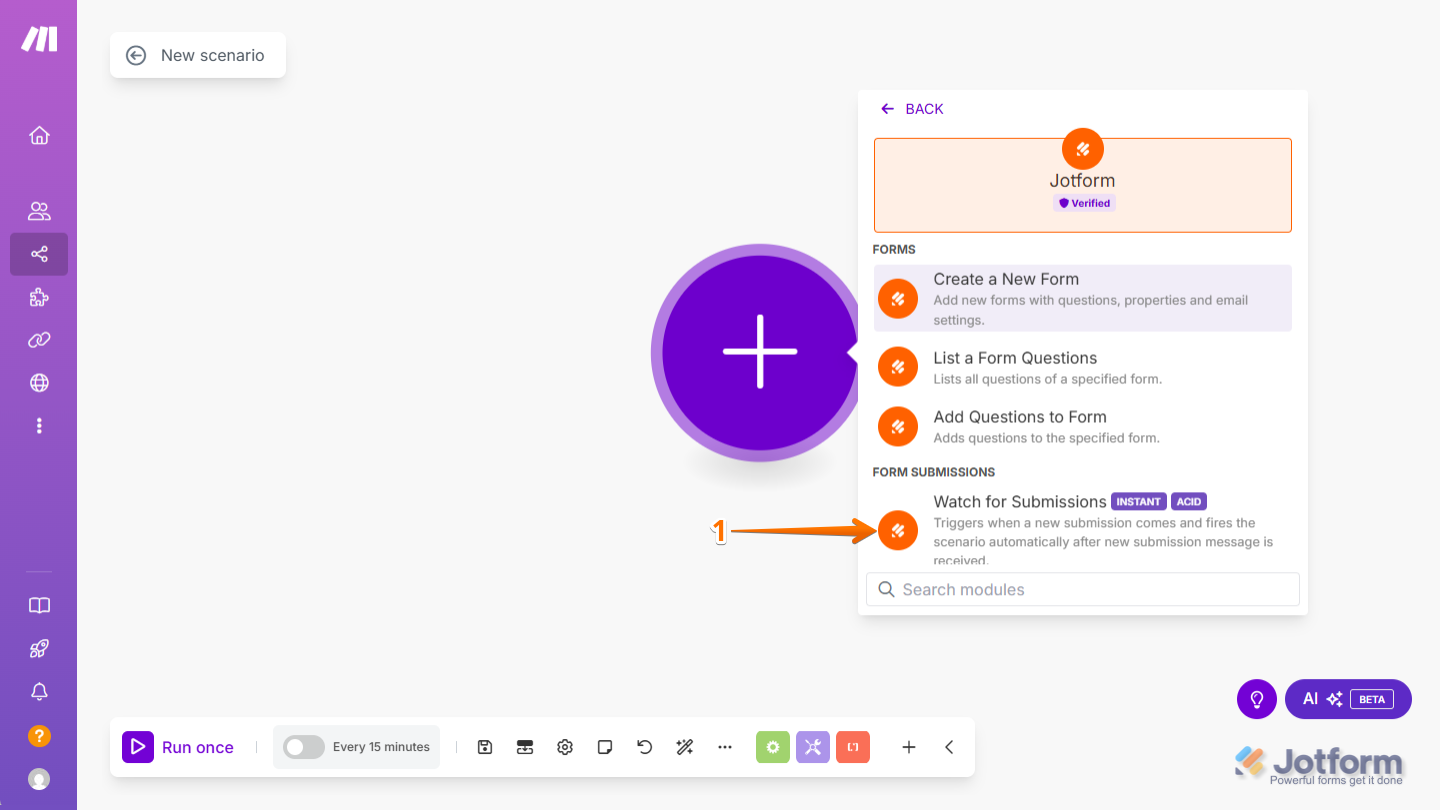
As mentioned above, you can choose from various triggers and actions when selecting Jotform. For example, let’s use Watch for Submissions:
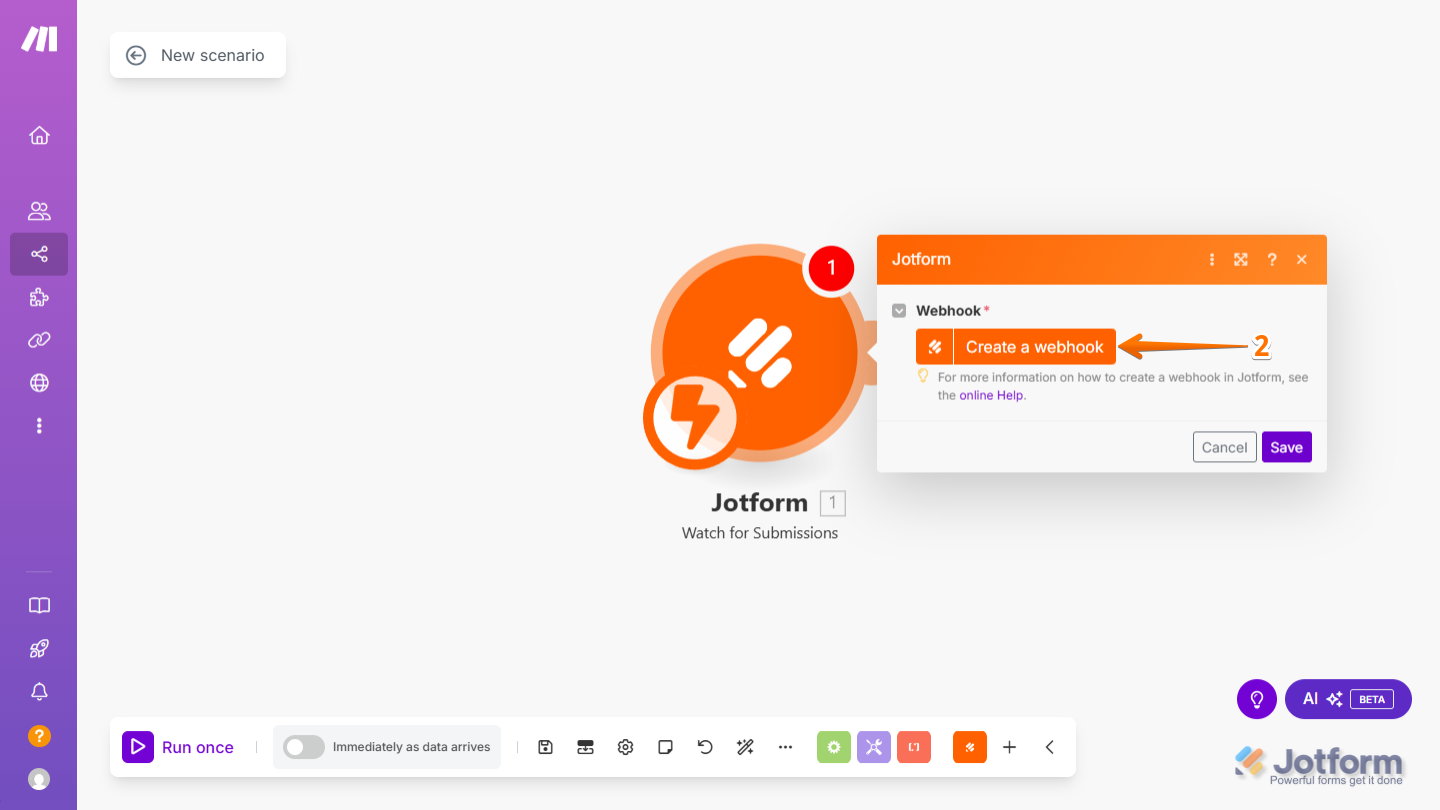
- After you select Jotform from the list, for example, select Watch for Submissions.
- Then, click on Create a Webhook.
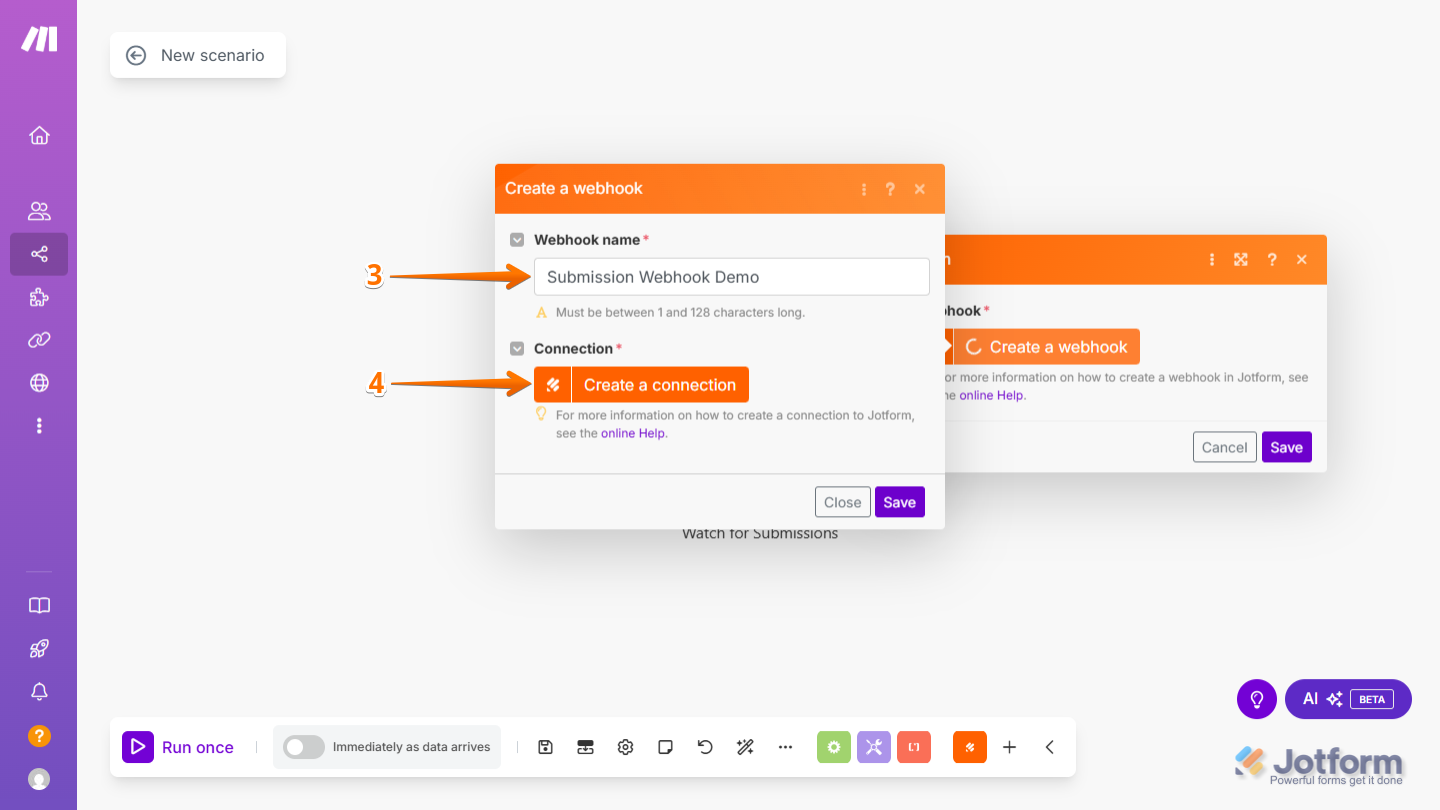
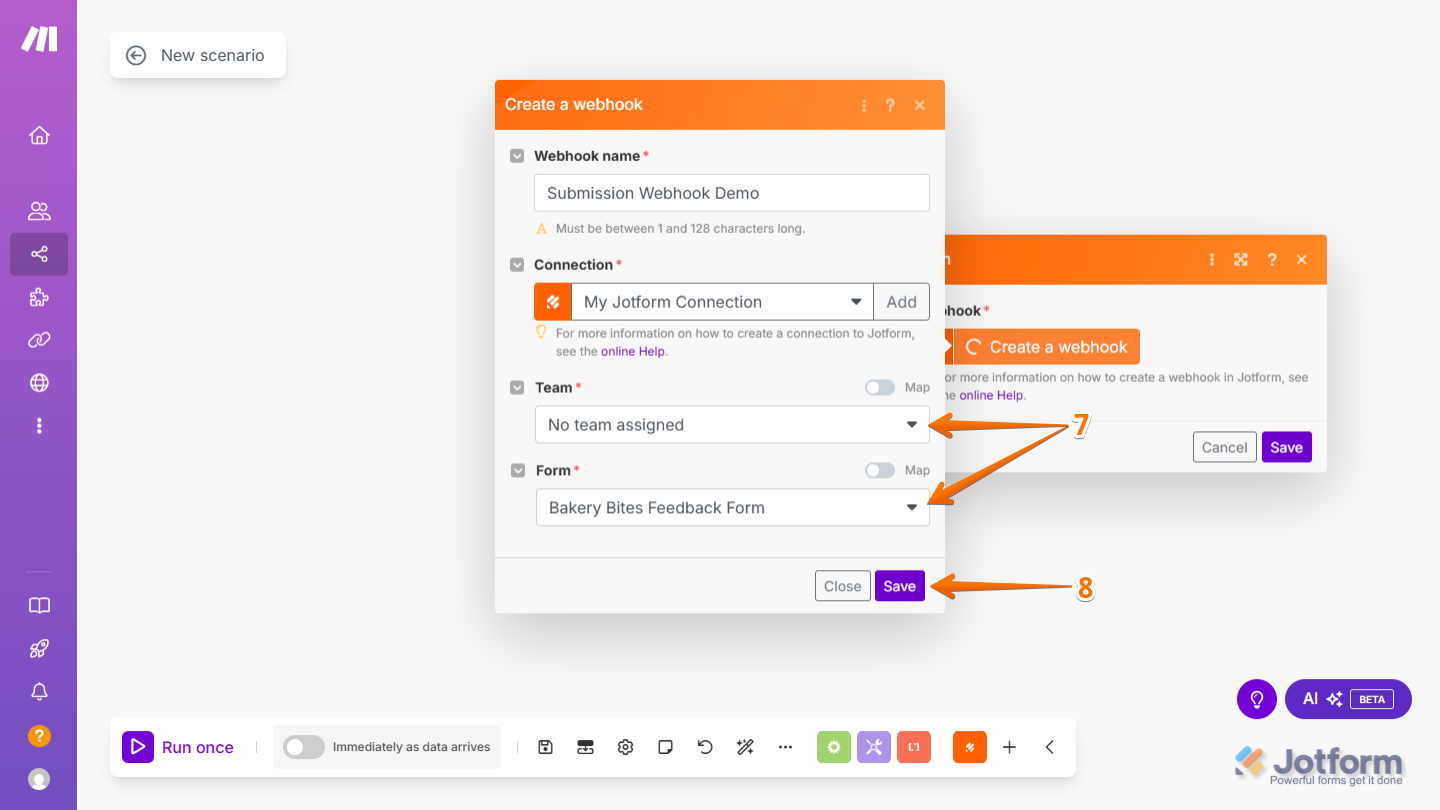
- Now, in the Create a Webhook window that opens enter your Webhook Name.
- Then, click on Create a Connection.
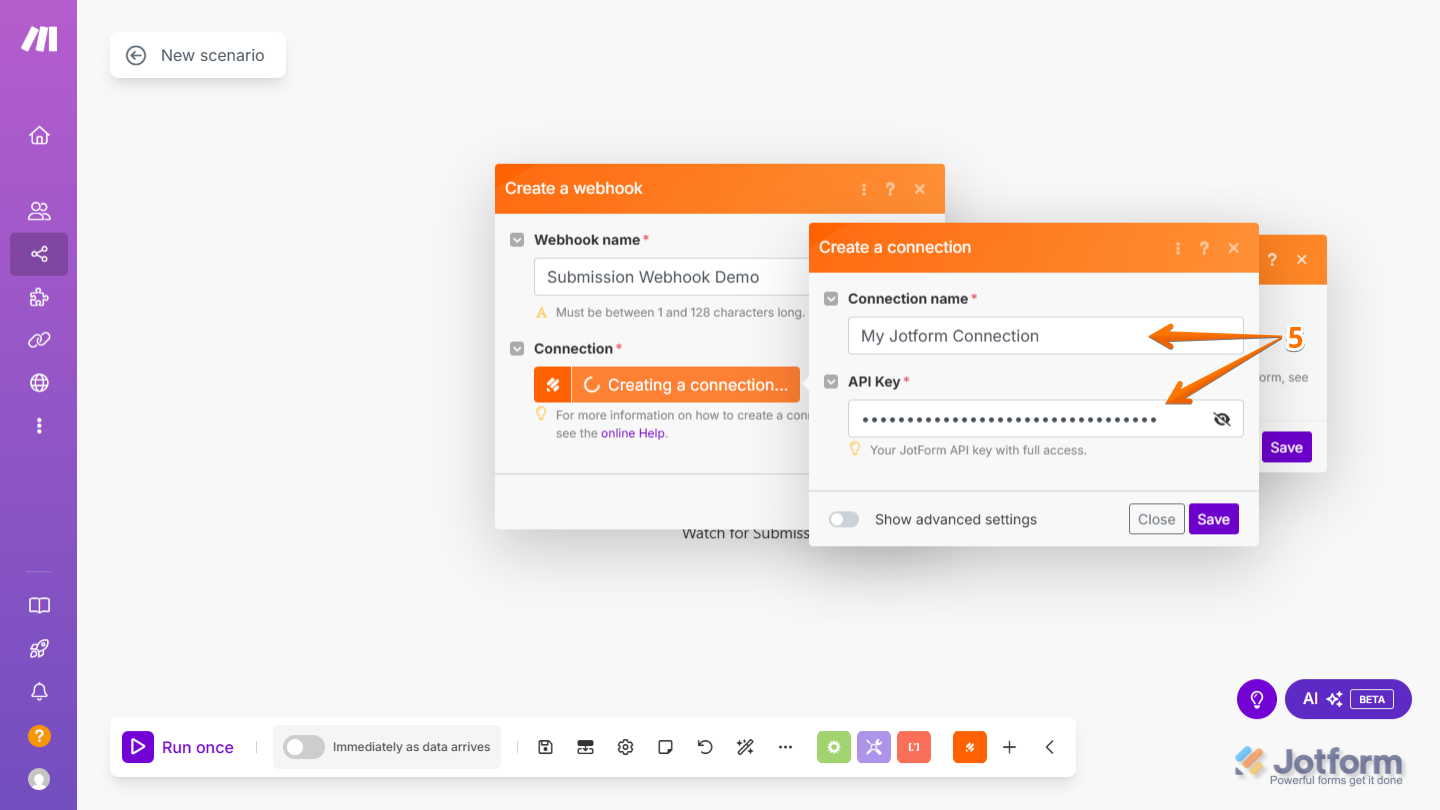
- Now, in the Create a Connection window that comes up, set up these things:
- Connection name — Enter a custom name to identify your connection.
- API key — Paste your Jotform API key. Make sure the key has Full Access permission for full functionality. Check out this guide about How to Create Jotform API Keys for more details.
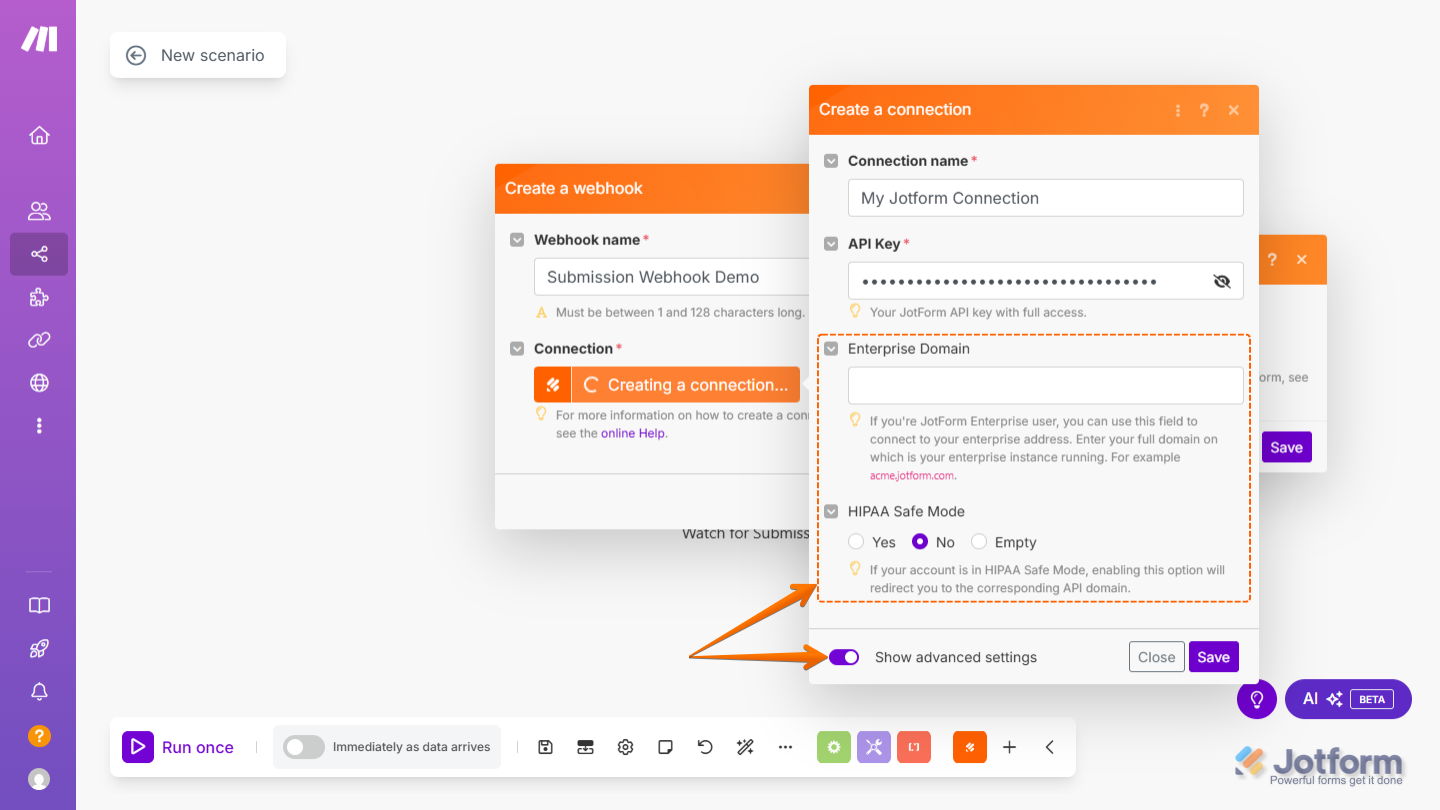
If you’re a HIPAA or Enterprise Jotform user, you can toggle on the Show Advanced Settings and set up these things:
- Enterprise Domain — Enter your full domain on which your enterprise instance is running. For example acme.jotform.com.
- HIPAA Safe Mode — If your account is in HIPAA Safe Mode, enabling this option will redirect you to the corresponding API domain.
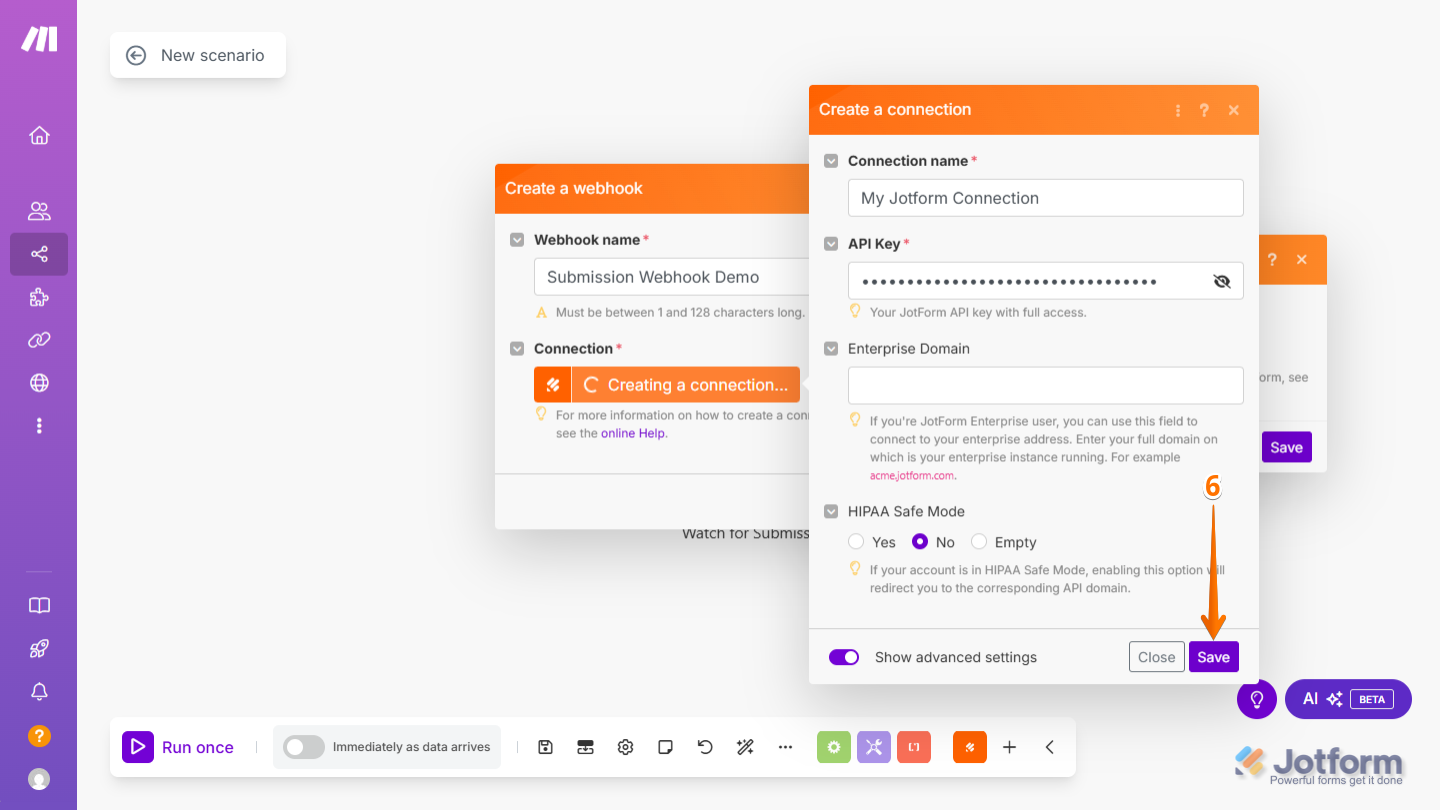
- Then, click on Save at the bottom of the window.
- Next, configure these things:
- Team — Select the team that owns the form you want to use. If the form you want to use isn’t part of a team, select No team assigned from the dropdown.
- Form — Choose the specific form that will act as the trigger for your scenario.
- Then, click on Save.
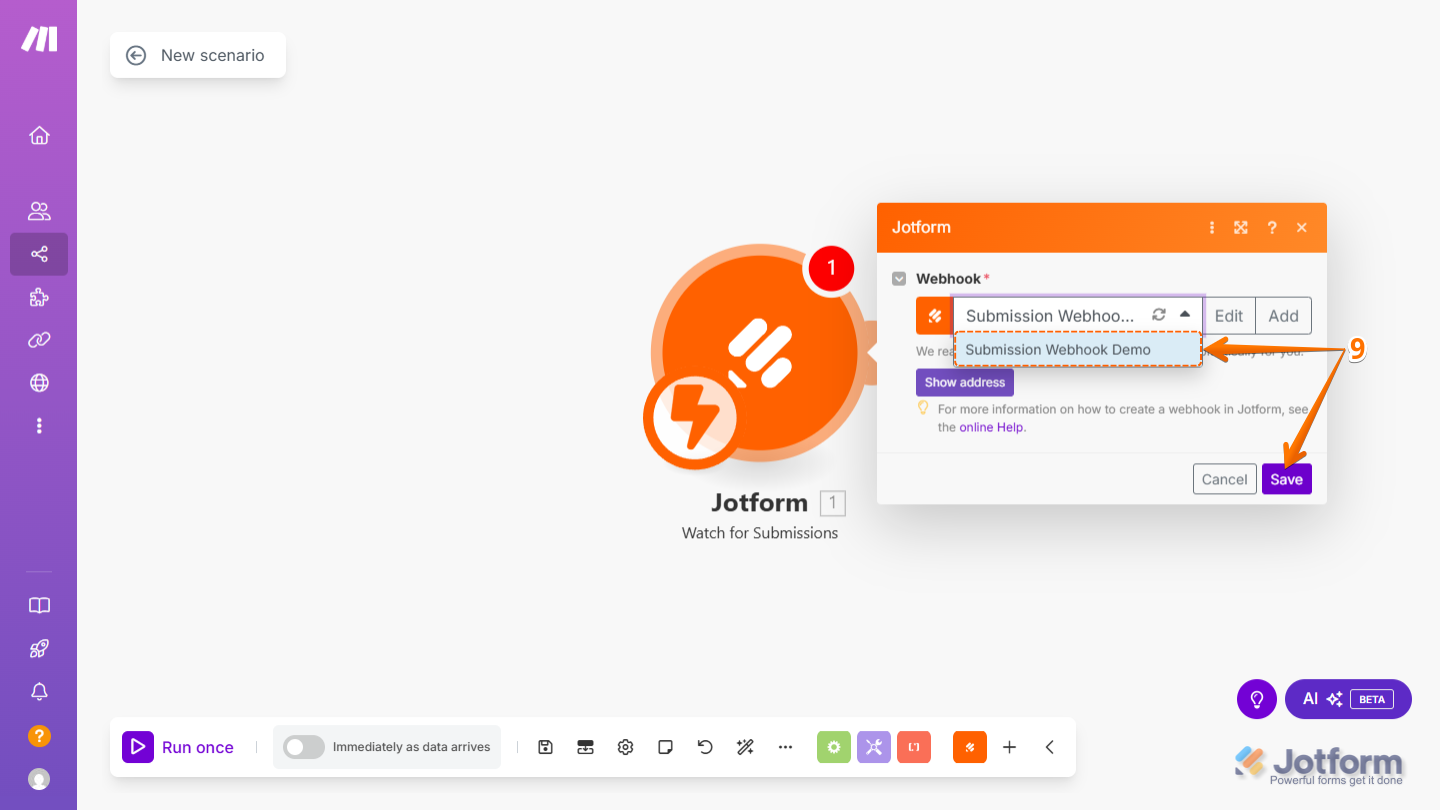
- Now, ensure that the newly created webhook is selected from the Webhook Dropdown and click on Save.
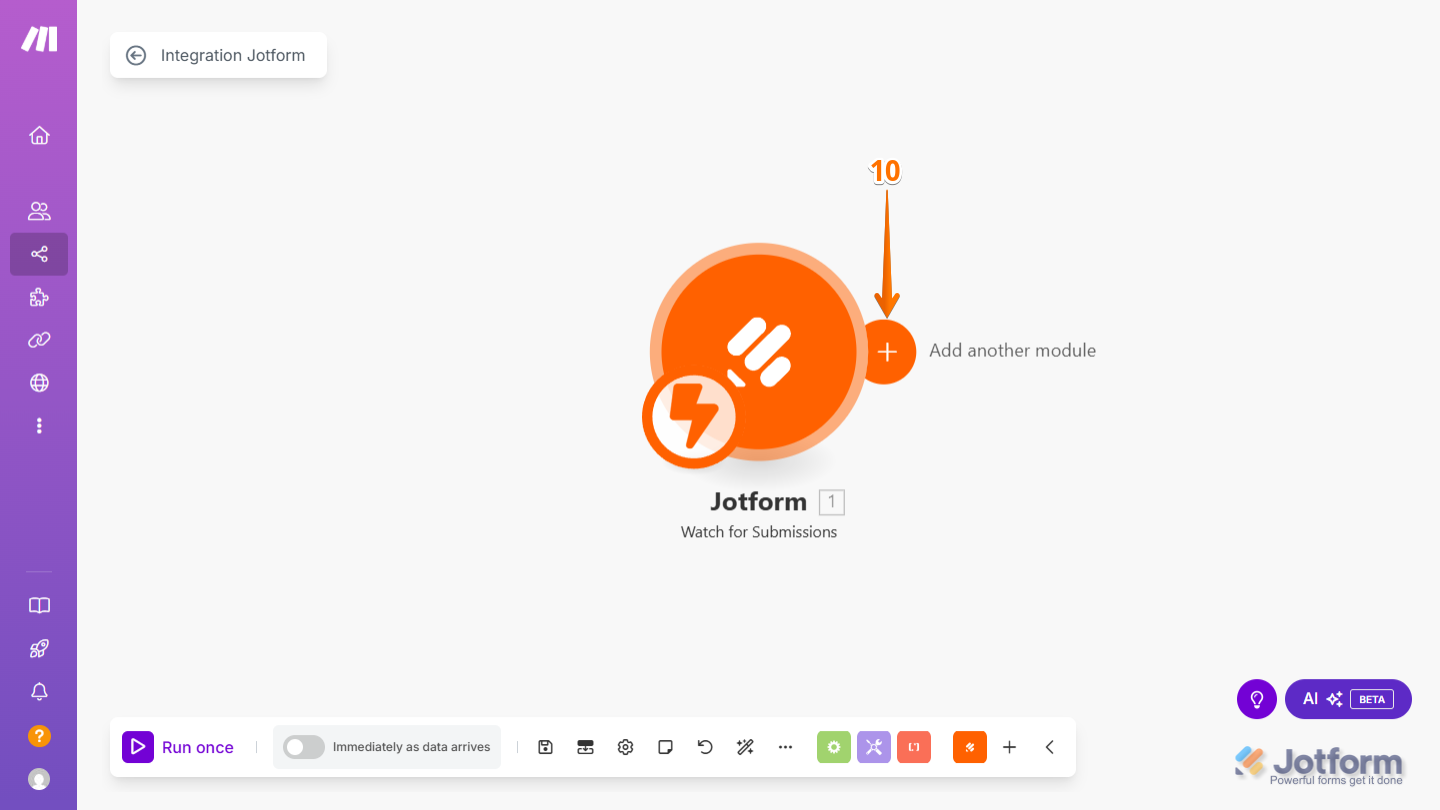
- Next, click on the Add Another Module icon to connect it with the other apps.
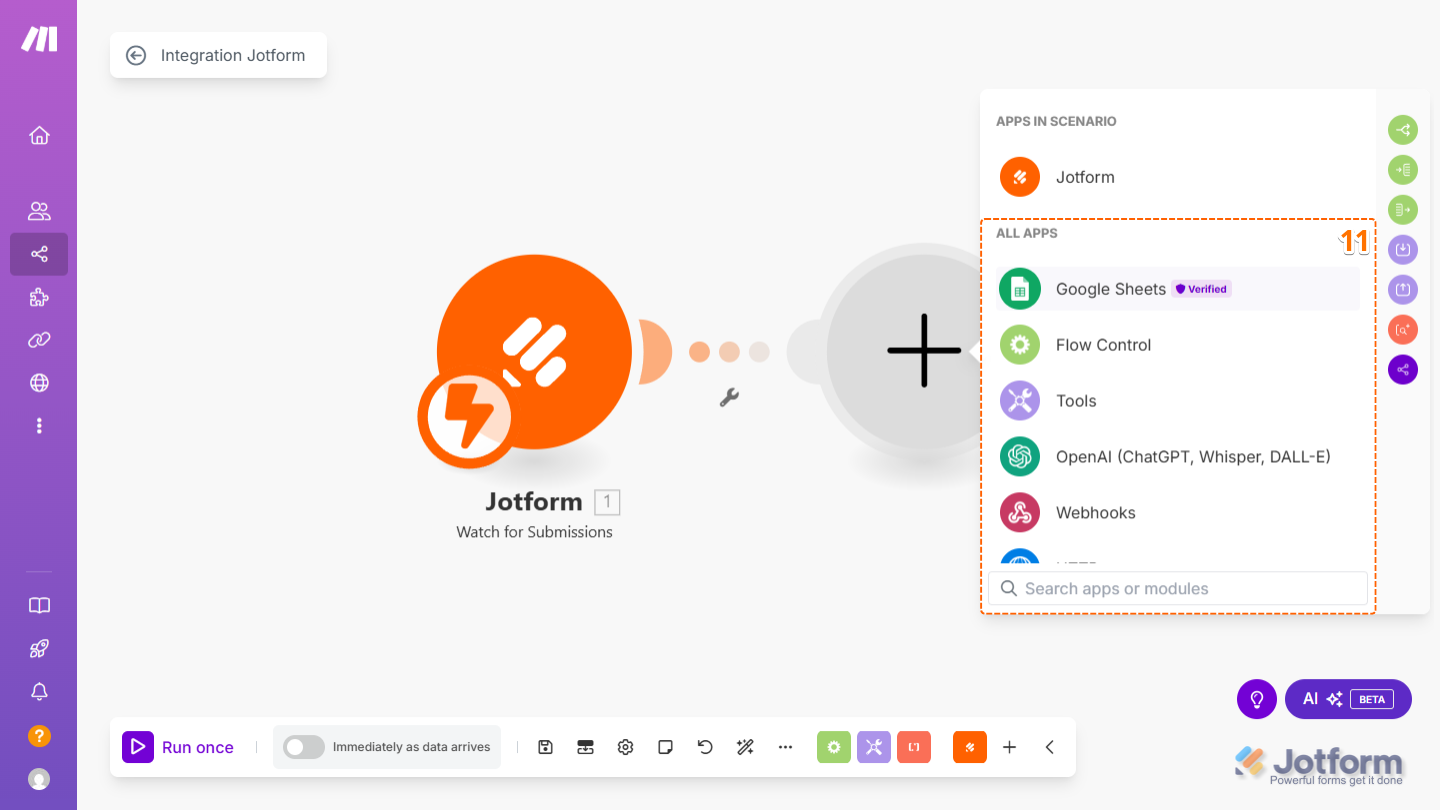
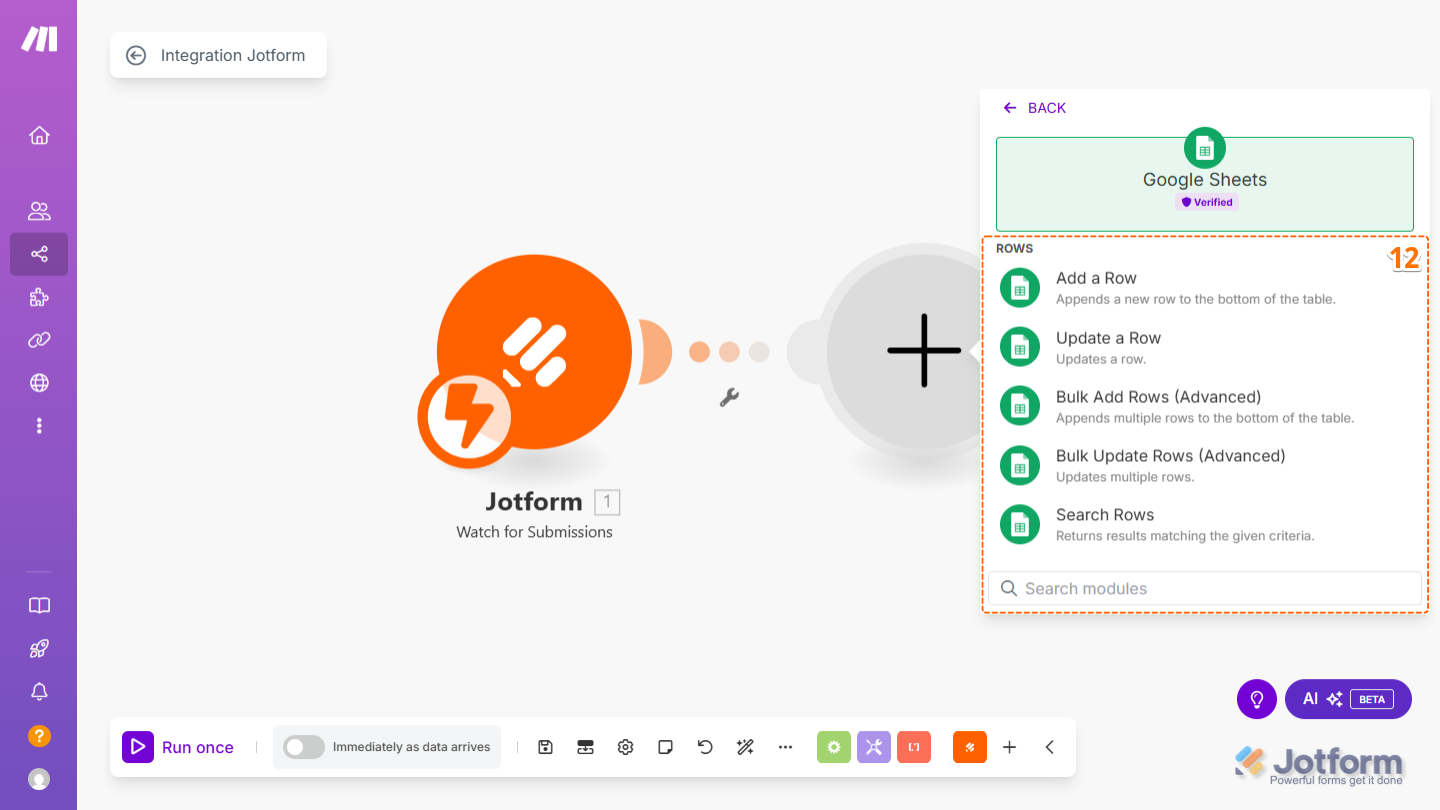
- Then, search for and select the app you want to connect with Jotform—for example, Google Sheets. To view the full list of apps you can connect with Jotform through Make, take a peek at this guide on Connect Any App with Jotform to learn more.
- Now, select an Action for your Google Sheet. For example, Add a Row.
- Then, click on Create a Connection.
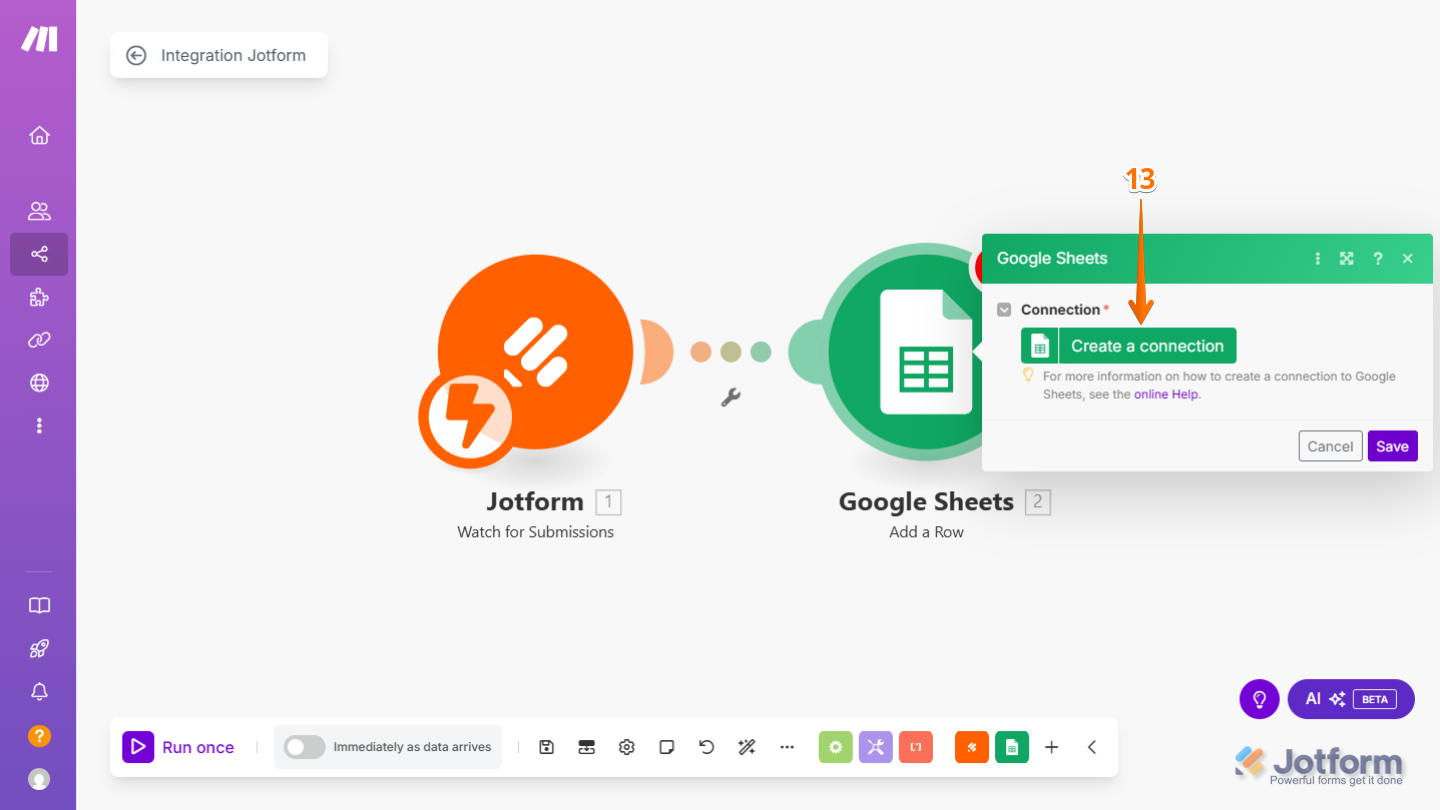
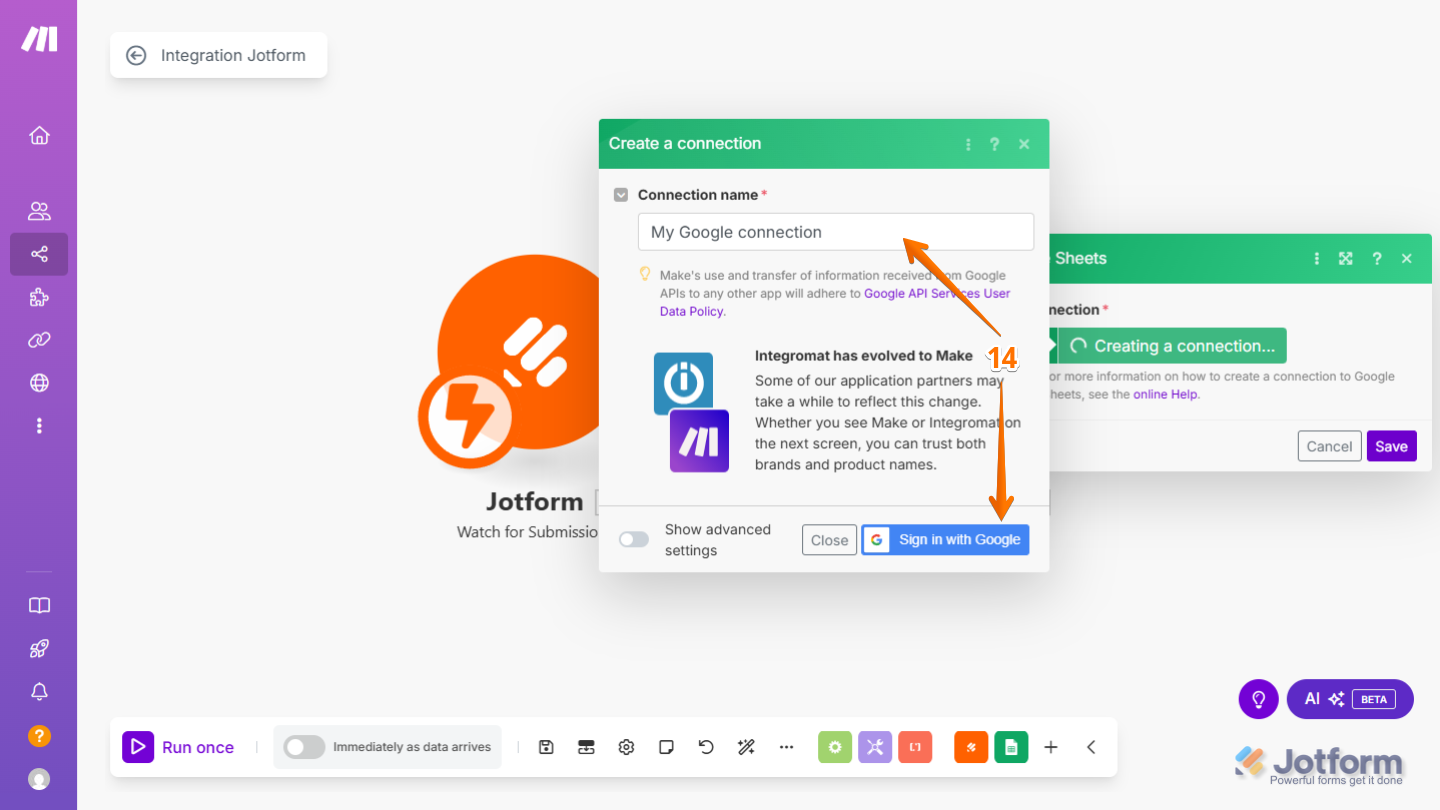
- Next, set up your Connection Name and click on Sign in with Google to connect your Google Account.
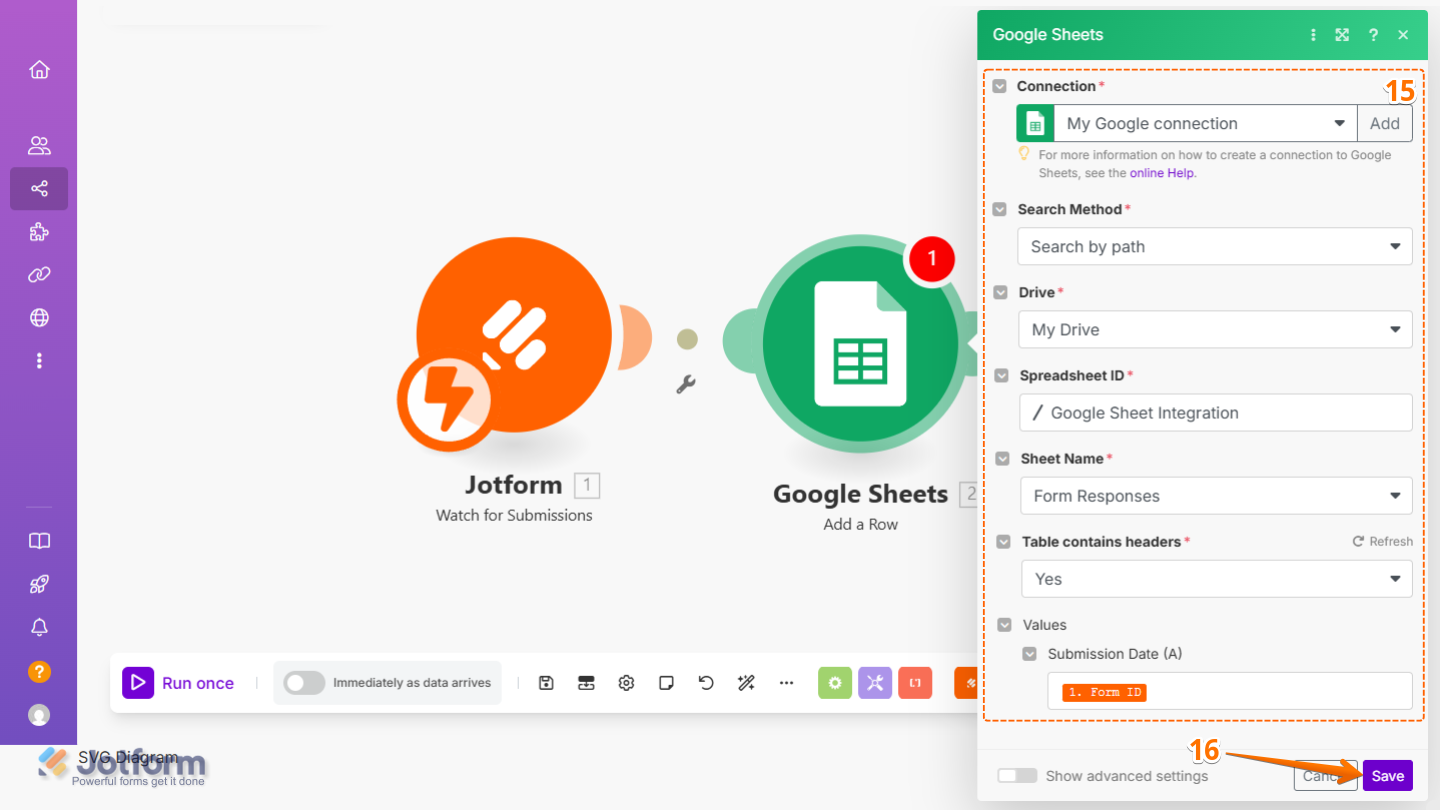
- Now, fill in these details:
- Connection — Select or create the Google account connection you want to use.
- Search method — Choose how you want to locate the spreadsheet.
- Drive — Select the specific Google Drive where the spreadsheet is stored (e.g., My Drive or a shared drive).
- Spreadsheet ID — Enter or select the ID of the spreadsheet where you want to send or retrieve data.
- Sheet name — Specify the name of the sheet within the spreadsheet where the data will be added.
Table contains headers — Indicate whether the first row of your sheet contains column header. - Values — Map the fields from Jotform submissions to the appropriate columns in your spreadsheet.
- Finally, click on Save.
Testing Your Scenario
Now that both Jotform and the app (Google Sheets) are connected, it’s time to test your scenario and make sure everything runs smoothly. Here’s how to do it:
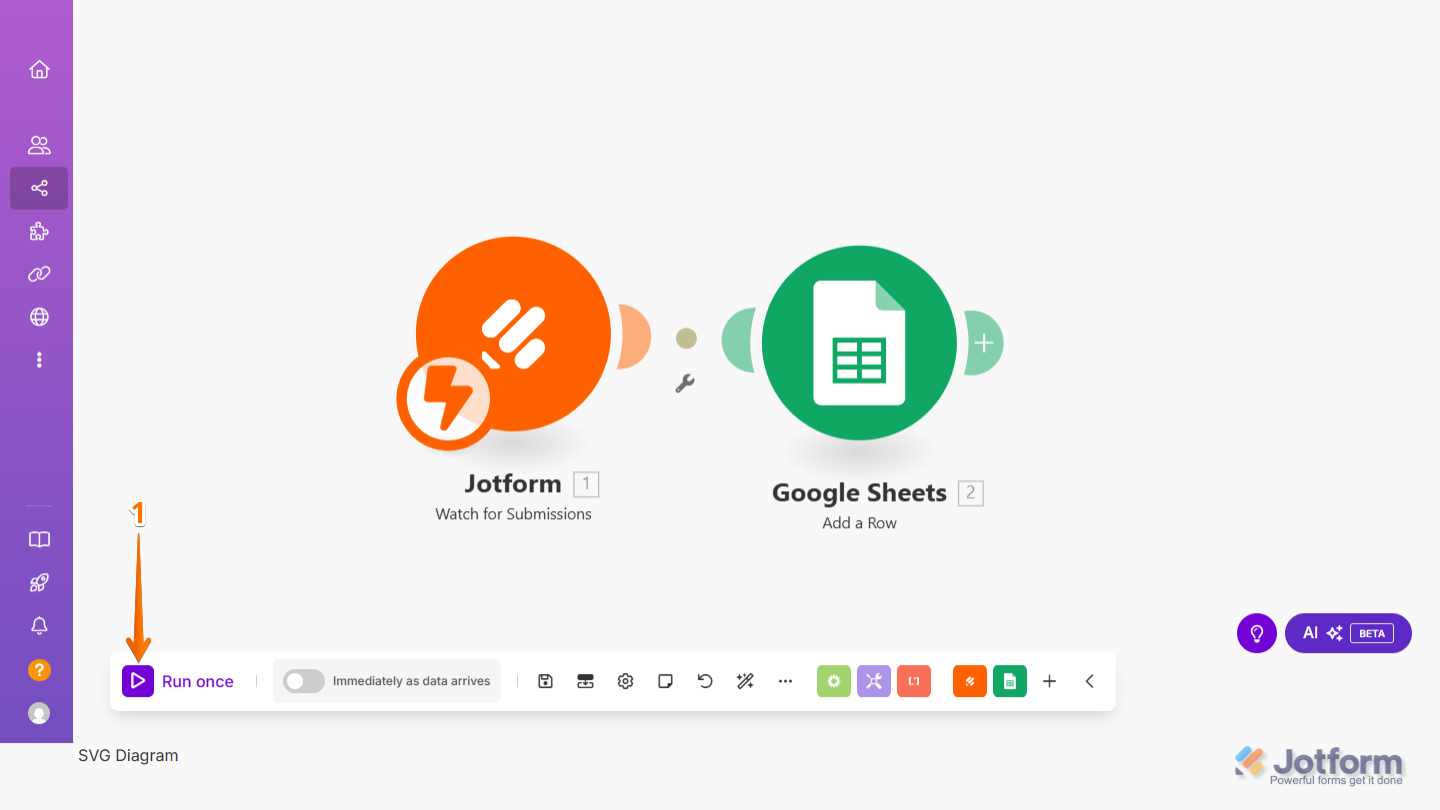
- In your Make Scenario Diagram, click on the Play button icon in the bottom-left of the screen.
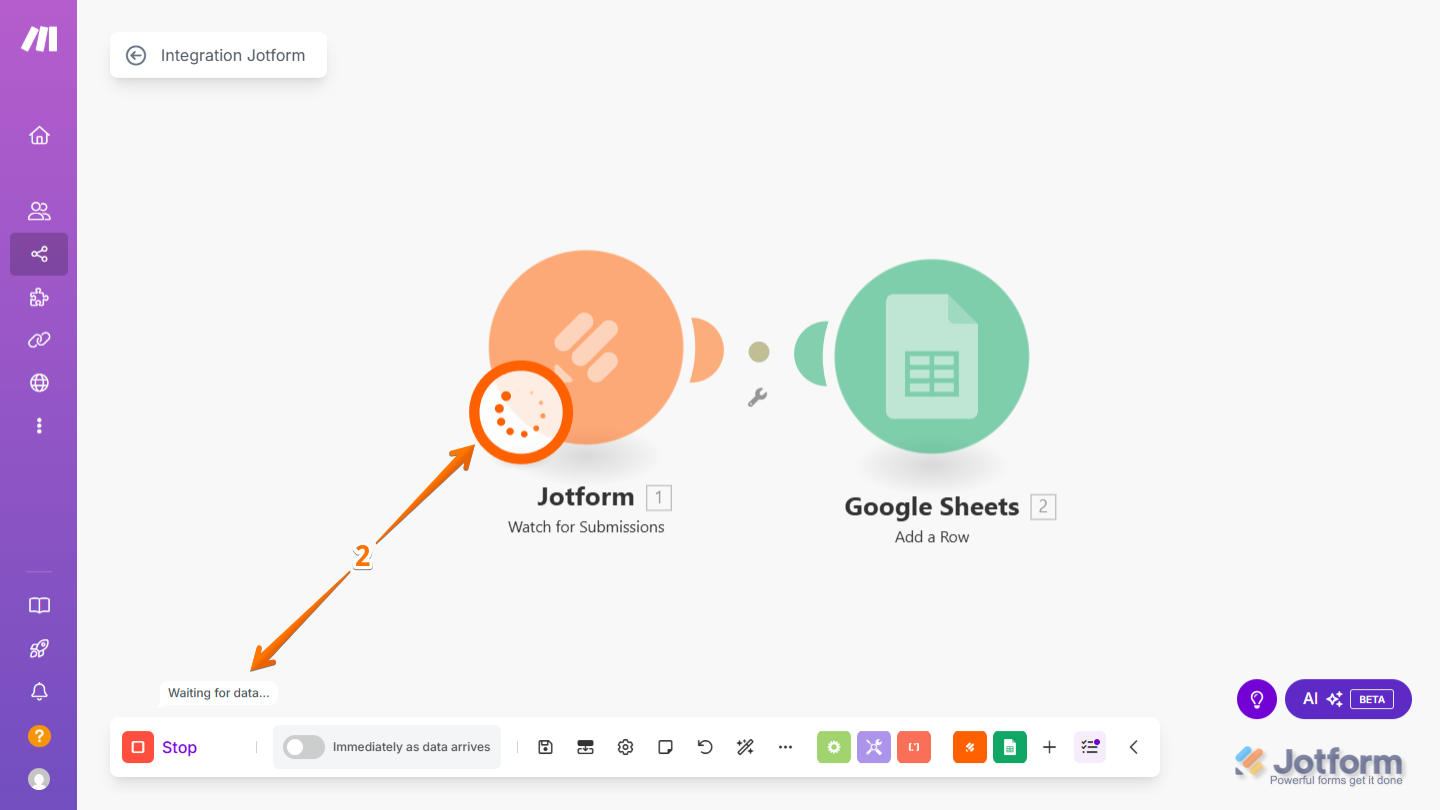
- Now, open your form and submit a test submission. Once submitted, the scenario in Make will wait for the incoming data from your form.
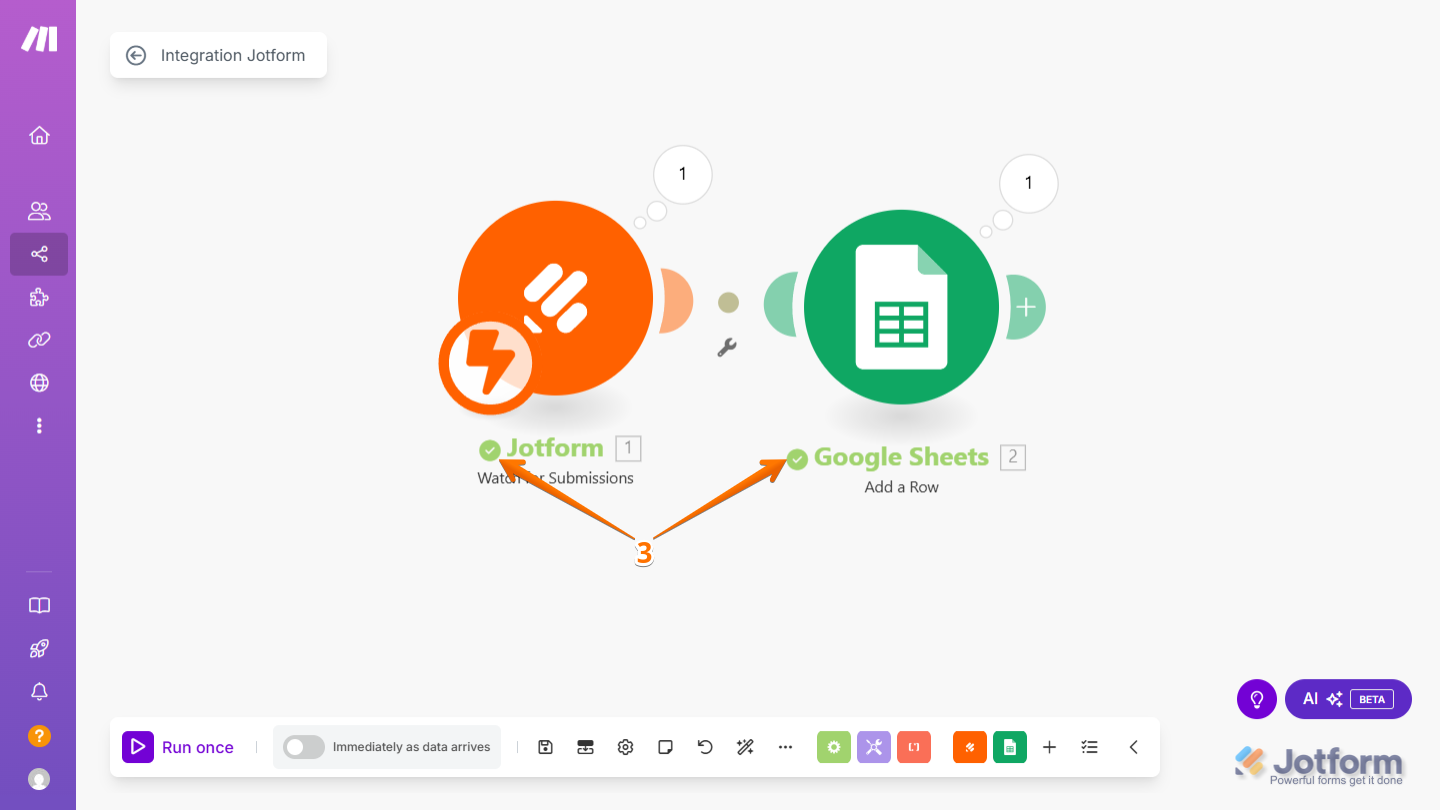
- When your test runs successfully after you submit the form, the scenario will stop automatically. A green checkmark will appear on both the Jotform module and the connected app module (like Google Sheets), showing that the data was transferred correctly.
Activating Your Scenario
You’re now all set to start your integration. Now, let’s dive into how to activate your scenario. Here’s how to do it:
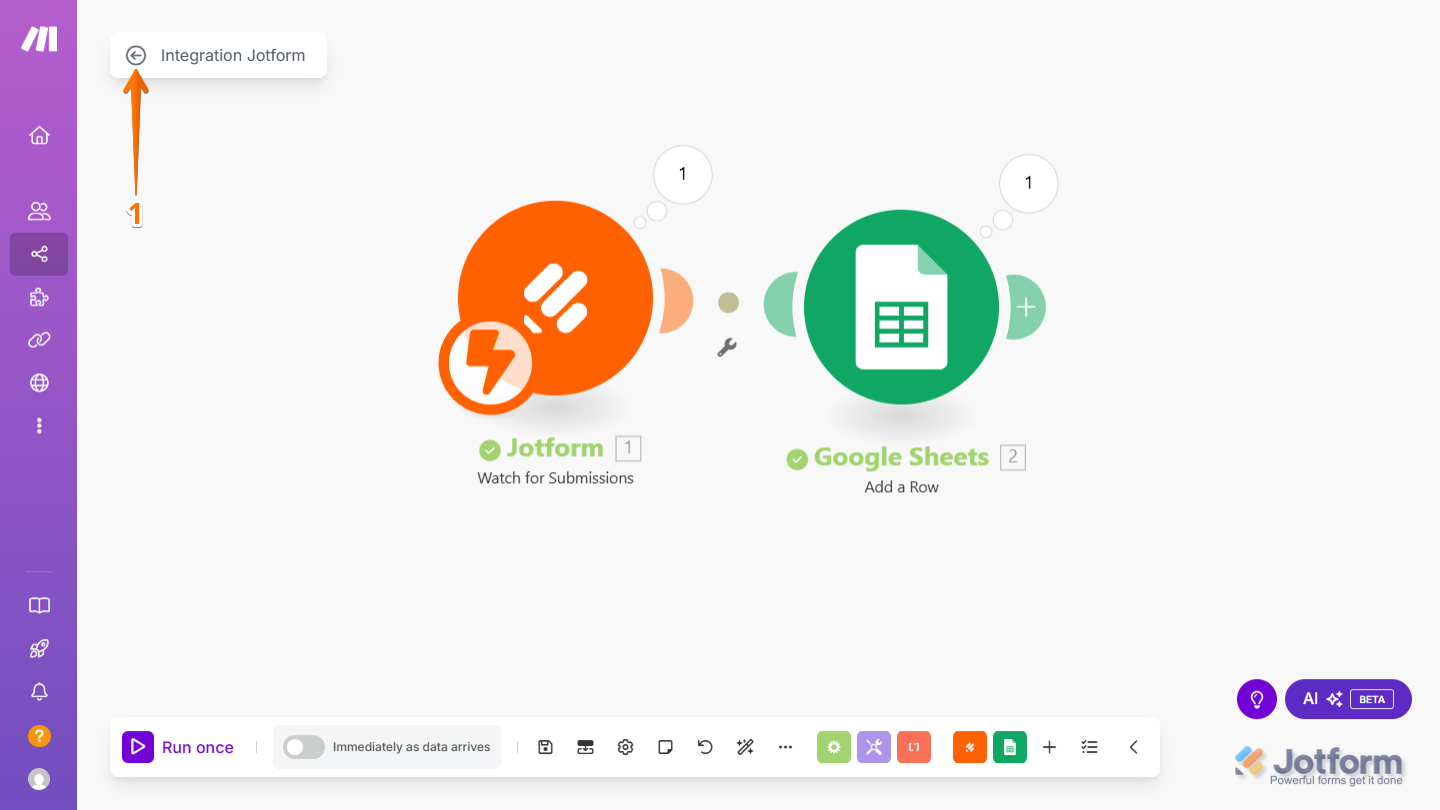
- In your Make Scenario Diagram, click on the Backward Arrow icon in the top-left corner of the screen.
- Now, Toggle to On the scenario in the top-right corner of the screen, and you’re all set.
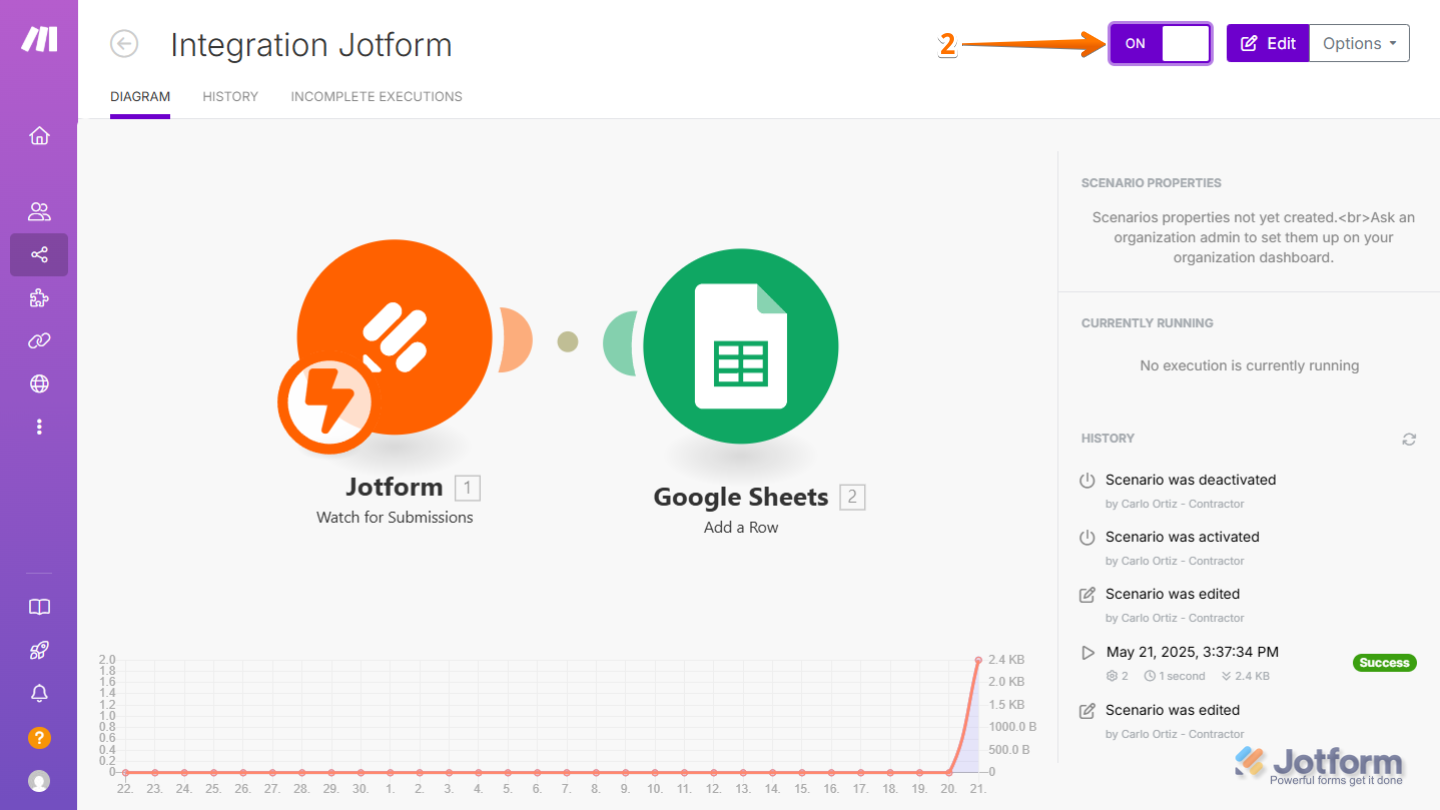
With your scenario activated, Jotform is now seamlessly connected to your chosen app through Make. New form submissions will automatically trigger the workflow, saving you time and ensuring your data flows accurately between platforms. You’re all set to automate tasks and focus on what matters most. We have also a guide on How to Send Data to Other Apps in Jotform Tables that you can check out.

Send Comment: