Square is an online payment gateway. You can accept credit and Visa debit card payments from your customers and process them entirely through Square. Payments can be immediate or authorized for later capture.
Connecting your form to your Square account allows customers to securely make online purchases or payments without leaving your form. You can also directly track the orders in your Square Dashboard.
Integrating your form with Square is relatively easy. Create a new or edit an existing form and follow the steps below.
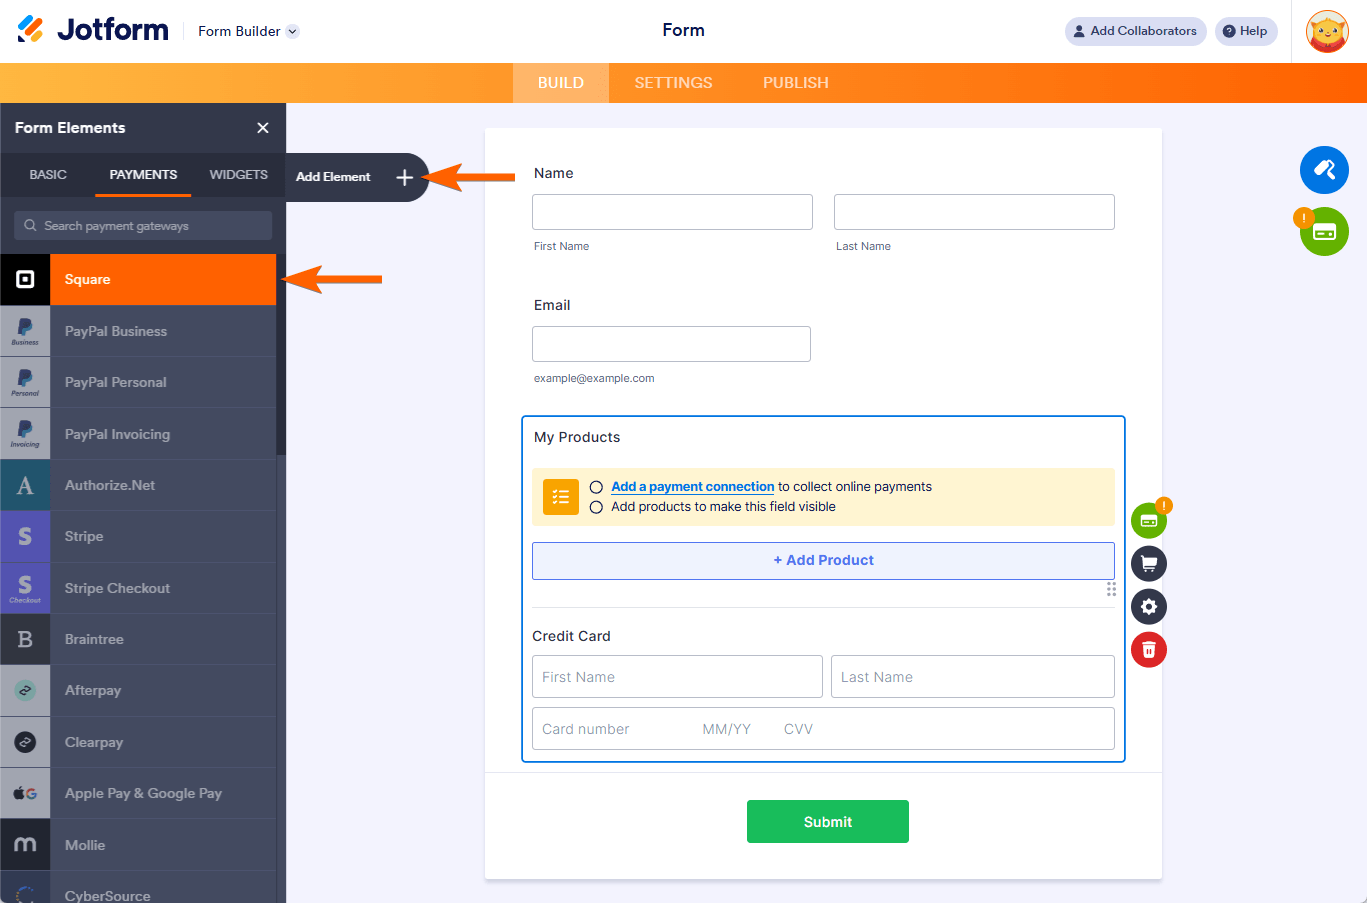
- In the Form Builder, click the Add Element button on the top-left side of the screen.
- Search for Square from the Payments tab. Click or drag/drop it to add.
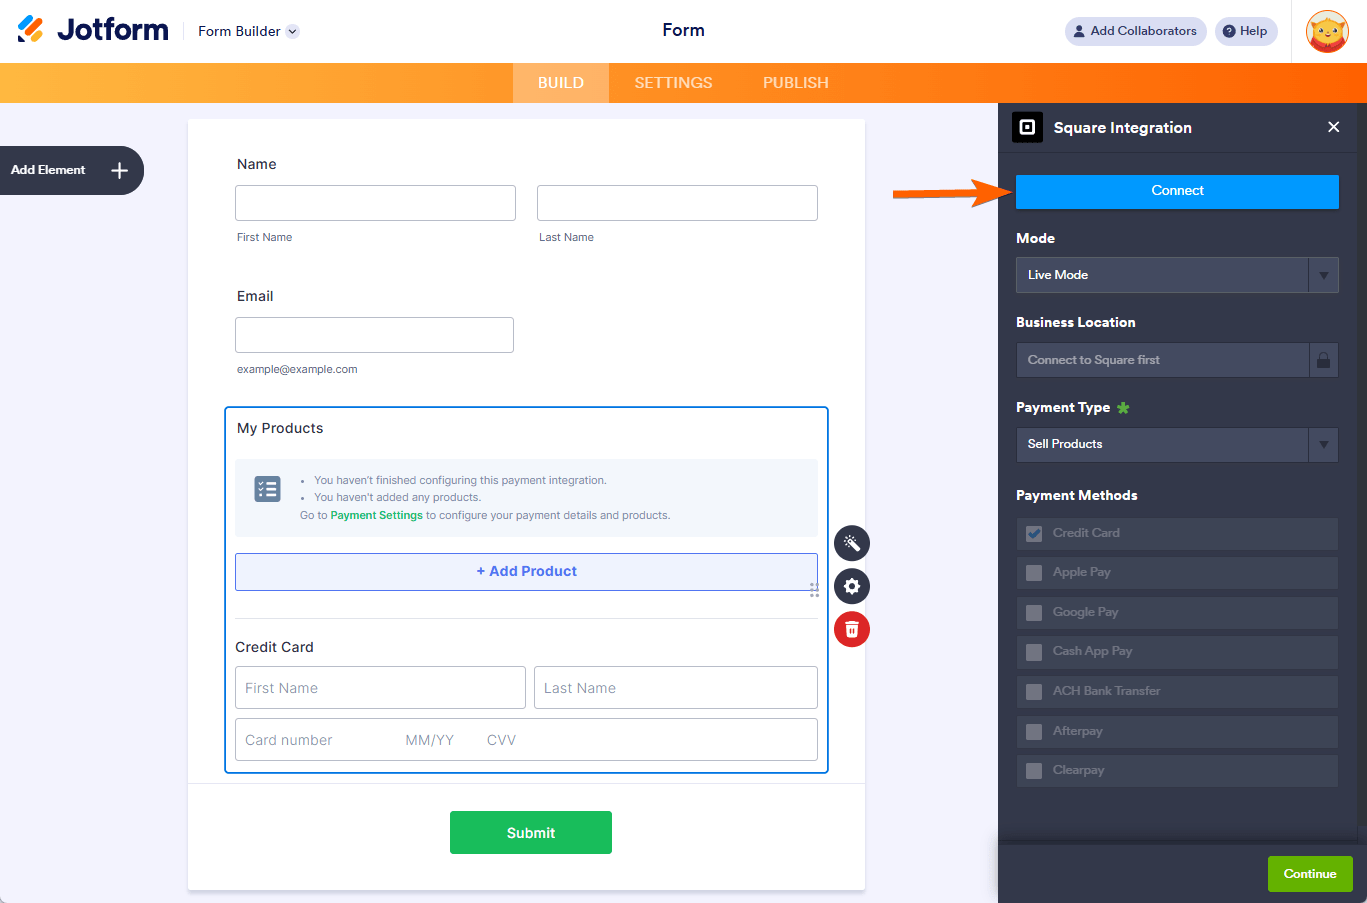
- In the Payment Settings, select a Mode first. The option determines the account type you’ll be using. Test Mode is for testing in Sandbox, and Live Mode is for accepting live payments.
- Now, click the Connect button to connect your Square account. Ensure to allow permissions when asked.
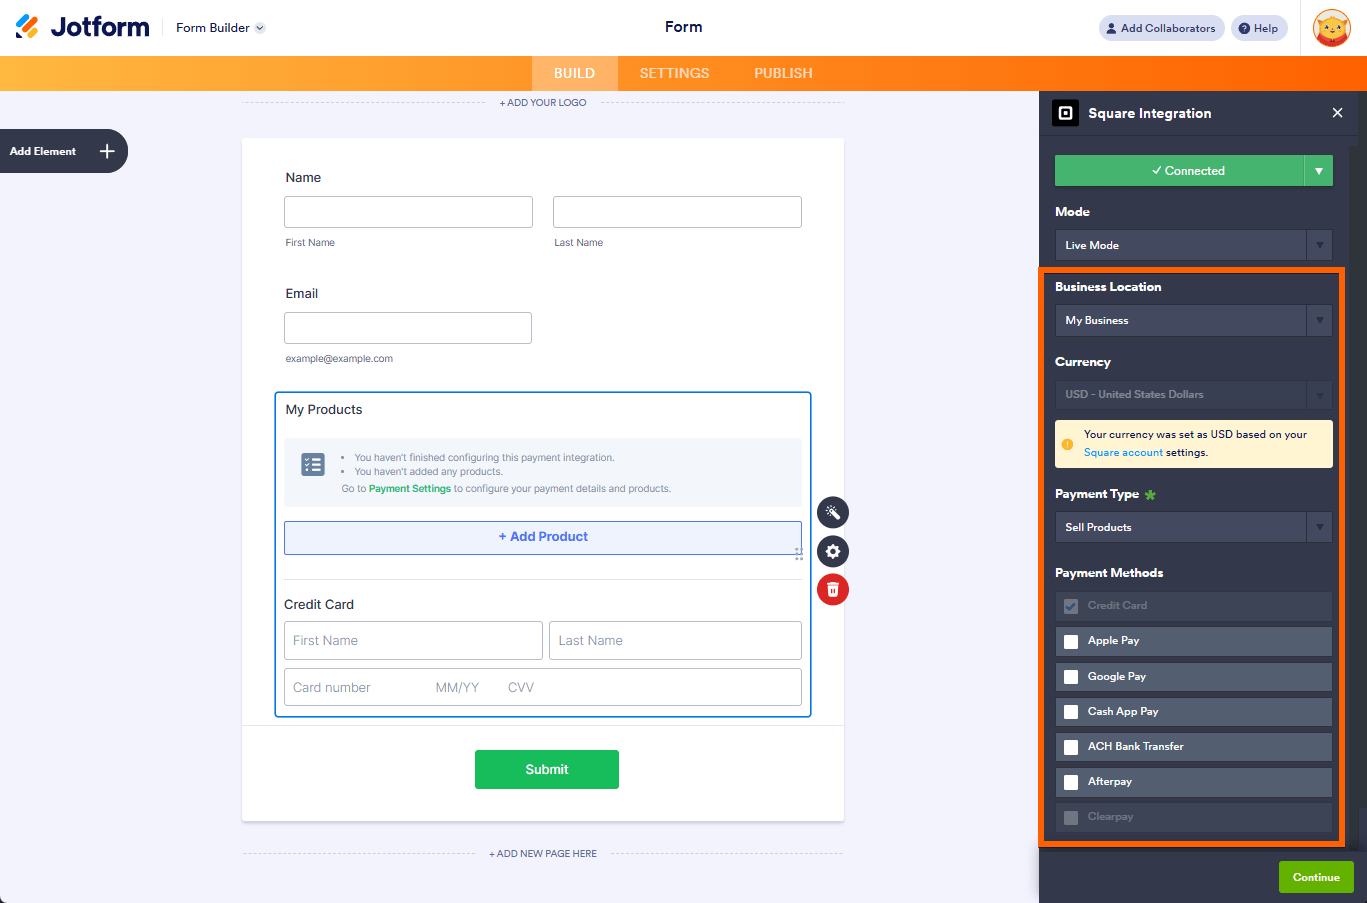
- Once connected, set up the other options accordingly:
- Business Location — If your business has multiple locations and you have them added in Square, you can select one here. It’s where Jotform will send your form transactions.
- Currency — The integration will automatically set the currency based on the country where you initially registered or created your Square account. For example, if you’ve registered and selected the USA as your preferred country upon creating your Square account, your currency in the integration is automatically locked to USD. If your customers are outside the USA, their bank will automatically do the conversion upon payment.
- Payment Type — With Square, you can sell products or subscriptions, collect donations, or allow user-defined amounts.
- Payment Methods — The Form Builder preselects the Credit Card as the default payment method. You can also accept payments through Apple Pay & Google Pay, Cash App Pay, ACH Bank Transfer, Clearpay, and Afterpay for selling products, collecting donations, and user-defined amounts, but not for selling subscriptions.
Did you know?
You can open the Payment Settings by clicking the Wand icon on the right side of the Square gateway.
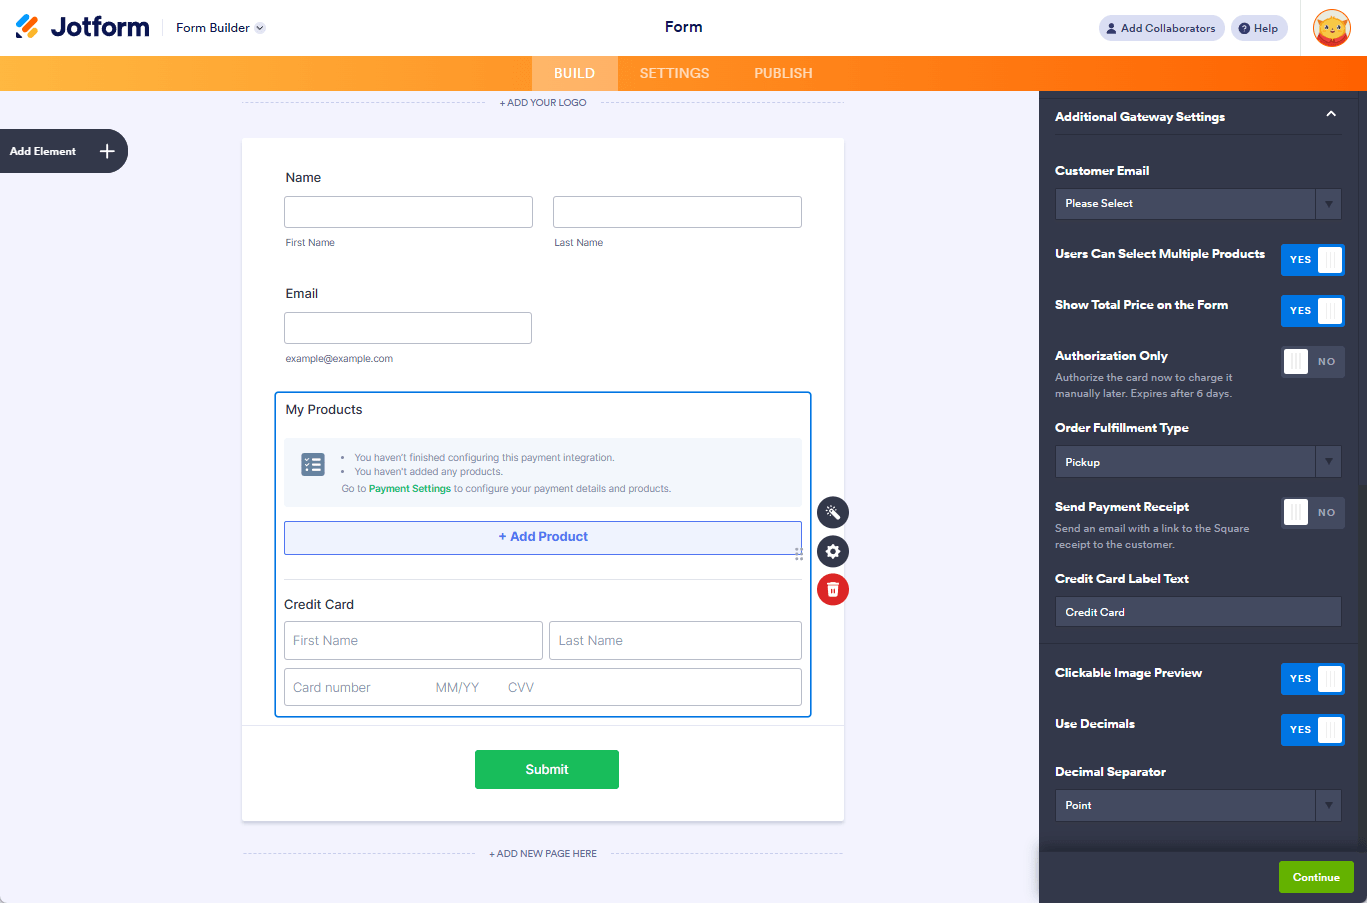
Under the Additional Gateway Settings, you’ll find several options based on the selected Payment Type. The options may include the following:
- Customer Email — Select the email address to be your customer’s email address sent to your Square records.
- Authorization Only — You can set up Square to authorize payments only and charge customers at a later date. Visit How to Enable Payment Authorization for more information.
- Order Fulfillment Type — Specify whether payments from your form are for Pickup or Shipment. Pickup is the default method for payments made through your Square form.
- Send Payment Receipt — Choose whether to send the Square-generated receipt to your customers.
- If you’ve chosen to sell products or subscriptions, click the Continue button to proceed. If you’ve selected user-defined amounts or donations, click the Save button to complete the integration.
See also:
- Setting Up Your First Order Form
- How to Set Up a Recurring Payment Option
- How to Add Coupon Code to Payment Forms
- How to Add Shipping Cost to Payment Forms
- How to Add Tax to Your Payment Form
- How to Add Options to Payment Forms
- How to Generate an Invoice for Your Payment Form
Setting up Square with Reusable Payment Connections
Reusable Payment Connections is Jotform’s feature that allows you to set up payment integrations like Square and reuse the same configuration on your other forms or apps created with Jotform Apps without setting it up again.
To set up Square
- In the Form Builder, click the Add Element button.
- Search for Square from the Payments tab. Click or drag/drop it to add.
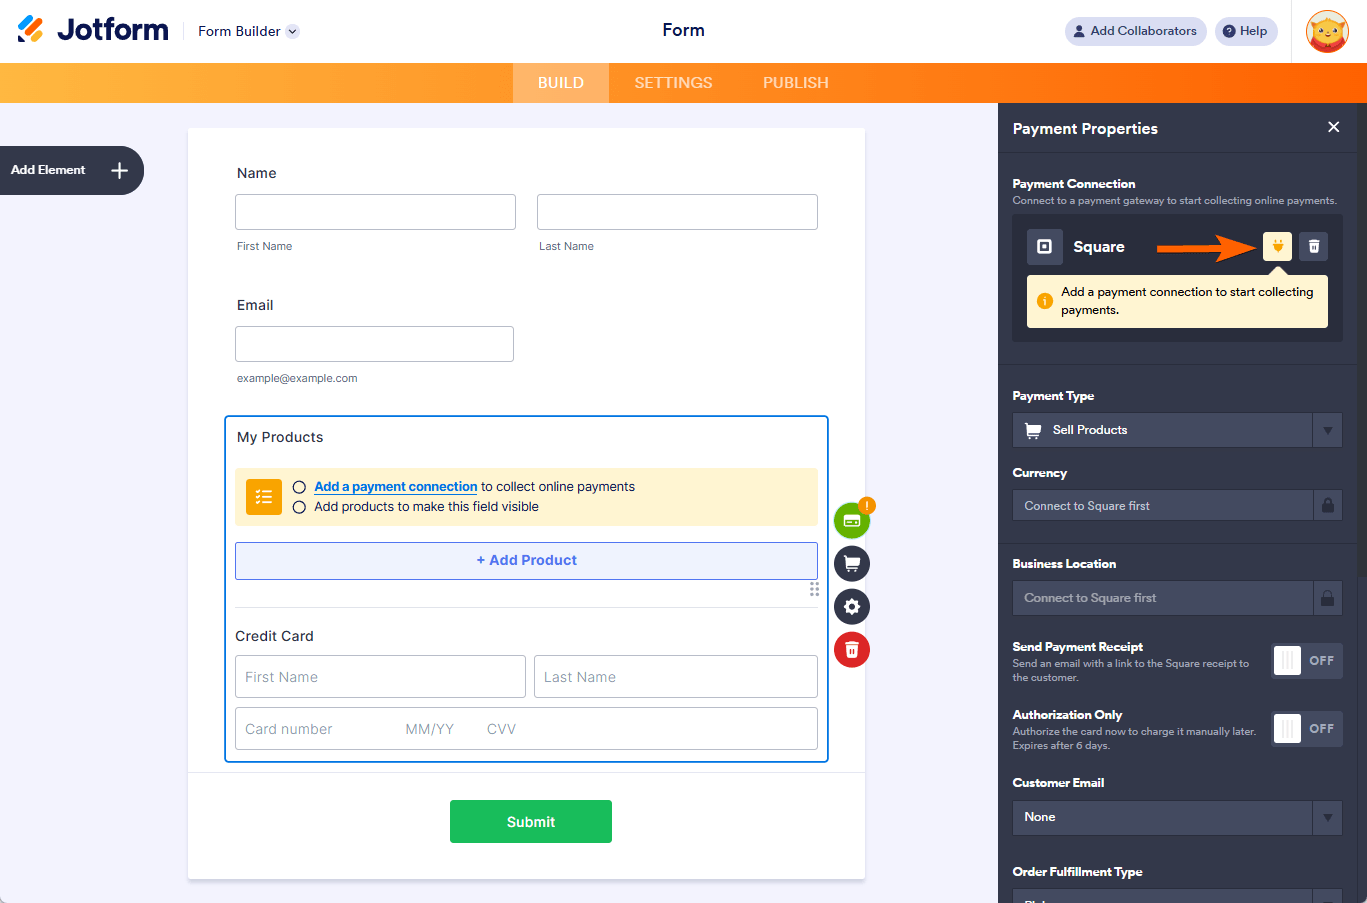
- In the Payment Properties, click the Plug icon next to the Square label:
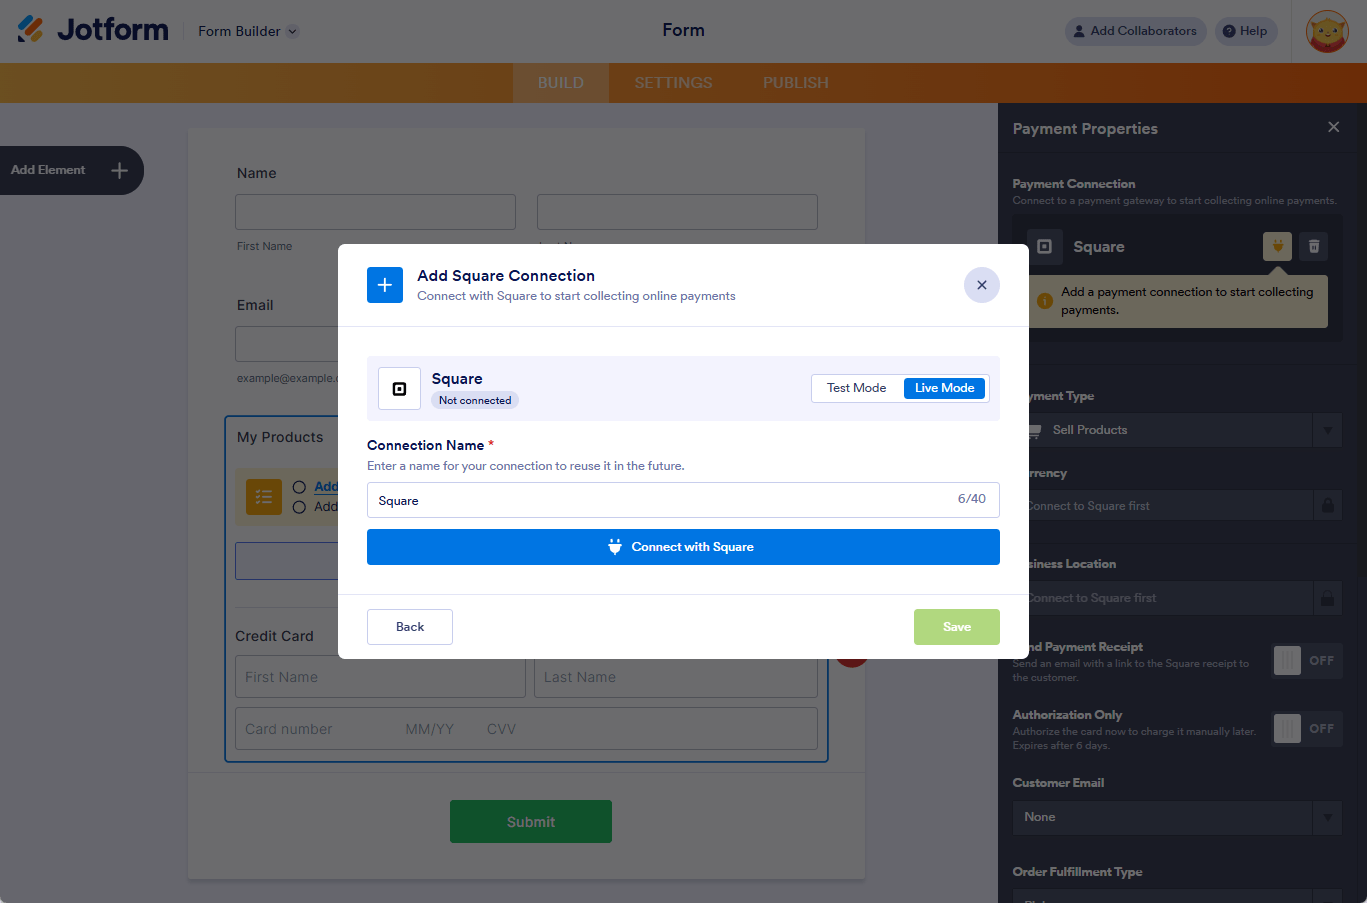
- In the Payment Connection settings, select and do the following:
- Mode — Select to connect a Sandbox account (Test Mode) or an approved Stripe account (Live Mode).
- Connection Name — Provide a name for your connection. You can label it with the gateway’s name or personalize it with your form’s name to easily manage it later.
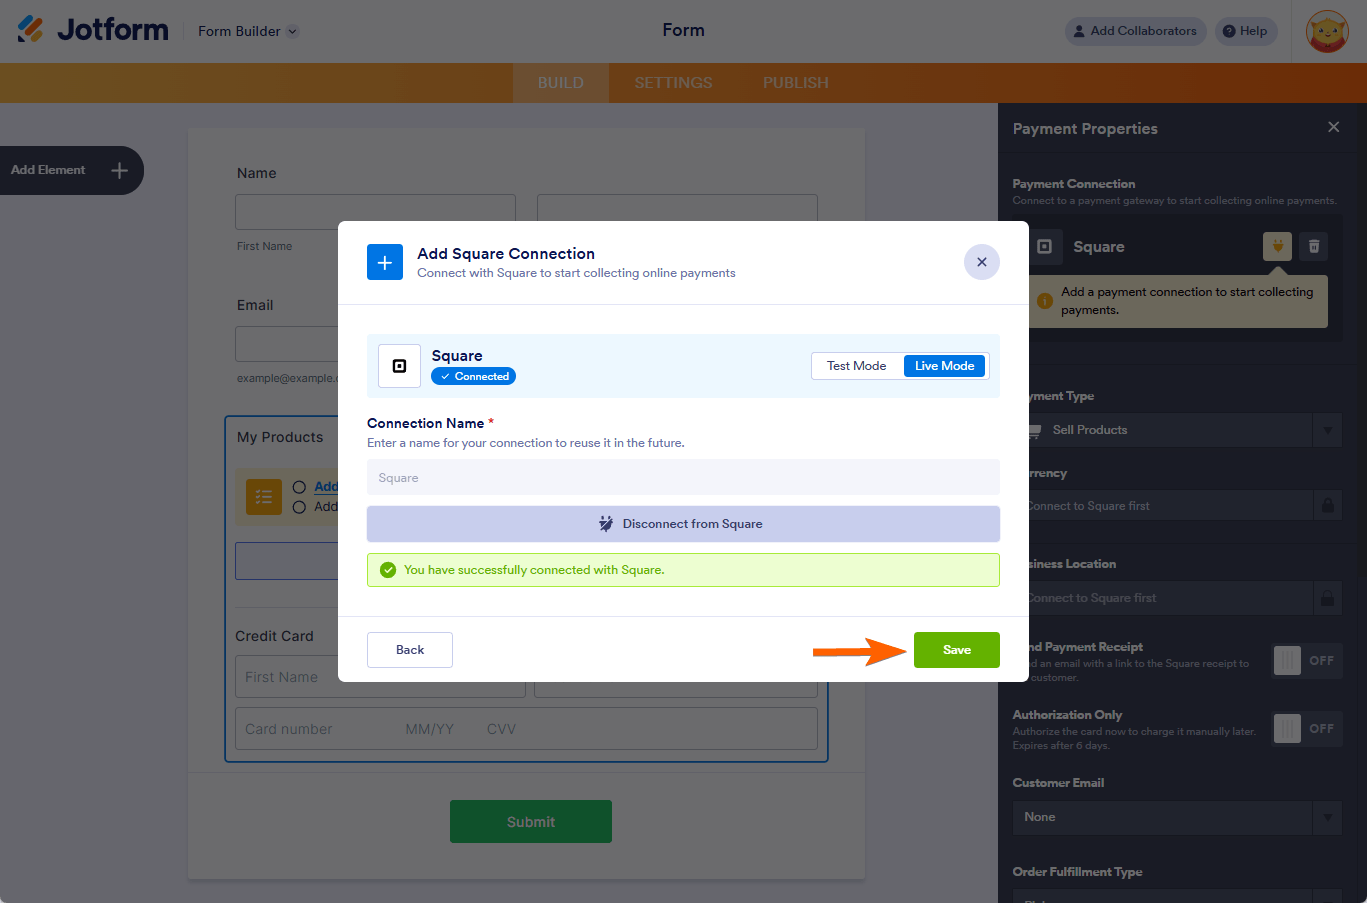
- Connect with Square — Click this button to link your Square account.
- Click the Save button to complete the Reusable Payment Connection for Square.
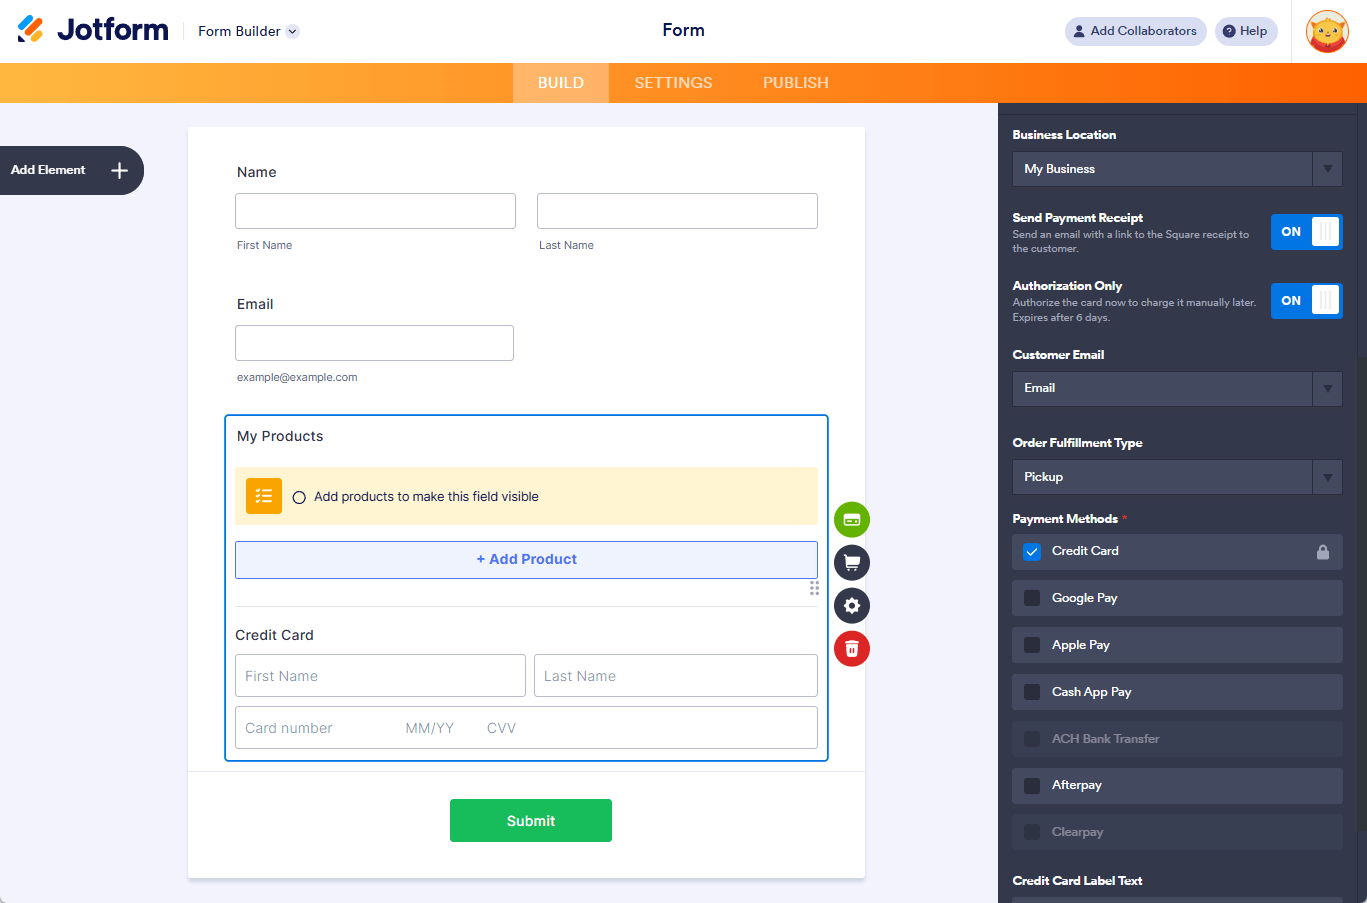
- Now, set up the other options accordingly. Some of the options will appear after you choose an option from the Payment Type.
- Payment Type — With Square, you can sell products or subscriptions, collect donations, or allow user-defined amounts.
- Currency — The integration will automatically set the currency based on the country where you initially registered or created your Square account. You cannot change this.
- Business Location — Select one of your registered businesses with Square. It’s where Jotform will send your form transactions.
- Send Payment Receipt — Choose whether to send the Square-generated receipt to your customers.
- Authorization Only — You can set up Square to authorize payments only and charge customers at a later date. Visit How to Enable Payment Authorization for more details.
- Customer Email — Select the email address to be your customer’s email address sent to your Square records.
- Order Fulfillment Type — Specify whether payments from your form are for Pickup or Shipment. Pickup is the default method for payments made through your Square form.
- Payment Methods — You can accept Credit Card payments, which is the default. You can also accept payments through Apple Pay & Google Pay, Cash App Pay, ACH Bank Transfer, Clearpay, and Afterpay for selling products, collecting donations, and user-defined amounts, but not for selling subscriptions.
The Form Builder automatically saves the changes after selecting the options from each dropdown mentioned above.



Send Comment:
111 Comments:
8 days ago
i don't want to add a payment method to my form it is just an artist proposal form. How can I add that to my square account?
110 days ago
how to add the amount charged to the payment form
More than a year ago
I cannot get our square account to connect. It has never been an issue and now it just spins and nothing happens.
More than a year ago
how do i fix the access token error for payments i have checked and it says im connected to square ever thing look ok but its not letting me commplete and pay when i try to do a form
More than a year ago
I have watched the video on integrating square on my Jotform, and I have tried multiple times to connect it, but it is not working. The circle spins, but it fails to connect...
More than a year ago
no drop down for store locations with square
More than a year ago
Hello,
My account got locked. I made a template requesting credit card information but then remembered you cannot do that. I did not save form, but I cannot sign in now. Please unlock. Also, I am using square, I see you can intergrade Jotform with Square. Is there a form that I can use requesting credit card & security code info to have card on file for no show or late cancelation fees?
Another question I have, is Jotform free? I was told that I need a paid e-mail address in order to use the free account. Is this true?
I use yahoo for my business e-mail, but have apaid website etc. Please advise.
Thanks,
More than a year ago
I have watched the video on how to integrate square on my Jot form, and I have tried multiple times to get it connected, but it is not working
More than a year ago
is the book free?
More than a year ago
Trying to set up square. This is in answer to the reply you sent me earlier. Okay, another question.....I have several variables --add a dog, plus Dropbox/Flash Drive are separate prices, Junior handler is an add on or not near the top. Can we just have the person fill in the amount and go from there, because there are several amounts that may be added in the form? Right now they have to go to a separate button on the site and they have to do the math themselves, so if we could incorporate Square the form as checkout that would be optimum, but they would need to add up what they purchased. That widget is not the only issue.
More than a year ago
I cannot set up either a sandbox or live account and when I click the ‘connect’ button it does not change to ‘connected’. I’ve been trying to load a square payment element onto a jotform form for two or three weeks with no success.
More than a year ago
Don’t want customer to see my address on square up
More than a year ago
hello,
I've made an item automatically add to customers carts and would like to change that setting. How can I do so?
More than a year ago
Hello! I have the same question as Alba Villaronga. Our sales made off Jotform are not going to a corresponding item in our square items list and therefore being categorized as “none” which is difficult for our bookkeeping. Is there a way to link what we are selling through Jotform to a specific item in square?
More than a year ago
Hello, I built a form using jotform for hair extension consultation, it was built because we want to know the type of hair our customers want and this morning we tried to log in and we noticed we have been banned. We are using it because we love Jotform and we want to continue using it, kindly help us and look into it and unrestrict us.
More than a year ago
Can you integrate square payment options alongside an appointment booking system with the square and jotform appointments syncing together?
More than a year ago
We have successfully verified our Square account, but when I try to do a test purchase it is saying 'Payment error 1, this account has not been enabled to take payments" the form is in live mode. Please assist. Thanks!
More than a year ago
We have linked Square to Jotform with no problem. The only issue we are having is that when we receive a payment thru Jotform they show up as uncategorized in Square, meaning that when we are trying to report where our money comes from (academy, tournament, league, etc.) it's impossible for us to have the correct numbers because all the payments received through Jotform come uncategorized.
We spoke with Square and they say is an issue with the API that could be fixed on Jotform. Can someone help? Thanks!
More than a year ago
I would like to create a shopping cart for customers to add products, but not collect payment at the time. We would be invoicing them later. Is there a way to turn off the payment?
More than a year ago
I want sales reps to use jotform to enter orders, but NOT capture payment info or accept payment when submitting. Payment comes later. Order (form) submitted, order prepared, order delivered, then I process their payment - more than 6 days later. I'd have to submit a new form to handle the payment if I integrate with square? That defeats the purpose. Sounds like the ONLY way I can use this integration is to accept payment immediately or within 6 days?
More than a year ago
Hi there! I am trying to change the square account linked to our form. However, it won’t allow me to log in to the new account. I have disconnected the current square multiple times.
More than a year ago
How do I add more products that are in a different category?
More than a year ago
How do I simply link my beauty consult form to send the information to my square account so I can save that form under a clients account?
More than a year ago
Help I added the square element and all of my products. I can connect to my square account through the square integration box but when I publish the form the cr card box is not there. It is on the form in the jotform build box. I can only enter First and last name for the cr card payment on the online form. On the square integration box it still shows connect to square first.
More than a year ago
Does the products I create in jotform for the square payment integration, show in Square? I can't seem to find even the name. I did know that inventory wouldn't show/change, but thought I could still see the product name?