Conditional logic is an excellent tool for streamlining forms and automating data-collection. As the name suggests, conditional logic enables you to serve up questions, pages, or direct actions based on predefined conditions you choose.
For example, you can use conditional logic to
- Direct employees to relevant resources based on their needs
- Use prospect feedback to tailor educational offerings
- Calculate financial aid data for incoming students
- Use single sign-on data (SSO) to prefill or hide form fields
There are many benefits to implementing conditional logic. You can automate manual processes like calculations to reduce errors, create a more efficient and customized experience for your users, and ensure the information you request matches the format you need to integrate it into your other data management systems.
You likely make decisions based on conditions all the time. For example, if a key stakeholder can’t weigh in on an important decision, you have to adjust your timeline or delegate the decision to another appropriate manager. If you’re leading an orientation program for summer interns, you’ll need to tailor the training materials to reflect the needs of the departments in which they’ll be working.
Once you understand the basics of conditional logic, it’s easy to see how you can apply this powerful tool to forms and approval workflows across your organization. For example, you could use conditional logic in forms to
- Require file uploads for contracts or requests for reimbursement that exceed a set amount
- Show specific options based on a customer’s location
- Require parent signatures for respondents under 18 years of age
- Populate other fields based on known demographic data
- Restart a workflow if a stakeholder requests a revision to a design
How to use conditional logic in Jotform
Jotform offers a variety of ways to add conditional logic to forms to help customize the user experience.
In the Jotform Form Builder, go to the Settings tab and click on Conditions in the left menu. From there, you can select the action you want to take place under a specific condition. Here’s an overview of what you can do with each of these options.
Show/Hide Field
With the Show/Hide Field condition, you can display or skip form fields based on a user’s previous answers to collect additional details or reduce the amount of time it takes to fill out the form.
If your Jotform Enterprise account has an SSO or CRM database integration, you can use this feature to prefill and skip questions that ask for previously collected information. Hiding unnecessary fields is a great way to streamline forms for employees, customers, students, or patients with existing data on file. To make sure all of a respondent’s data is correct, you can prompt them to review and update it by displaying their completed form submission or sending an autoresponder email when they submit a form.
Alternatively, you might want to ask for additional information under certain conditions. Suppose you’re gathering information in the field and a user indicates that there’s damage to a vehicle in your fleet. You can display additional fields to capture the extent of the damage, recommended repairs, estimated time out of service, and the replacement vehicle to be assigned.
Here are some user guides to help you use the Show/Hide Field condition:
- How to show or hide fields based on a user’s answer
- Hide or show multiple fields at once
- Show or hide multiple fields at once using the form collapse tool
Update/Calculate Field
The Update/Calculate Field condition lets you calculate numerical data from multiple fields. For example, nonprofit organizations can use this condition to calculate the value of multiple donations from a single donor to generate the donor’s receipt.
Finance teams can use this functionality to streamline purchase orders and billing, eliminating manual work and potential errors. Having a digital record of purchase orders makes it easier to connect revenue with inventory for a holistic view of your organization’s financial health.
Check out these how-to guides on the Update/Calculate Field condition:
- How to insert text or a mathematical calculation into a field using conditional logic
- How to manipulate a text string with conditions and calculations
Enable/Require/Mask Field
If you want to require information only when a user’s response meets specific parameters, you can use the Enable/Require/Mask Field condition. For example, say your HR team is using a form to screen job applicants and wants to flag anyone who says they were referred by a current employee. You can use this condition to require the name of their referrer and have it trigger a notification for the HR team to follow up with that person.
You can also use this condition to control the format of the information provided in a given field. If you serve an international audience, for example, this feature lets you tailor the address and phone number fields to accept the information specific to each area, like country codes or provinces. For more information, review these guides:
- How to make a field required based on a user’s answer
- How to set a content mask on a form field based on another field input
Skip To/Hide a Page
Another useful option is the Skip To/Hide a Page condition. It’s an ideal way to help users navigate long forms. Say you have a feedback form with 10 questions, each with a subset of follow-up questions. Using this feature, your users can skip any questions that don’t apply to their experience.
There’s evidence that shorter forms lead to higher conversion rates. So if you’re using a form as part of a payment process, it pays to keep it as short as possible. According to Jotform data, nearly 20 percent of users made it to checkout when a form had fewer than five fields. Conversions steadily decrease as additional fields are added, with only 9 percent of users making payments when forms have more than 50 fields.
Check out our guide “How to skip pages using conditional logic” for more details.
Tailor thank-you pages
Thank-you pages have become fairly standard practice with surveys and forms to thank respondents for their time and add calls to action. A great way to make yours stand out is by customizing them using conditional logic. Using the Change “Thank You” Page feature, you can tailor where you direct a person based on their input for a personalized experience.
Some options include pointing to a requested resource after a form is submitted, pointing to related products after an order is placed, or providing results from a survey or quiz to keep your audience informed and engaged.
Here are some guides that might help you with this feature:
- Change thank-you URL based on a condition
- How to change thank-you message using conditional logic
- How to change thank-you message depending on the language used
Customize notifications
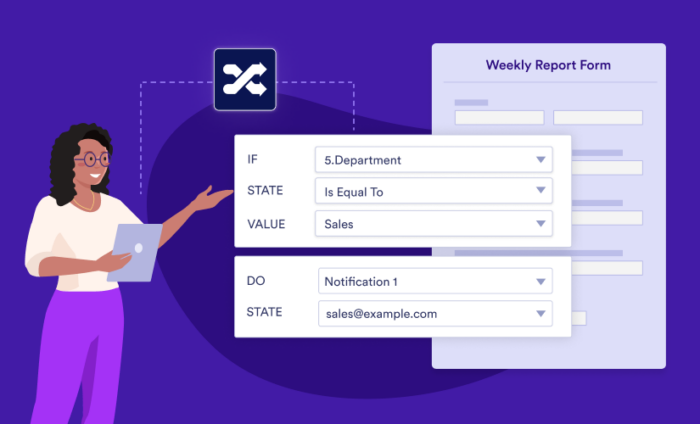
The Change Email Recipient option makes it possible to tailor who receives email notifications about the form submission based on a response. Going back to our recruiting example above, if an applicant fills out a form indicating an employee referred them, you could require the employee’s name with the Enable/Require Field condition and send a notification to someone on your HR team to follow up with the referrer and the candidate.
This condition is helpful for contact and request forms in both internal and external circumstances. In an internal setting, you might use a basic request form for employees to request services from various departments. Using a dropdown menu, employees select which department they need to respond to their request (IT, marketing, finance, etc.), triggering which department receives the notification.
Another common use case is a basic contact form on a website. You can direct contact form notifications to your sales or customer service teams based on a similar dropdown menu selection that lets new prospects and existing customers choose the department they need.
Here’s a comprehensive guide on how to set up email alerts with conditions:
How to send email based on a user’s answer.
We hope you’re now inspired to try using conditional logic in your forms and approval workflows. It’s one of many powerful ways to automate processes with Jotform Enterprise. Once you’ve mastered conditional logic, you’ll wonder how you managed without it.






































Send Comment:
1 Comments:
More than a year ago
Conditional Logic is great. But it would be good if we could make better use of and/or (any/all). With Jotform, it is all AND or all OR. Other form builders I have used offer the ability to combine multiple IF statements with, say, OR, and condition that with another IF and condition them with an AND.
So, for example:
IF (A or B or C) AND D, Then Do X.
With Jot, we need 3 separate conditionals, instead of 1.
My example is simple, it gets very convoluted with slightly more complex conditionals. As AWESOME as Jot is, it lags in this area. I wish you would improve upon this.
Thank you.
Gold Account Holder.