-
ClintlunaAsked on July 18, 2018 at 5:17 PM
I'd like to Customize Design of Various Button Designs to look like the image I've attached below for this form.
I just need the code to fade from one color blue to a lighter color, I have already figured out the rest.
I'm going to do this for my Radio Button Widgets, Configurable List Button, and the Continue / Previous buttons that take you to the next page.
Thanks!

-
Vanessa_TReplied on July 18, 2018 at 9:11 PM
To achieve a fading effect, you only need the following CSS:
background: -moz-linear-gradient(top, #21a6cf 0%, #badce6 100%);
background: -webkit-gradient(linear, left top, left bottom, color-stop(0%,#21a6cf), color-stop(100%,#badce6));
background: linear-gradient(top, #21a6cf 0%, #badce6 100%);
You'll be needing those 3 lines for browser compatibility.
#21a6cf would be your starting color
#badce6 would be the bottom color
To apply the CSS into your page buttons (back/next/submit), simply get the field IDs / class, add the CSS above, then inject it into your form.
Meanwhile, follow this guide to inject custom CSS into each widget: How-to-Inject-CSS-Codes-to-Widgets
On the other hand, I have cloned your form, made the necessary changes as well as fixed the current CSS and a few more tweaks. Feel free to clone the form if it is of your liking and update it as you see fit.
Form URL: https://form.jotform.com/81987702056969
-
ClintlunaReplied on July 21, 2018 at 10:15 PM
Thanks Vanessa, this was great!!!
-
ClintlunaReplied on July 23, 2018 at 8:08 PM
Hey Vanessa,
So I'm using my code to try to duplicate the Configurable list buttons I made, and trying to make my radio buttons look the same....just not sure how I would edit it specifically for the radio buttons, for example on the cofigurable list code i used .add,.remove for the buttons but for the radio buttons, and next buttons I'm not sure what the name is. I know the id_for the radio buttons is #122, pasted this into my forms editor:
li#id_122 {
th {
color: #21a6cf !important;
font-family: "Lucida Grande", "Lucida Sans Unicode", "Lucida Sans", Verdana, sans-serif;
}
input[type="text"]{
width: 80px;
}
select{
width: 55px;
}
#list > tbody > tr:first-child {display: none;}
.mobileColumnName {
display: block;
color: #21a6cf !important;
font-family: "Lucida Grande", "Lucida Sans Unicode", "Lucida Sans", Verdana, sans-serif;
font-weight: bold;
}
td {float: left;}
td.col5 {clear: left;}
input { width: 150px !important;}
.add, .remove {
width: 150px;
height: 60px;
white-space: pre-wrap;
}
button {
font-weight: bold;
}
.add, .remove {
border-radius: 10px;
border: 2px solid #21a6cf
padding: px;
width: 150px;
height: 58px;
color: #ffffff;
font-family: "Open Sans";
font-size: 20px;
box-shadow: 8px 8px 5px grey;
}
.add, .remove {
background: #21a6cf;
}
}
-
Vanessa_TReplied on July 23, 2018 at 9:58 PM
Hello,
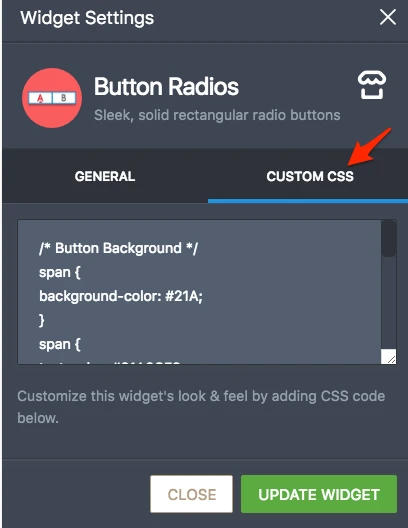
Please note that for widgets, the CSS needs to be added on the Widget's Settings > Custom CSS tab. So for Configurable List and Radio Buttons, you need to follow this guide:
How-to-Inject-CSS-Codes-to-Widgets
Meanwhile for buttons that are not part of a Widget, you may continue applying the CSS like the one you just did.
How-to-Inject-Custom-CSS-Codes
Based on your posted CSS, I assume this is the form you are referring to this time: https://www.jotform.com/81906589374168
I've reviewed your CSS, and I can see you have .add,.remove in the main form's custom CSS tab. Again, please note that the widget's CSS should be injected on their respective Widget's Settings > Custom CSS tab. The ones on the main form's custom CSS are actually just ignored.
For the Button Radios, please use this CSS selector to apply your changes:
.radios input + label
So, it would become something like this format:
.radios input + label {
background: blue;
}
For the pagebreak buttons (back/next/submit), you can use the selector below:
.form-all .form-pagebreak-back,
.form-all .form-pagebreak-next,
.form-all .form-submit-button
- Templates
- Integrations
- Products
- PRODUCTS
- Form Builder
- Jotform Enterprise
- Jotform Apps
- Store Builder
- Jotform Tables
- Jotform Inbox
- Jotform Mobile App
- Jotform Approvals
- Report Builder
- Smart PDF Forms
- PDF Editor
- Jotform Sign
- Jotform for Salesforce Discover Now
- Support
- GET HELP
- Contact Support
- Help Center
- FAQ
- Dedicated Support
Get a dedicated support team with Jotform Enterprise.
Contact Sales - Professional ServicesExplore